Topic

Devops

A collection of 7 issues
Latest — Feb 11, 2024

Self-signed certificates are widely used in testing environments and they are excellent alternatives to purchasing and renewing yearly certifications.

That is of course if you know how and, more importantly, when to use them. Remember, that A self-signed certificate is not signed by a publicly trusted Certificate Authority (CA). Self-signed certificates are considered different from traditional CA certificates that are signed and issued by a CA because self-signed certificates are created, issued, and signed by the company or developer who is responsible for the website or software associated with the certificate.

You are probably reading this article because for some reason, you need to create a self-signed certificate with Windows. So, we’ve tried to outline the easiest ways to do that. This article is up-to-date as of December 2021. By the way, we’re referring to Windows 10 for all the following tutorials. As far as we know, the processes for Windows 11 are identical.

So what are our options?

Using Let’s Encrypt.

These guys offer free CA certificates with various SAN and wildcard support. The certificate is only good for 90 days, but they do give an automated renewal method. This is a great alternative for a quick proof-of-concept. Other options would require more typing, for sure.

But this option works only if you want to generate a certificate for your website. The best way to start is by going to Getting Started, the instructions thereafter are very easy to follow.

Other one-click option:

We’ve reviewed different online services that allow you to easily generate self-signed certificates. We’ve sorted them from one-click to advanced, and the first one is:

Selfsignedcertificate.com

Just enter your domain name — and you are ready to go:


Getacert.com

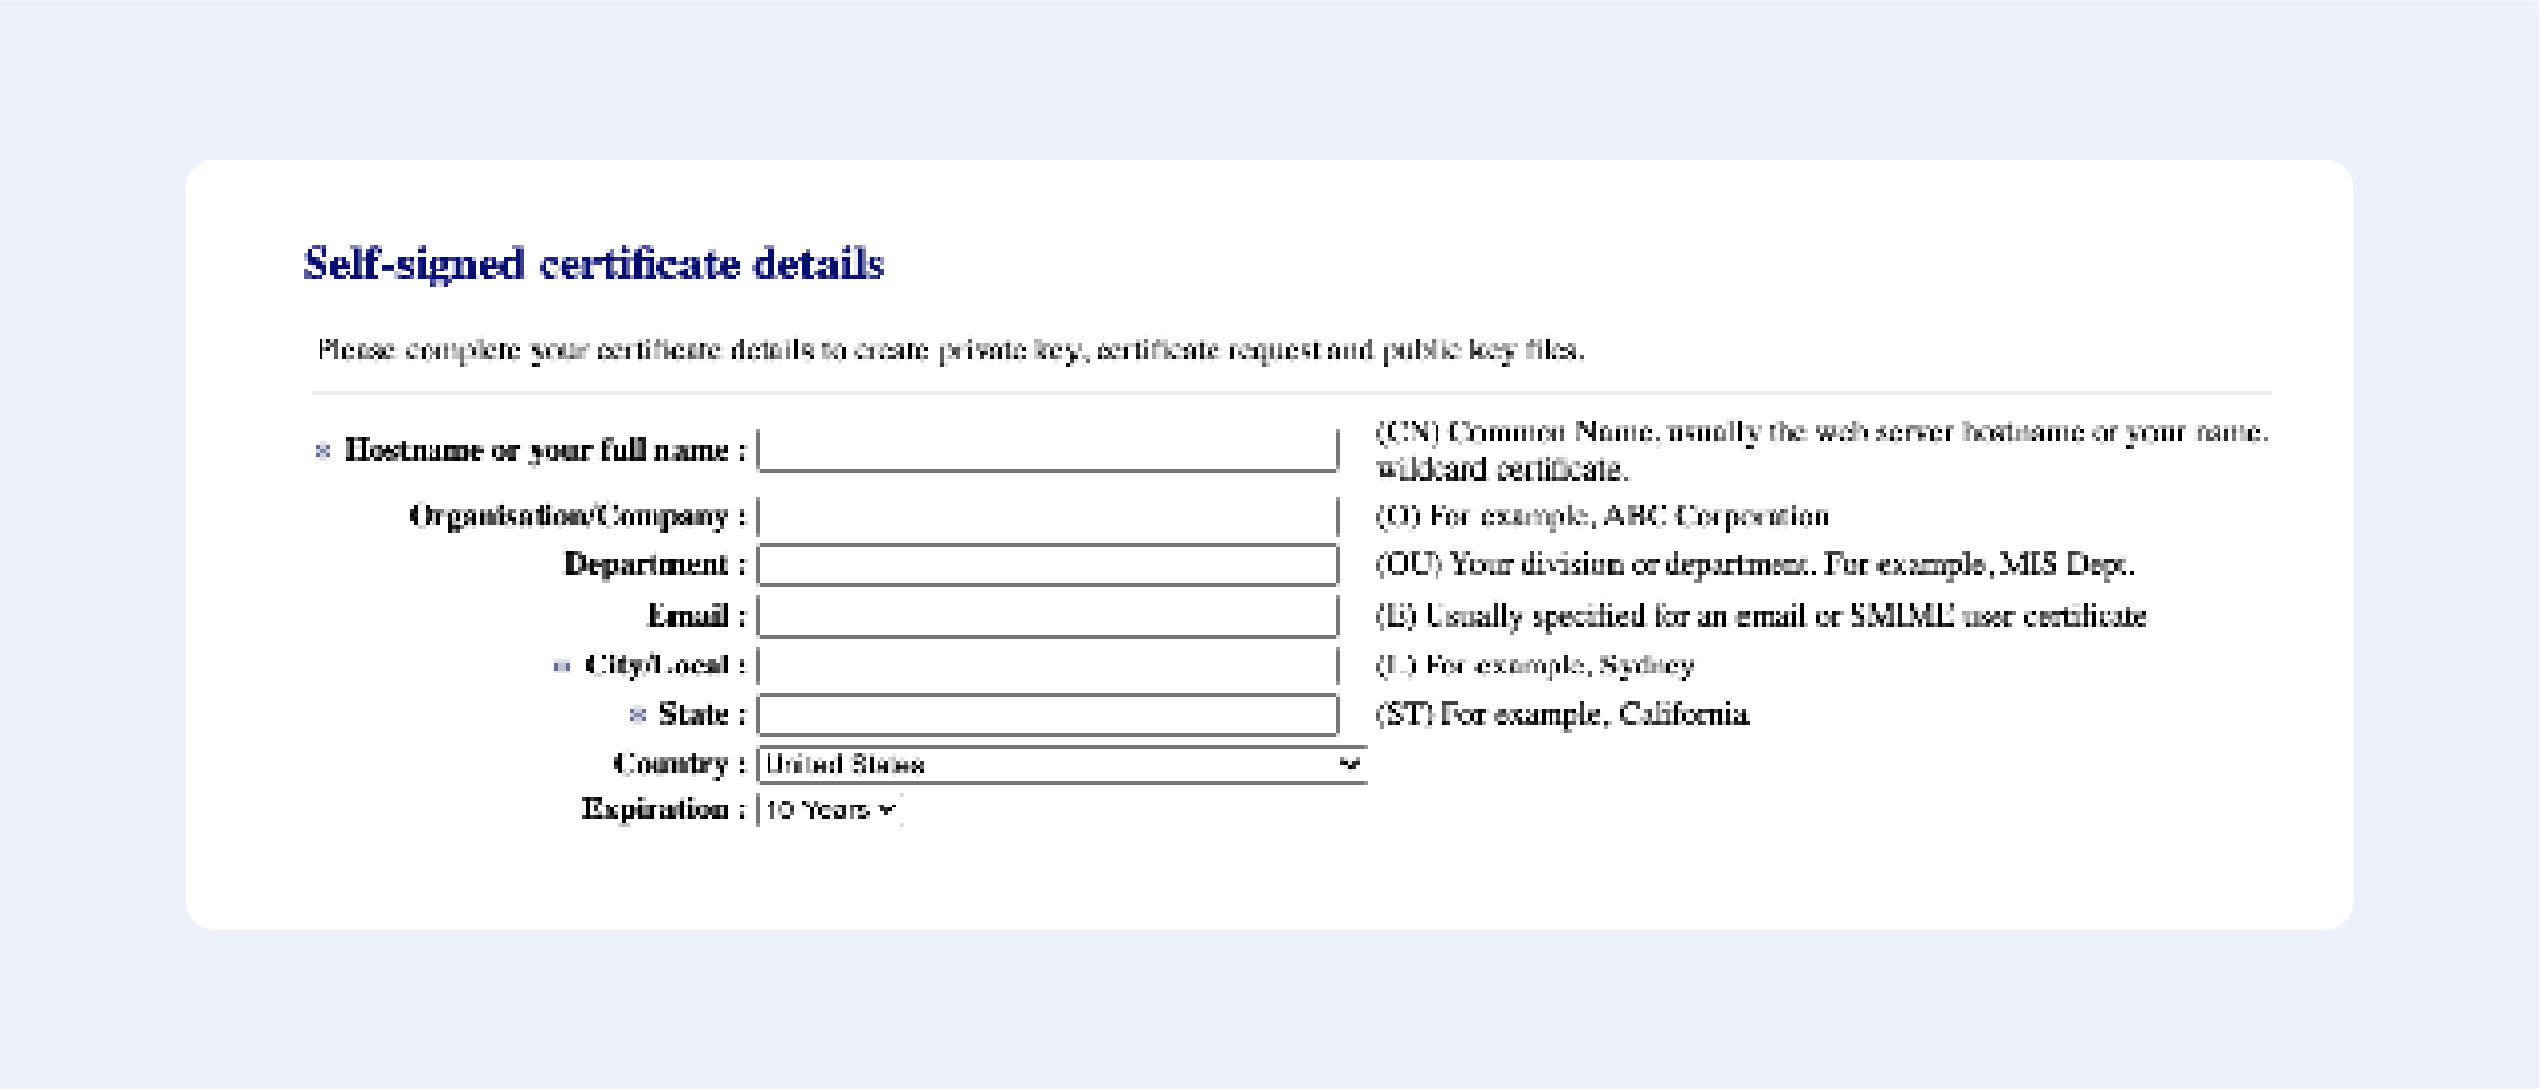
Fill out the following fields:

Press “Next”, then confirm your details, and get your certificate:

It’s that easy!

Сertificatetools.com

Among the online services that allow you to generate self-signed certificates, this one is the most advanced; just look at all available options to choose from:

Now let’s continue with offline solutions, that are a bit more advanced:

PowerShell 4.0

1. Press the Windows key, type Powershell. Right-click on PowerShell and select Run as Administrator.

2. Run the New-SelfsignedCertificate command, as shown below.

$cert = New-SelfSignedCertificate -certstorelocation 
cert:localmachinemy -dnsname passwork.com

3. This will add the certificate to the locater store on your PC. Replace passwork.com with your domain name in the above command.

4. Next, create a password for your export file:

$pwd = ConvertTo-SecureString -String ‘password!’ -Force -AsPlainText

5. Replace password with your own password.

6. Enter the following command to export the self-signed certificate:

$path = 'cert:localMachinemy' + $cert.thumbprint 
Export-PfxCertificate -cert $path -FilePath 
c:tempcert.pfx -Password $pwd

7. In the above command, replace c:temp with the directory where you want to export the file.

8. Import the exported file and deploy it for your project.

Use OpenSSL

1. Download the latest OpenSSL windows installer from a third-party source;

2. Run the installer. OpenSSL requires Microsoft Visual C++ to run. The installer will prompt you to install Visual C++ if it is already not installed;

3. Click Yes to install;

4. Run the OpenSSL installer again and select the installation directory;

5. Click Next;

6. Open Command Prompt and type OpenSSL to get an OpenSSL prompt.

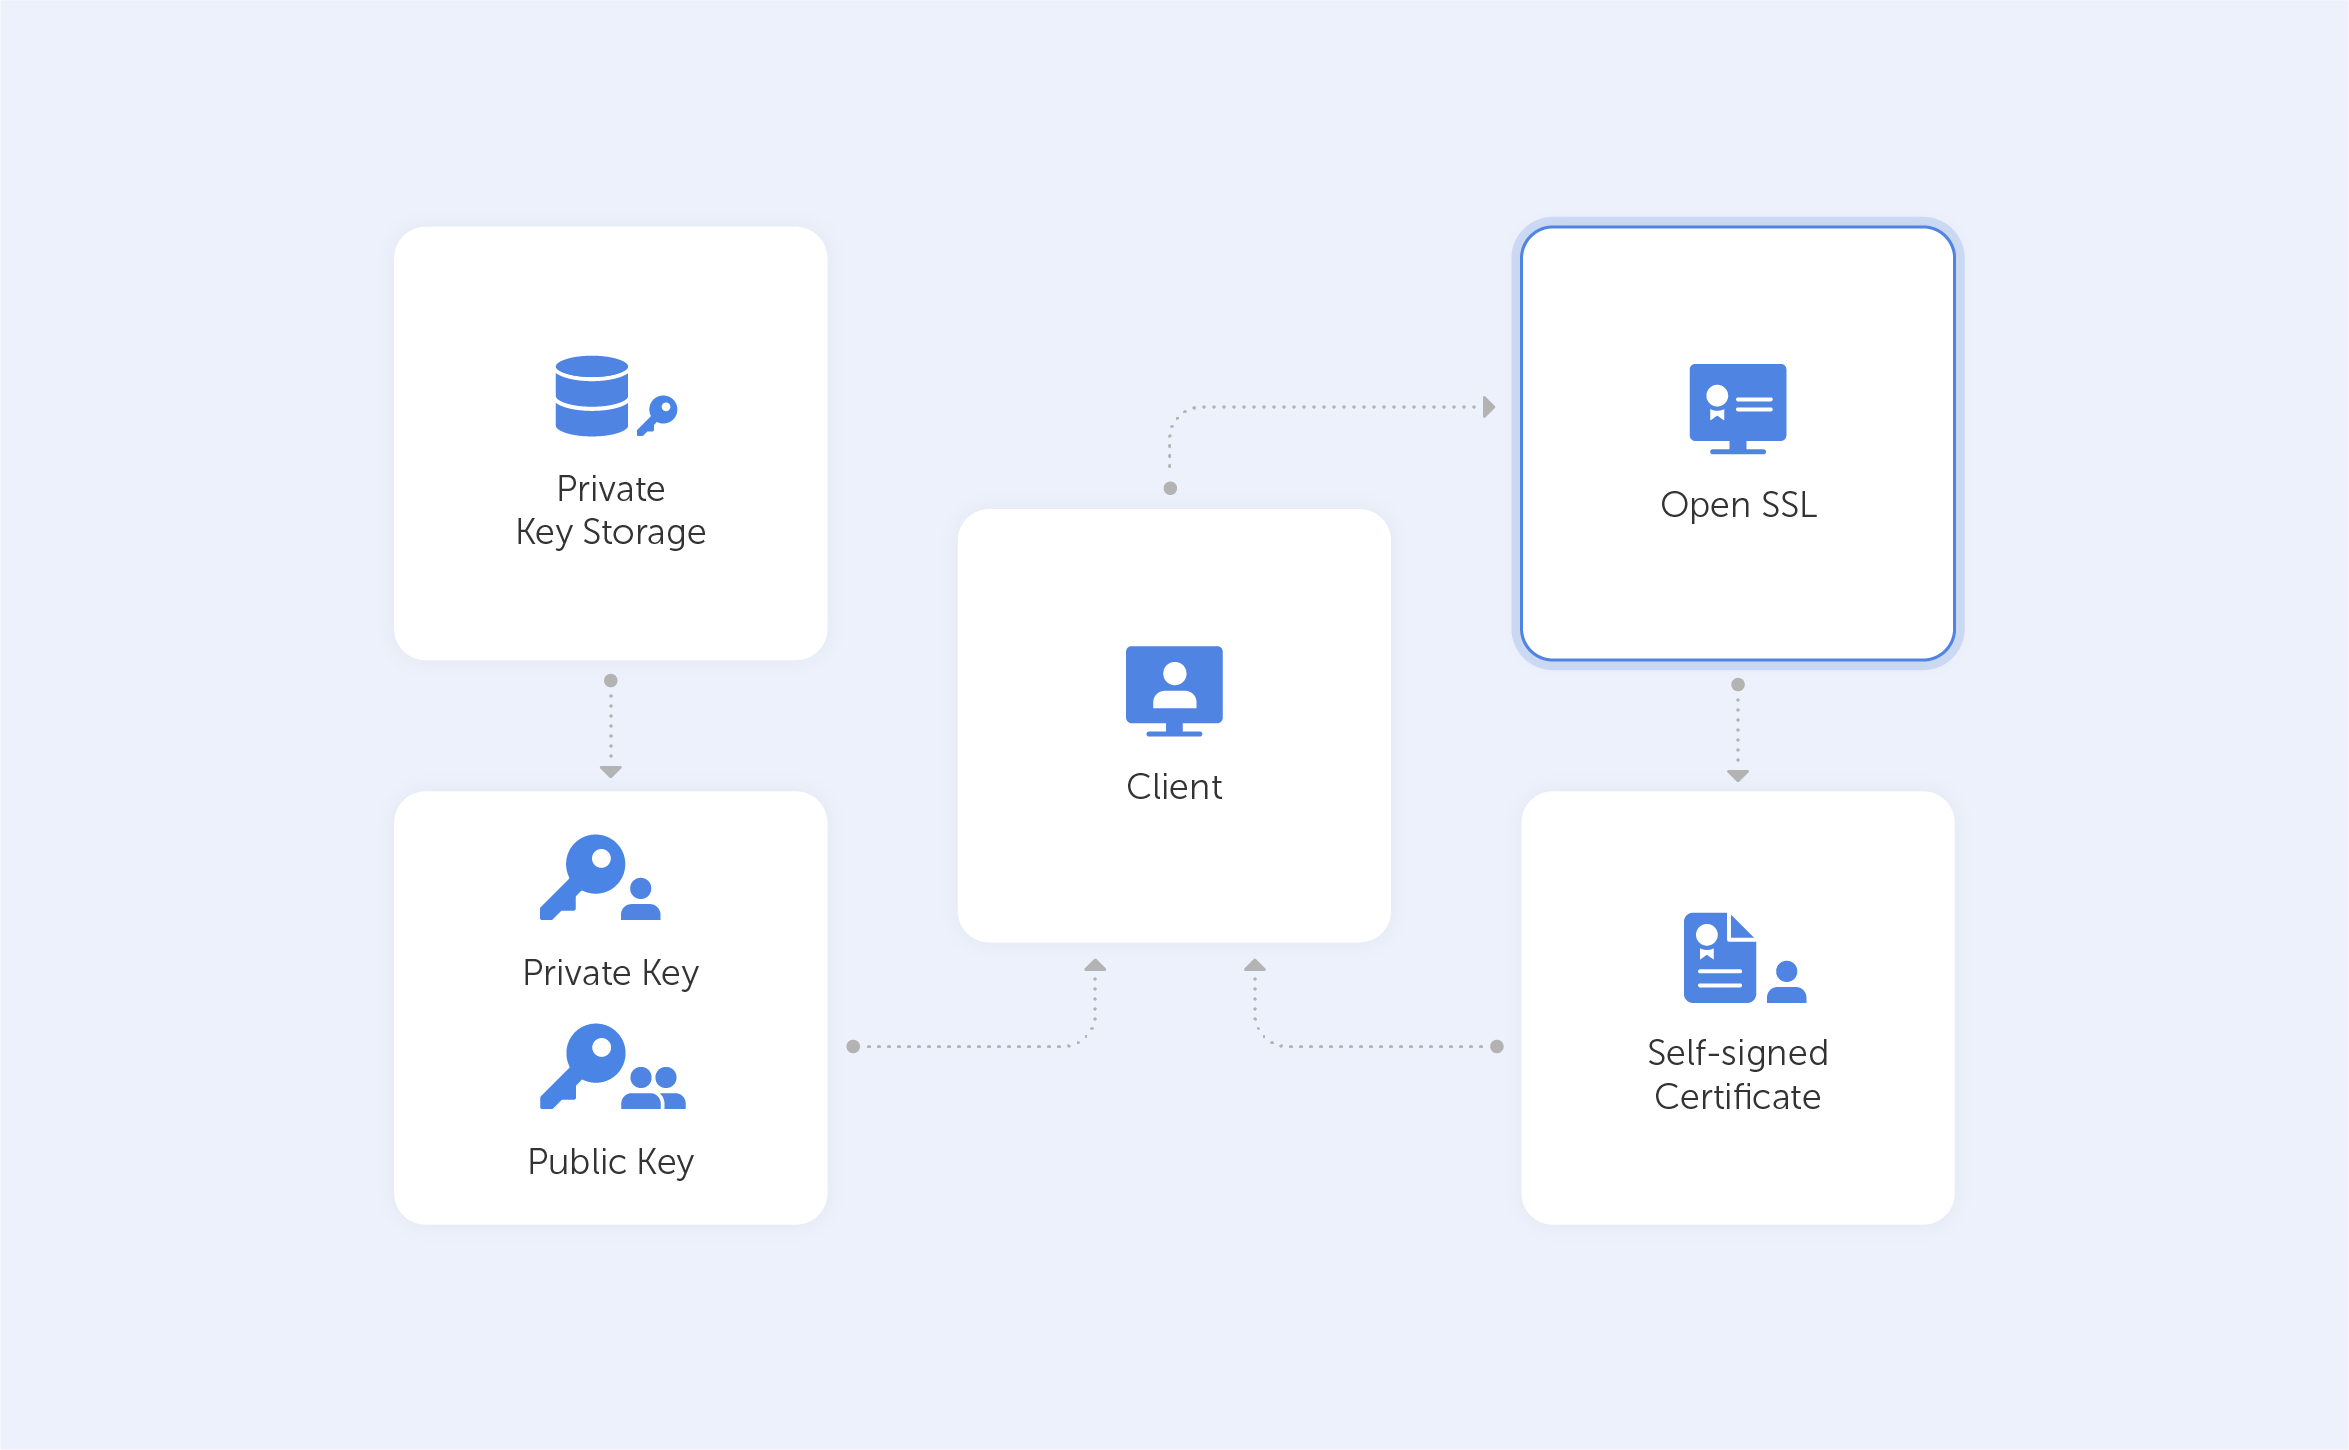
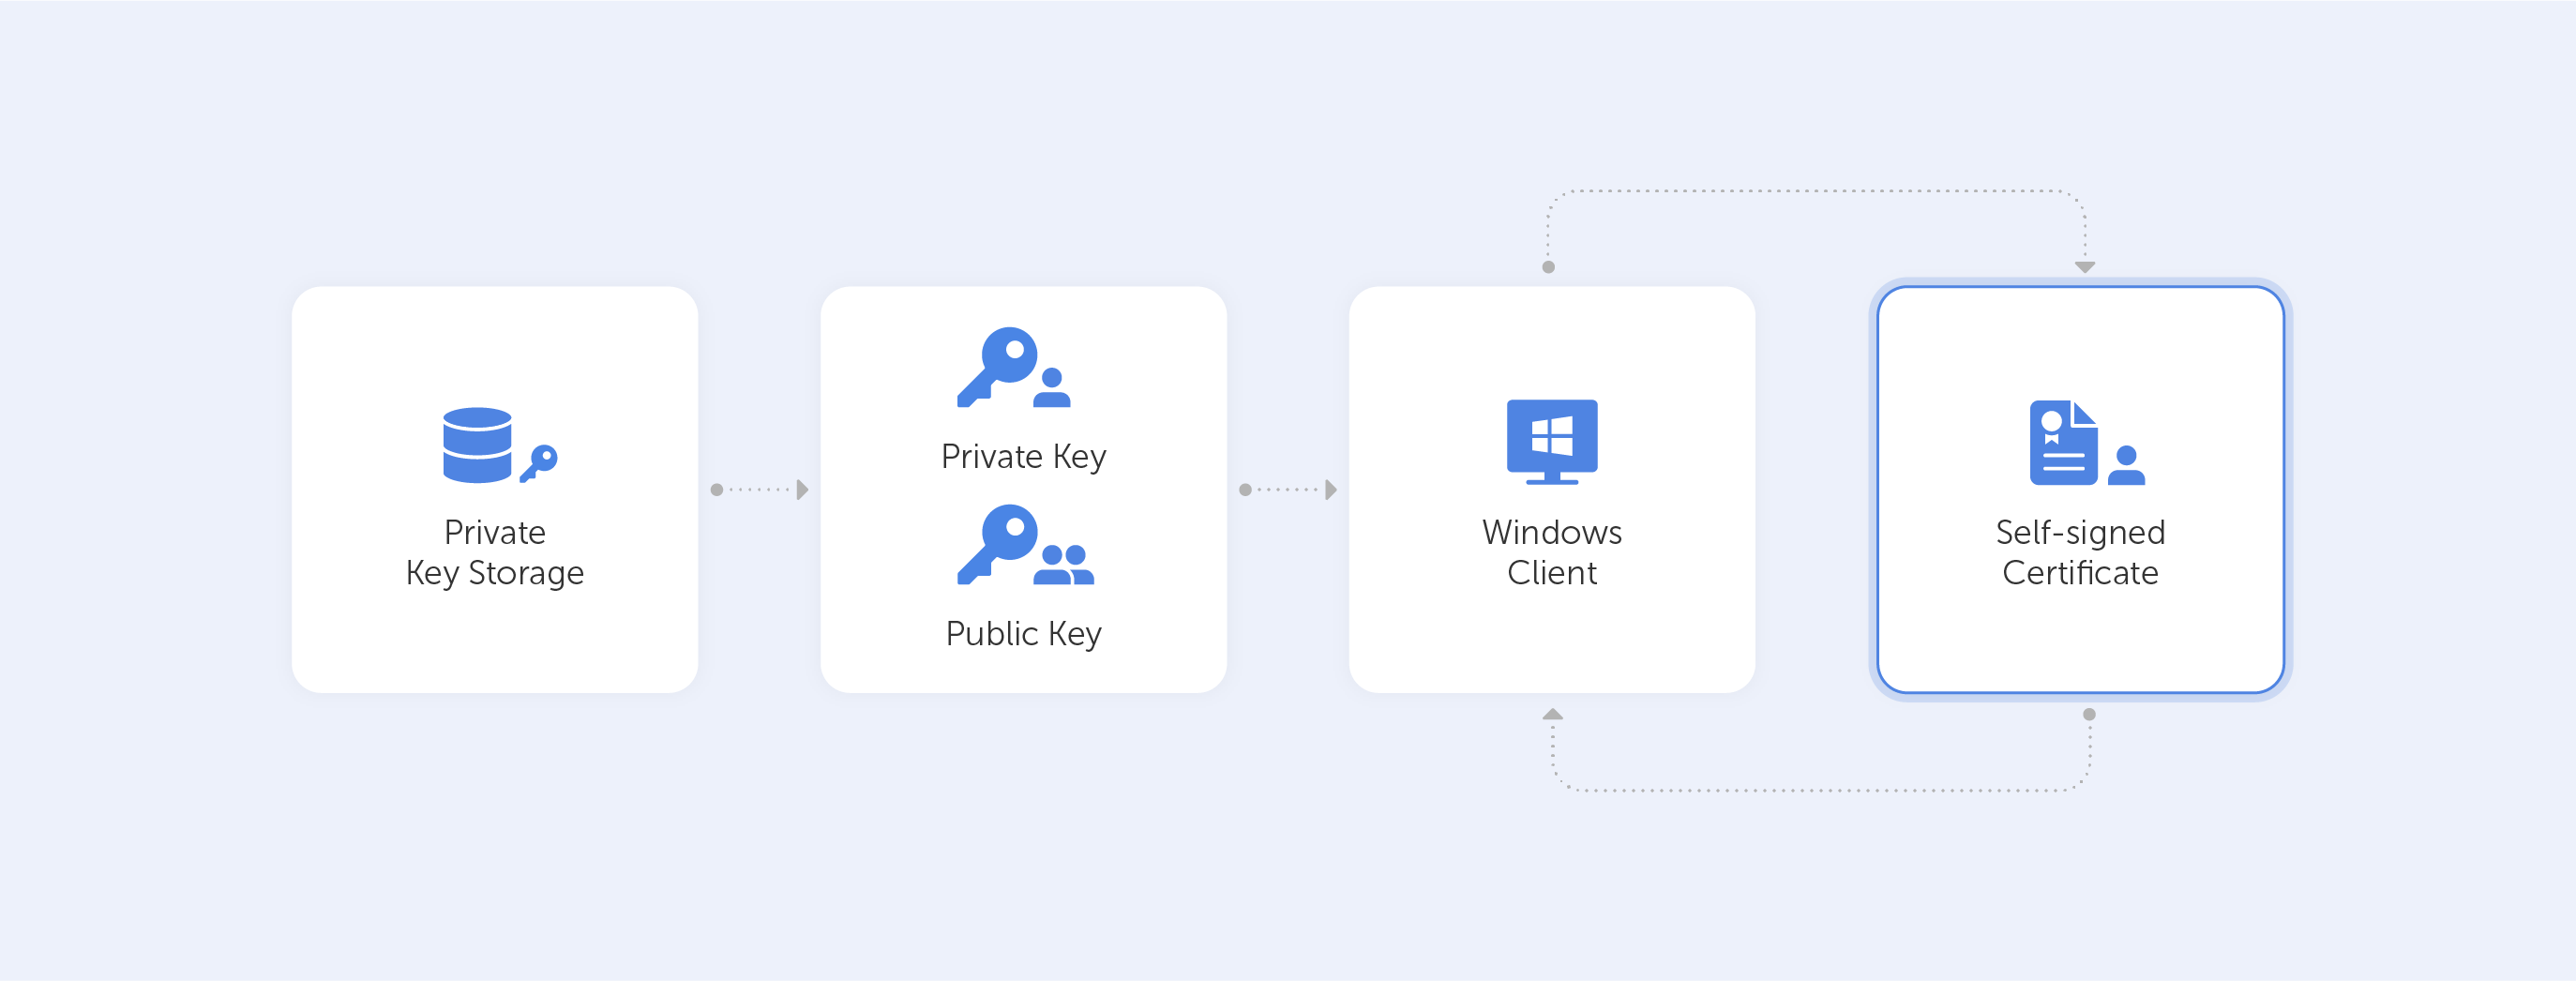
The next step would be to generate a public/private key file pair.

1. Open Command Prompt and create a new directory on your C drive:

C: >cd Test

2. Now go to the new directory:

C: Test>

3. Now you need to type the path of the OpenSSL install directory followed by the RSA key algorithm:

C: Test>c:opensslbinopenssl genrsa -out privkey.pem 4096

4. Run the following command to split the generated file into separate private and public key files:

C: Test>c:opensslbinopenssl ssh-keygen -t rsa -b 4096 -f privkey.pem

Once you have the public/private key generated, follow the next set of steps to create a self-signed certificate file on Windows.

1. Go to the directory that you created earlier for the public/private key file:

C: Test>

2. Enter the path of the OpenSSL install directory, followed by the self-signed certificate algorithm:

C: Test>c:opensslbinopenssl req -new -x509 -key privkey.pem -out cacert.pem -days 109

3. Follow the on-screen instructions;

4. You need to enter information about your organization, region, and contact details to create a self-signed certificate.

We also have a detailed article on OpenSSL – it contains more in-depth instructions on generating self-signed certificates.

Using IIS

This is one of those hidden features that very few people know about.

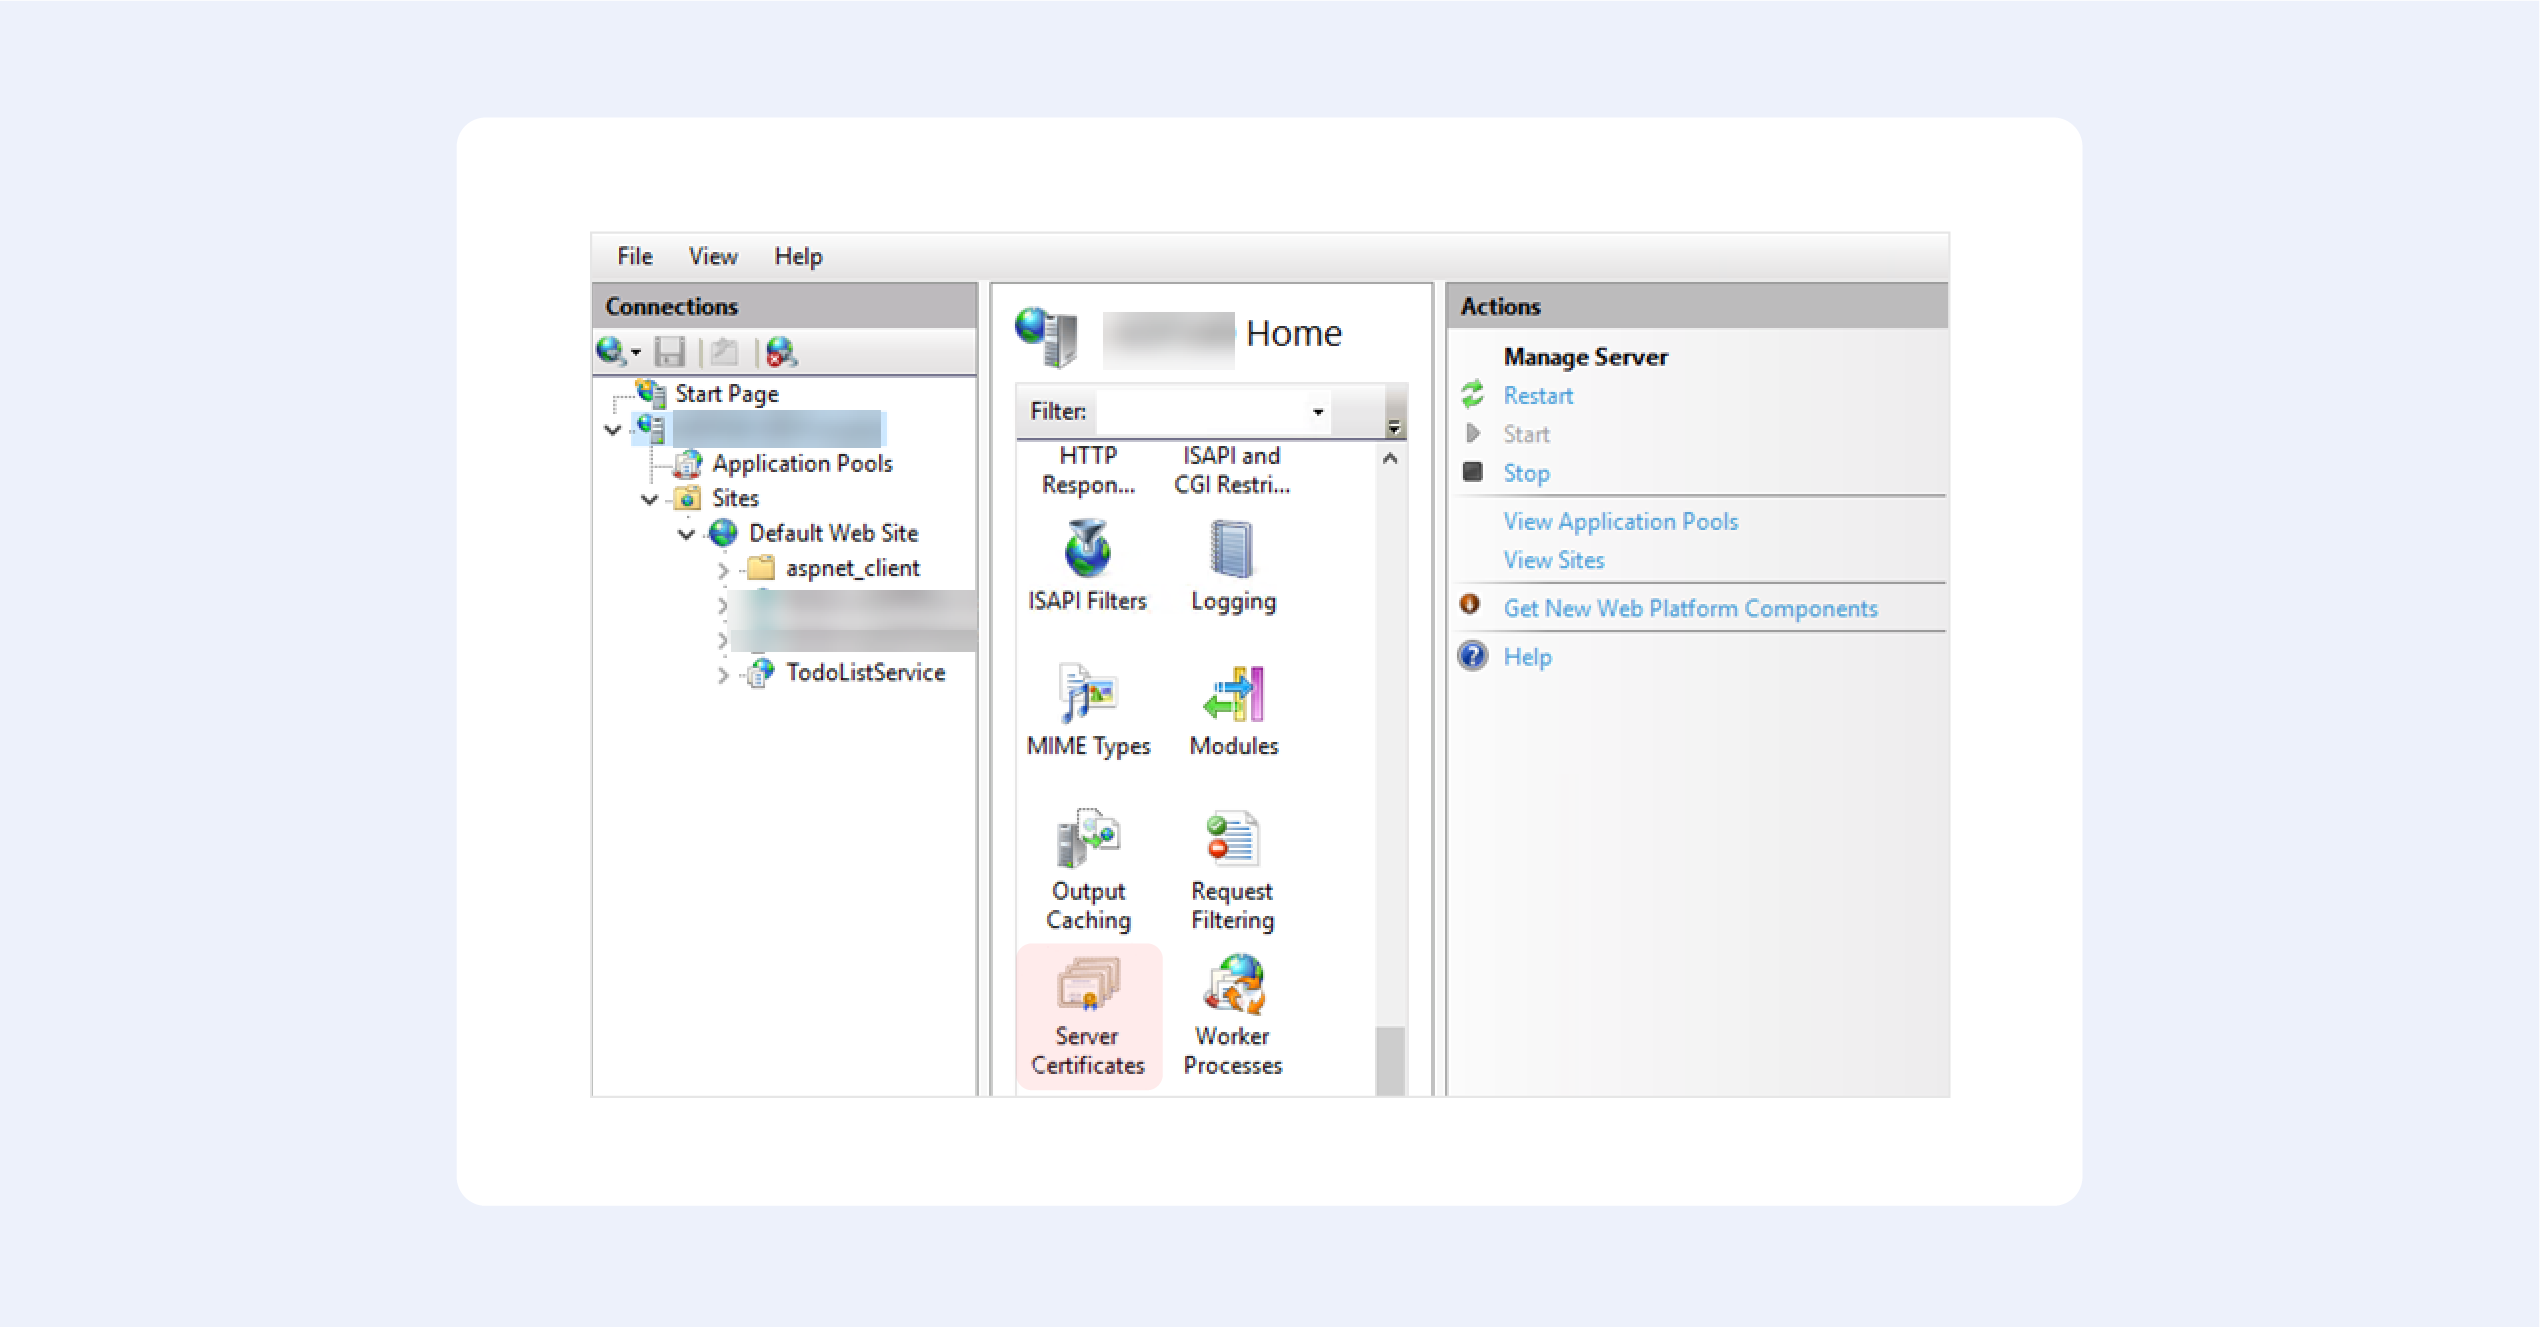
1. From the top-level in IIS Manager, select “Server Certificates”;

2. Then click the “Create” button on the right;

3. This will create a self-signed certificate, valid for a year with a private key. It will only work for “localhost”.

We hope this fruit bowl of options provides you with some choice in the matter. Creating your own self-signed certificate nowadays is trivial, but only until you begin to understand how they really work.

Our option of choice is, of course, OpenSSL — after all, it is an industry-standard.

7 ways to create self-signed certificates on Windows

Dec 14, 2021 — 5 min read

The Secure Sockets Layer (SSL) and the Transport Layer Security (TLS) cryptographic protocols have seen their share of flaws, like every other technology. In this article, we would like to list the most commonly-known vulnerabilities of these protocols. Most of them affect the outdated versions of these protocols (TLS 1.2 and below), although one major vulnerability was found that affects TLS 1.3.

POODLE

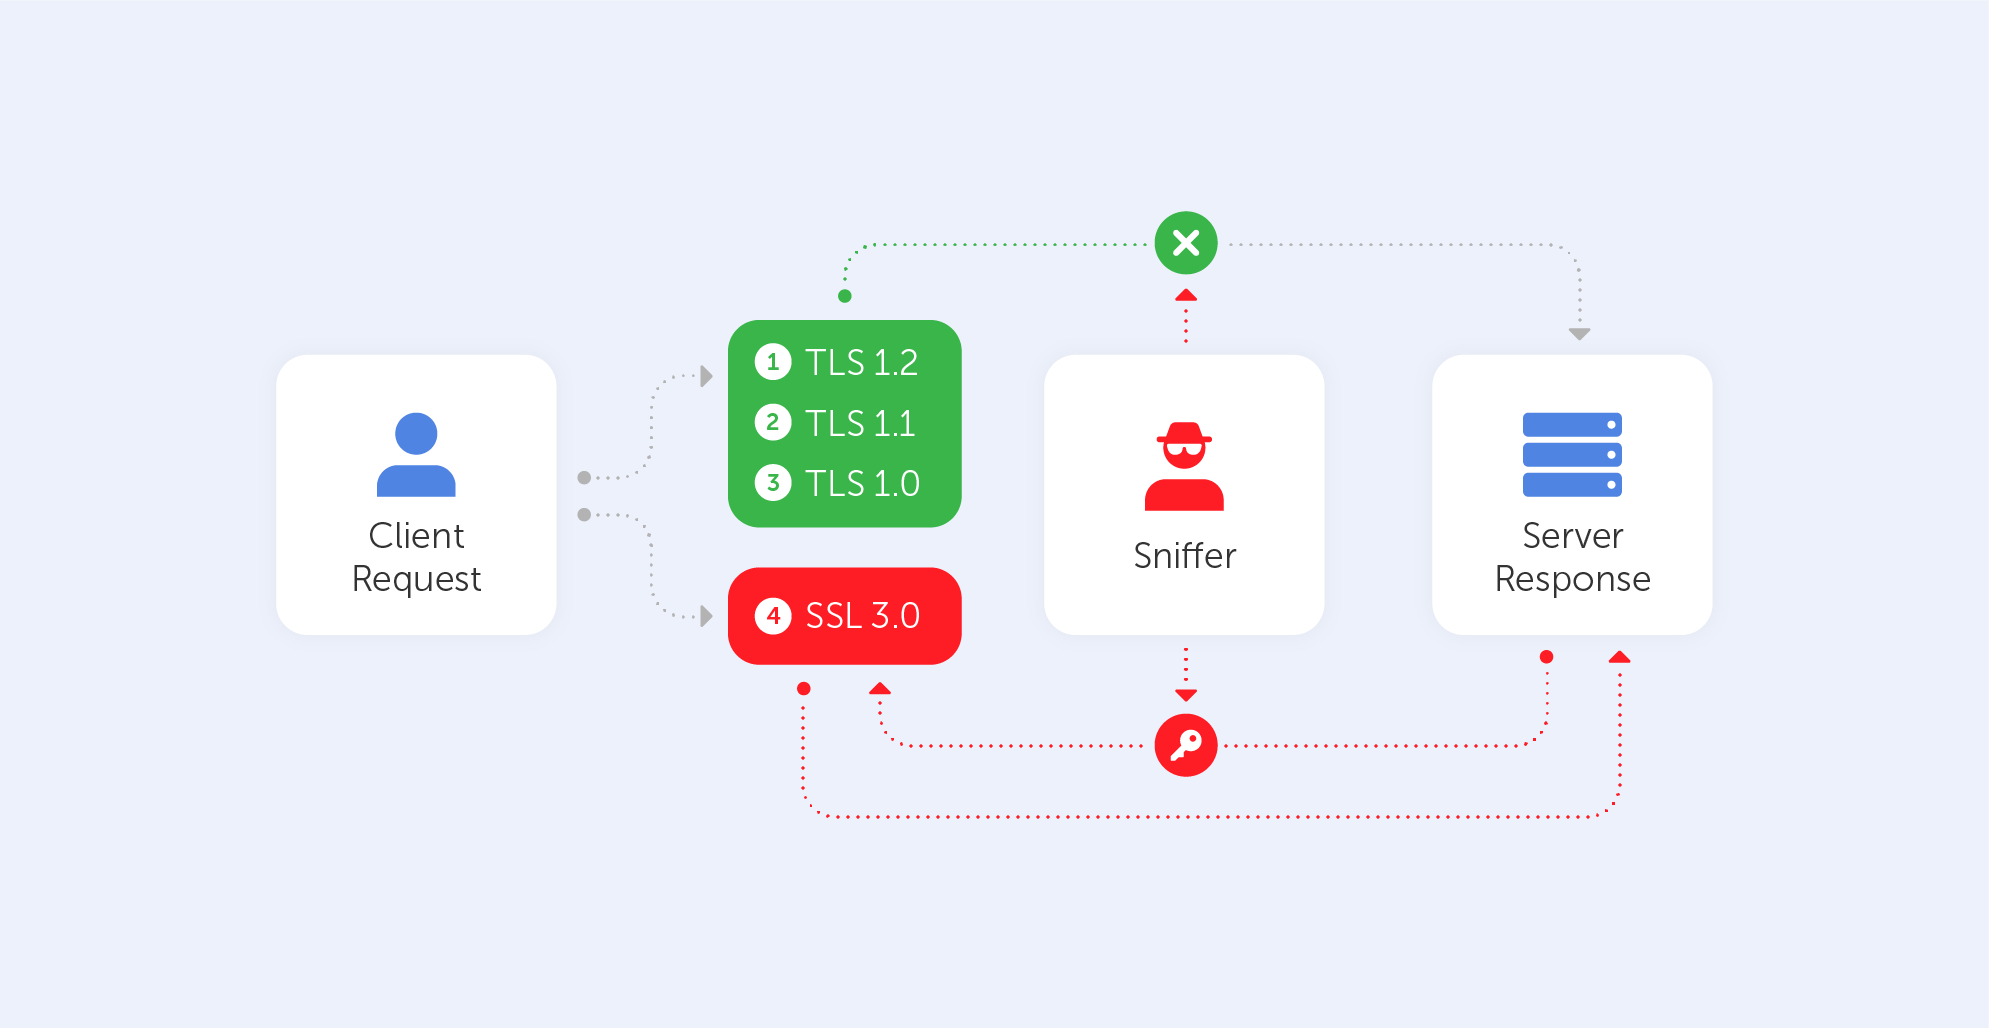
This cute name should not misguide you – it stands for Padding Oracle On Downgraded Legacy Encryption. Not that nice after all, right? It was published in October 2014 and it takes advantage of two peculiar facts. The first one is that some servers/clients still support SSL 3.0 for interoperability and compatibility with legacy systems. The second one is a vulnerability related to block padding that appears in SSL 3.0. Here is a link to that vulnerability on the NIST NVD database.

How does it work?

As mentioned before, this vulnerability comes from the Cipher Block Chaining (CBC) mode. Those block ciphers use blocks of a fixed length, so if the data in the last block is shorter than the block’s size, it is filled by padding. The server, of course, ignores such padding by default, it only checks whether the length is correct and verifies the Message Authentication Code (MAC) of the plaintext. In practice, this means that the server cannot verify if the content inside the padding has been altered in any way.

An attacker is able to modify padding data and then simply waits for the server’s response. Attackers can recover the contents byte-by-byte by watching server responses and altering the input. It usually takes no more than 256 attempts to reveal one byte of a cookie, which equates to a maximum of 4096 queries for a 16-bit cookie. Just by using automated scripts, the hacker may retrieve the plaintext char by char. Such a plaintext may be anything from a password to a cookie or a session. So, without even knowing the encryption method or key, a sniffer may easily decipher a block.

BEAST

The Browser Exploit Against SSL/TLS attacks was disclosed in September 2011. It affects browsers that support TLS 1.0, because this early version of the protocol has a vulnerability when it comes to the implementation of the above-mentioned CBC mode. Here’s a link to it in the NIST NVD database.

How does it work?

This kind of attack is usually client-side, so in order for it to succeed, an attacker should, in one way or another, have some control of the clients’ browser. After getting access to a browser, the attacker would typically use MITM to inject packets into the TLS stream. After such an injection, the only thing left is to guess the Initialization Vector (IV) – a random block of data that makes each message unique. This is used with the injected message and then simply compared with the results of the needed block.

CRIME

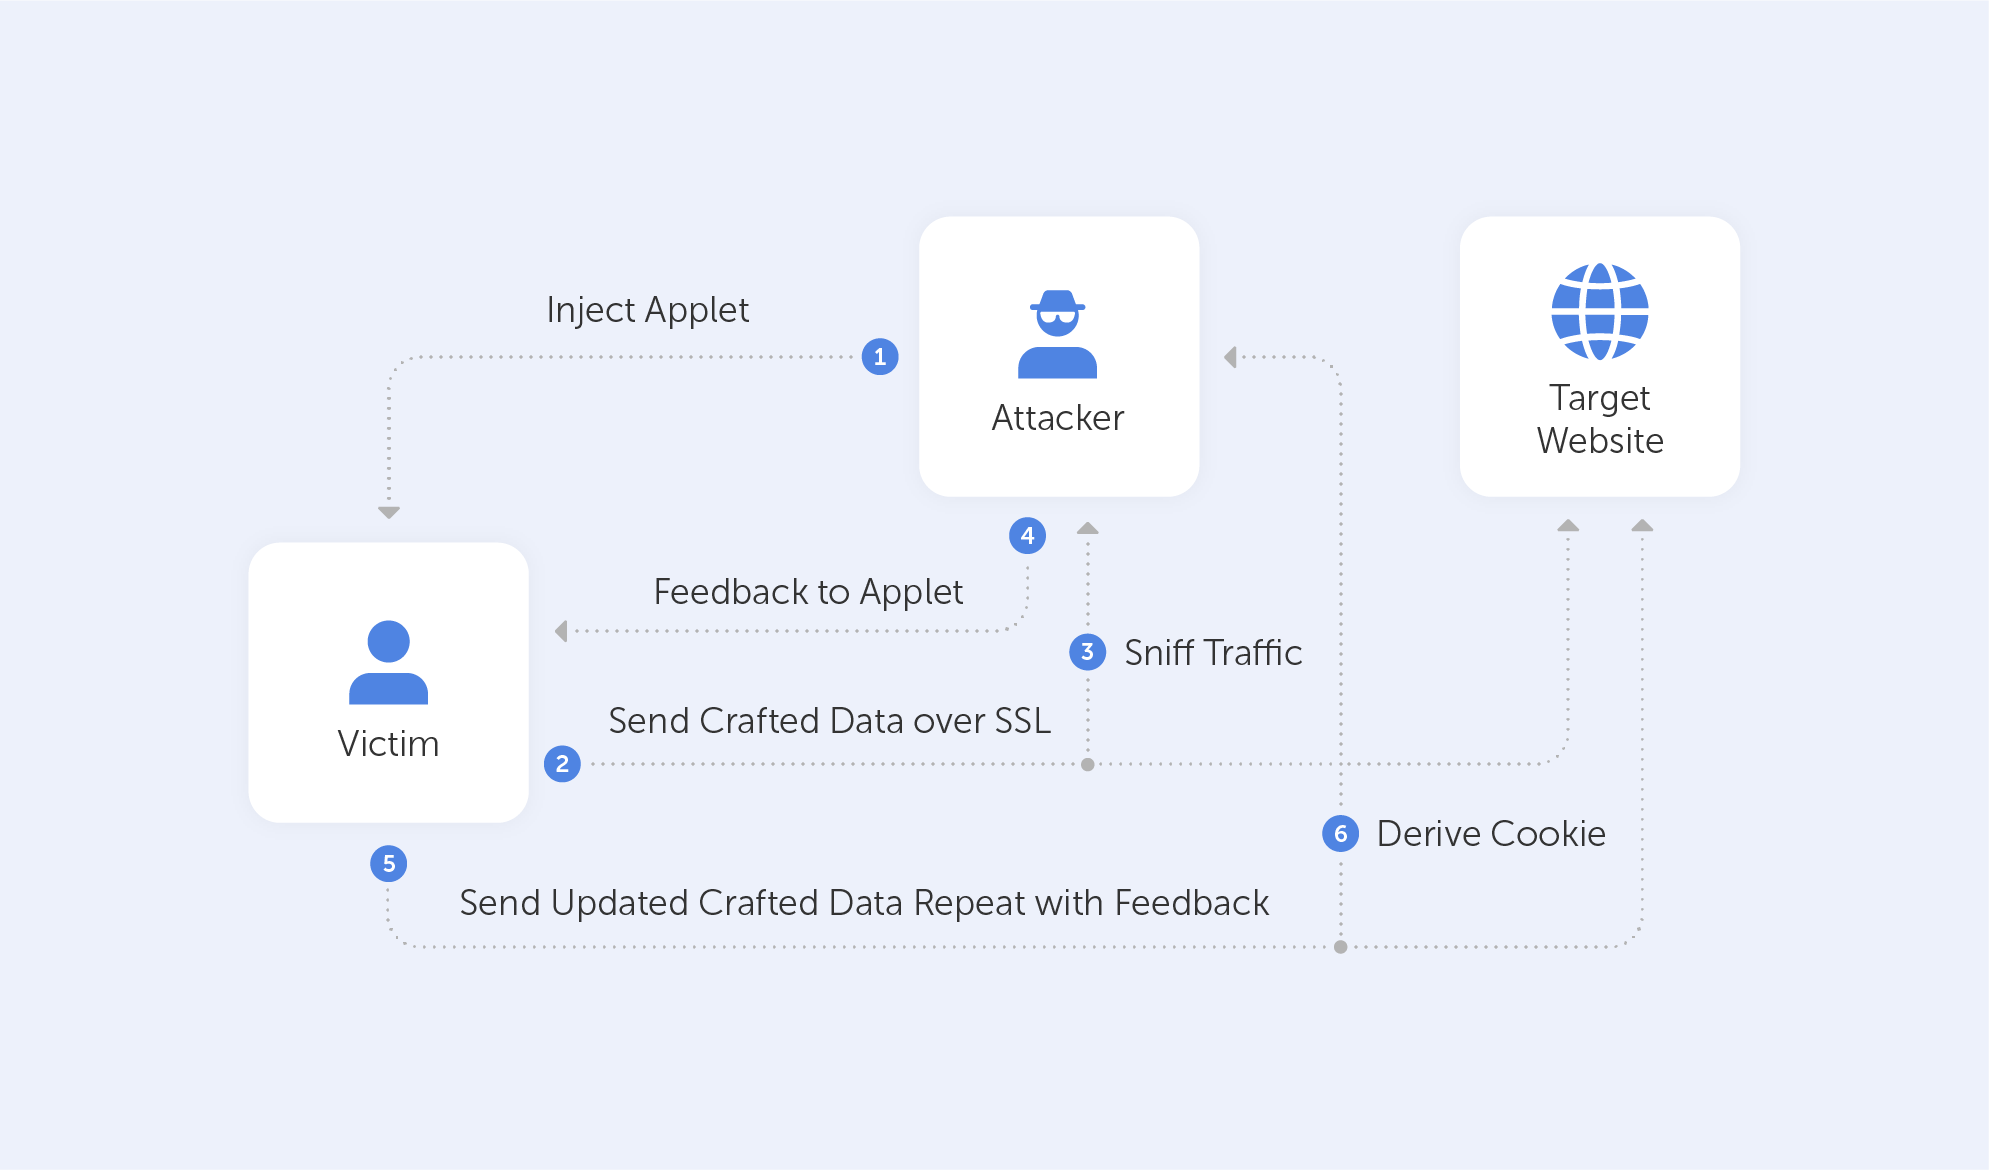
The Compression Ratio Info-leak Made Easy (CRIME) vulnerability affects TLS compression. The Client Hello message optionally uses the DEFLATE compression method, which was introduced to SSL/TLS to reduce bandwidth. The main method used by any compression algorithm is to replace repeated byte patterns with a pointer to the first instance of such sequences. As a result – the bigger the repeated sequences, the more effective such a compression is. You can visit this link to locate this vulnerability in the NIST NVD database.

How does it work?

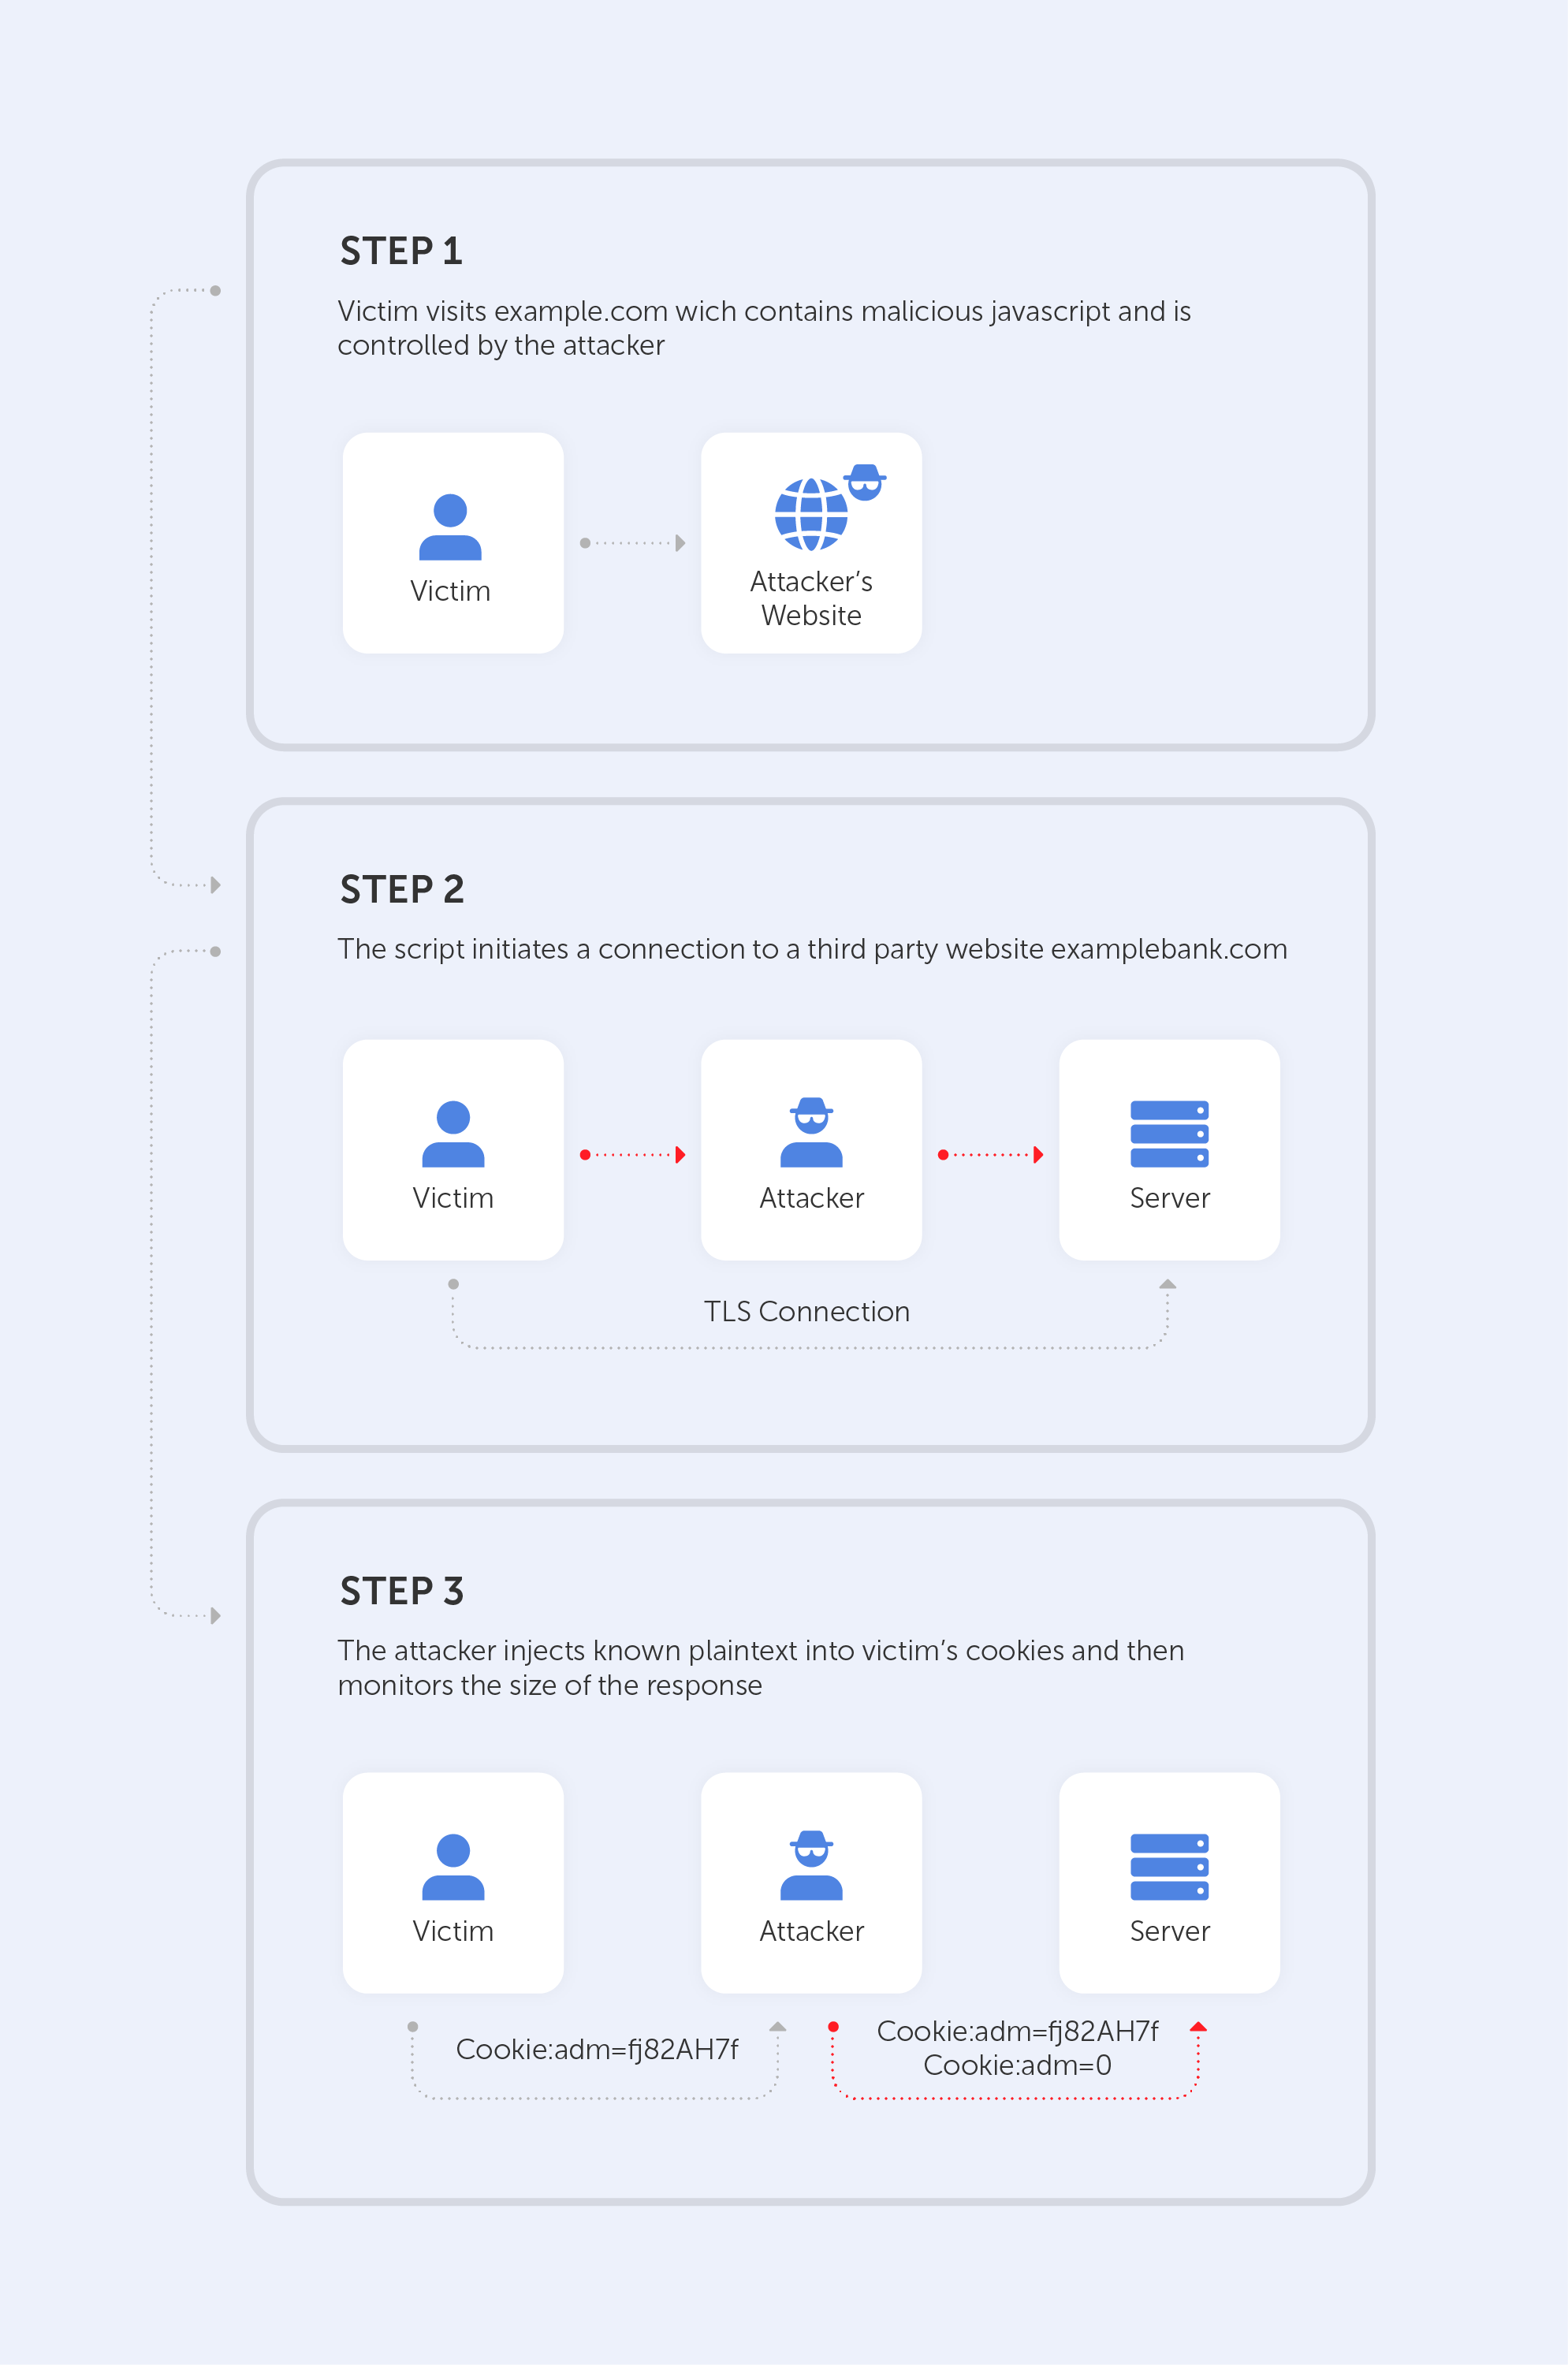
Let’s imagine that a hacker is targeting cookies. He knows that the targeted website creates a cookie for each session named ‘ss’. The DEFLATE compression method replaces repeated bytes and our antagonist knows that. Therefore, he injects Cookie:adn=0 to the victim’s cookie. The server would, of course, append 0 to the compressed response, because Cookie:adn= has been already sent, so it is repeated.

After that, the only thing for an attacker to do is to inject different characters and then monitor the size of the response.

The injected character is contained in the cookie value if the answer is shorter than the first one, hence the compression. The response will be longer if the character is not in the cookie value. Using this strategy, an attacker can recreate the cookie value using the server's feedback.

By the way, the BREACH attack is very similar to CRIME, but it targets HTTP compression instead.

Heartbleed

Heartbleed was a major vulnerability discovered in the OpenSSL (1.0.1) library's heartbeat extension. This extension is used to maintain a connection so long as both participants are online. Here is its link on our beloved NIST NVD database.

How does it work?

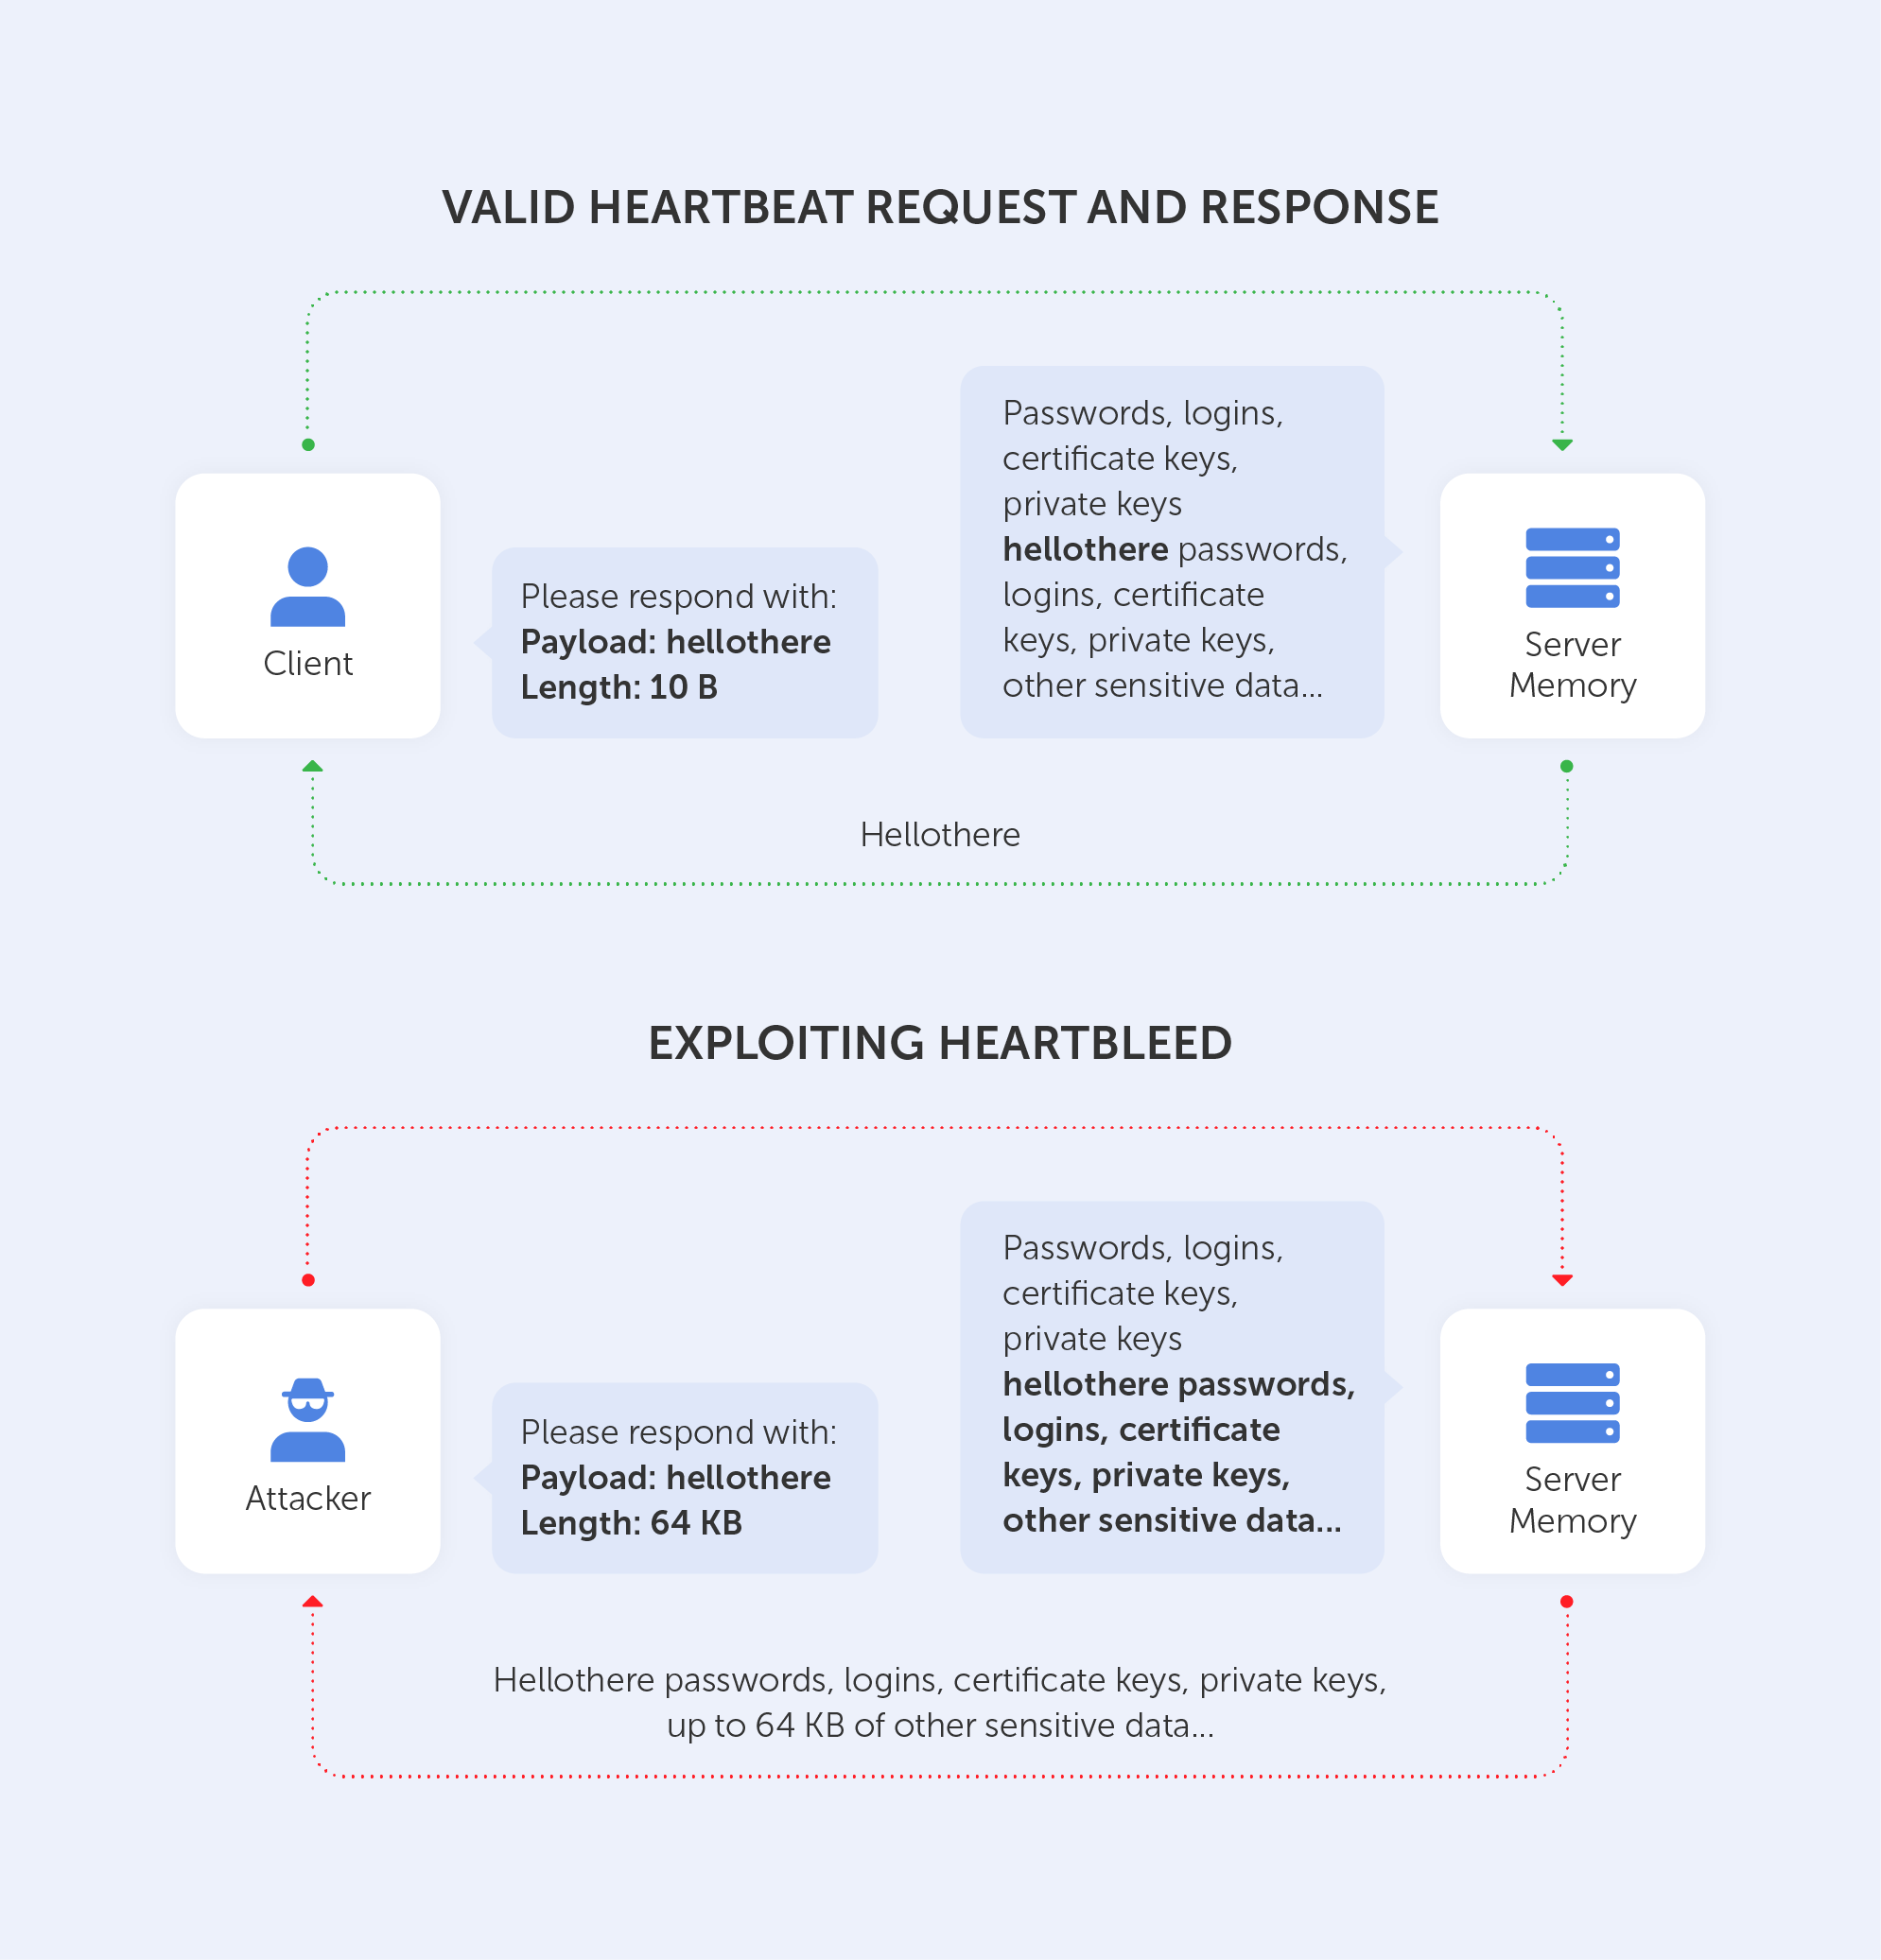
The client sends the server a heartbeat message with a payload containing data and its size + padding. The server will respond with the same heartbeat request as the client.

The vulnerability comes from the fact that if the client sent a false data length, the server would respond with a heartbeat response containing not only the data received by the client but, because it needs to fill the length of the message, also with random data from its memory. A very unfortunate technical solution, isn’t it?

Leaking such unencrypted data may result in a disaster. It is well-documented that by using such a technique, an intruder may obtain a private key to the server. Moreover, if the attacker has the private key – well, that means he’s able to decrypt all the traffic to the server. I guess we don’t need to tell you why that’s no good, right?

The entire list of vulnerabilities may be found in this wonderful report by the Health Sector Cybercecurity Coordination Center. It not only lists all above-mentioned techniques in a very informative manner but also provides a very neat table of all ‘Known Threats to TLS/SLS (pp. 24-26).

Instead of a long conclusion, let’s just look at the last page of that report:

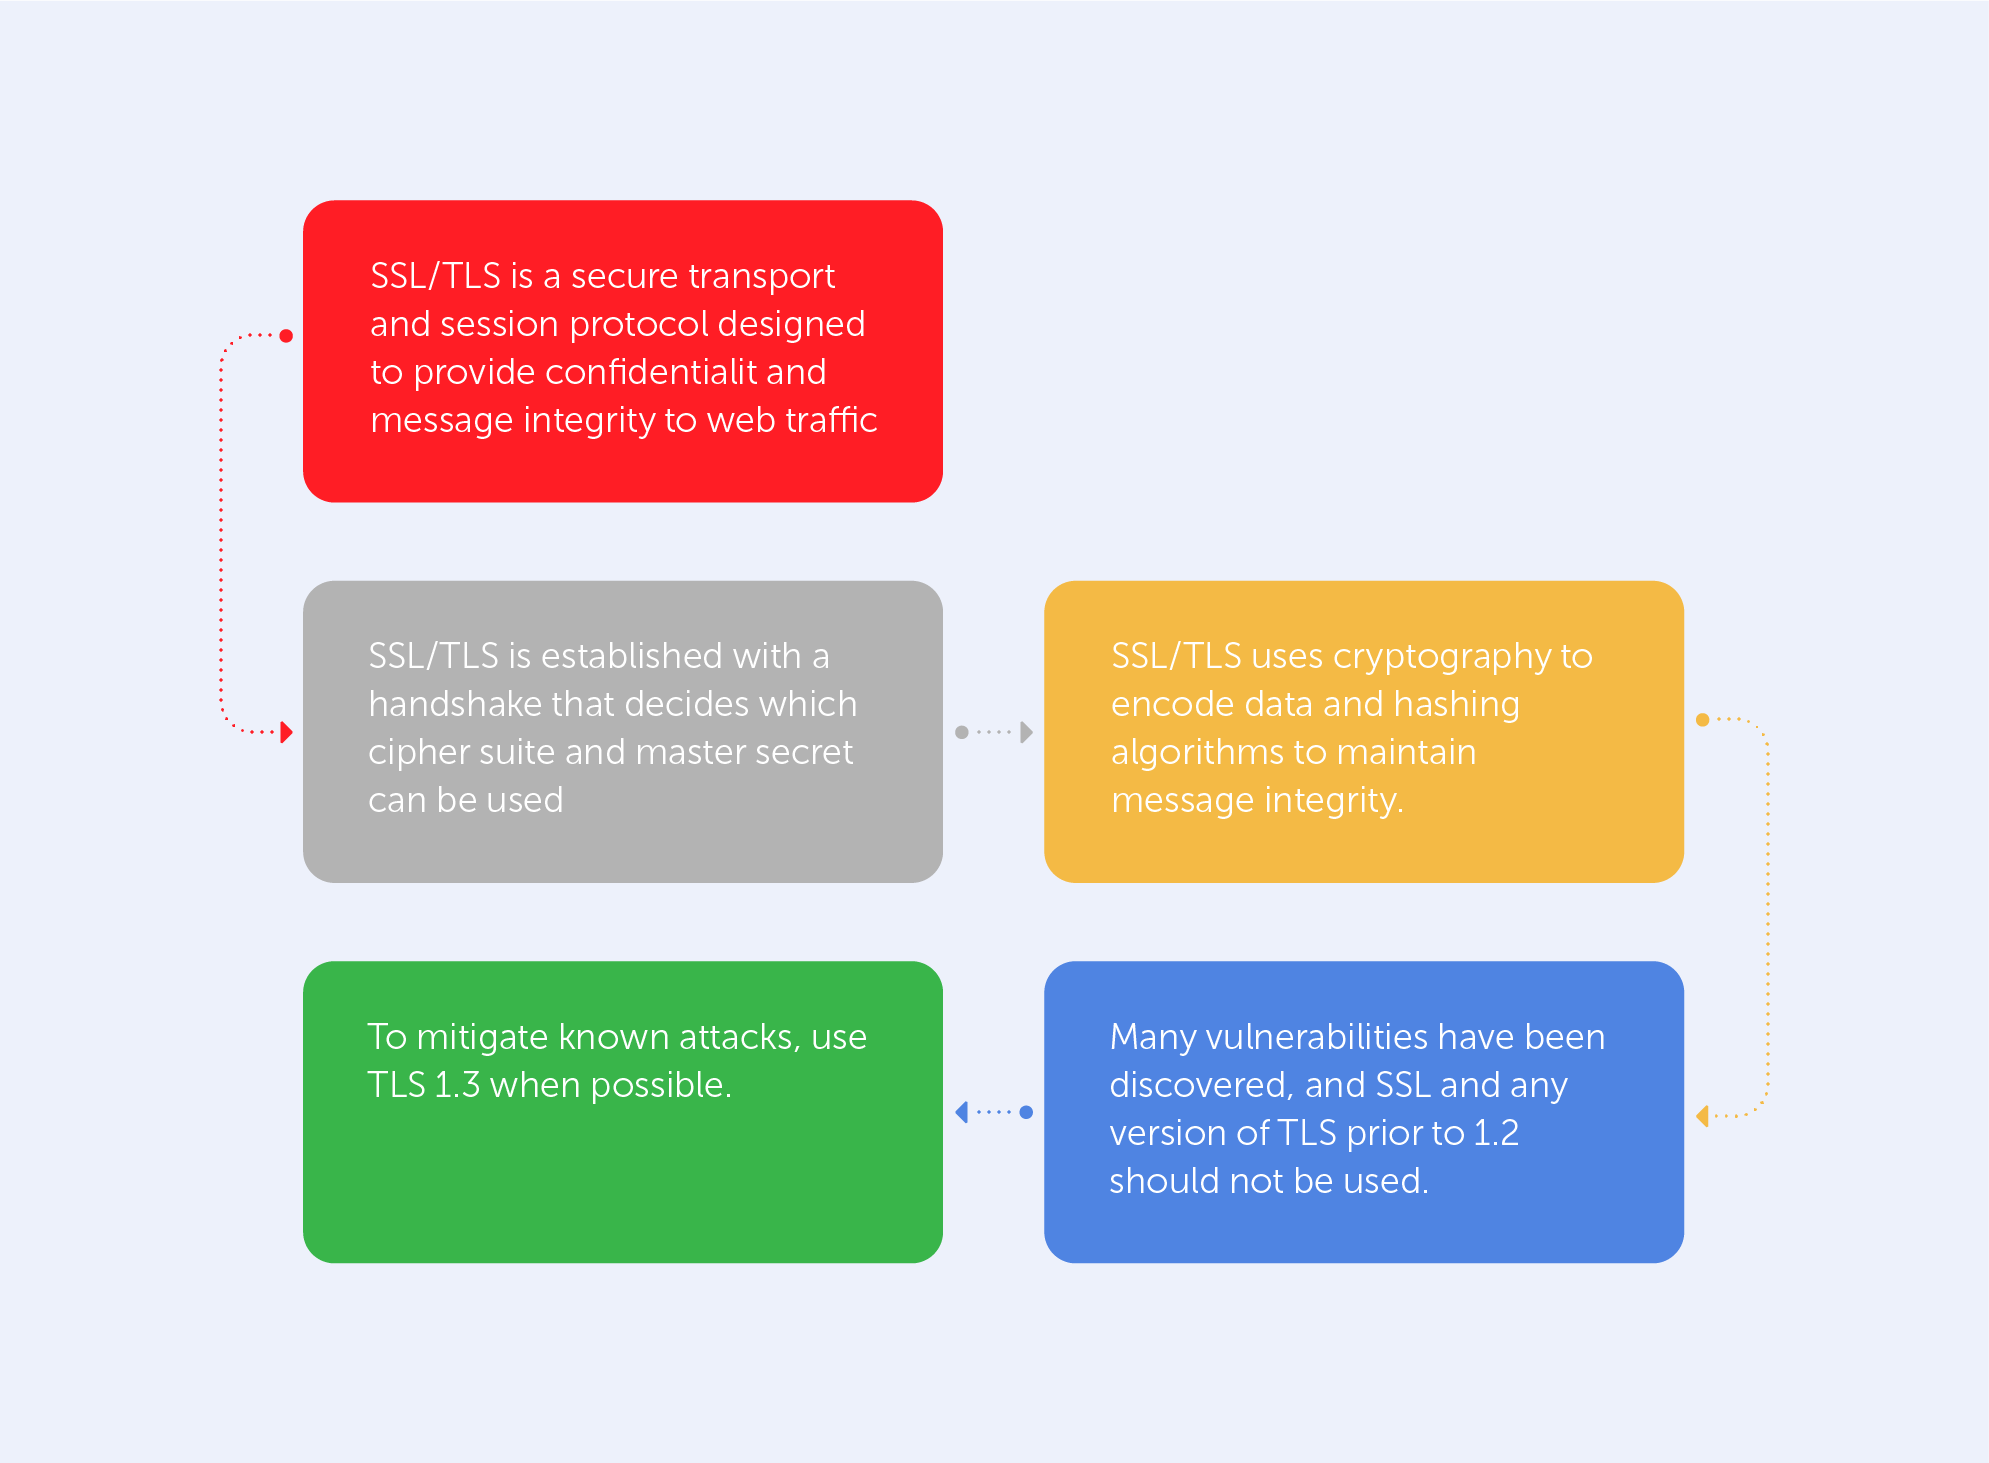
The green cell of the chart explicitly states how to get rid of most known vulnerabilities. Indeed, if you’re not interested in trawling through the nooks and crannies of the Library of Alexandria’s floor on Cybersecurity, the best way to track existing SSL/TLS vulnerabilities is by visiting csrc.nist.gov once in a while. You might even consider making it your homepage.


What are SSL Vulnerabilities?

Dec 2, 2021 — 4 min read

Security, security, security… There is no way one can underestimate the importance of it when it comes to caring for private files and sensitive data. As long as the world of cybersecurity is privy to the constant conflict between hackers and programmers, fully protecting yourself and your business will forever be impossible. But, as we know, hackers aren’t always using state-of-the-art techniques. Often, they’re still getting in by guessing your username and password.

Most popular kinds of technology are under a constant barrage of hacking attempts, which is why it is so important to follow simple protocols to save yourself both time and money. One of such technologies is SSL/TLS. It is used on almost every web service, and even though it may seem straightforward to set up, there are many arcane configurations and design choices that need to be made to get it ‘just right’.

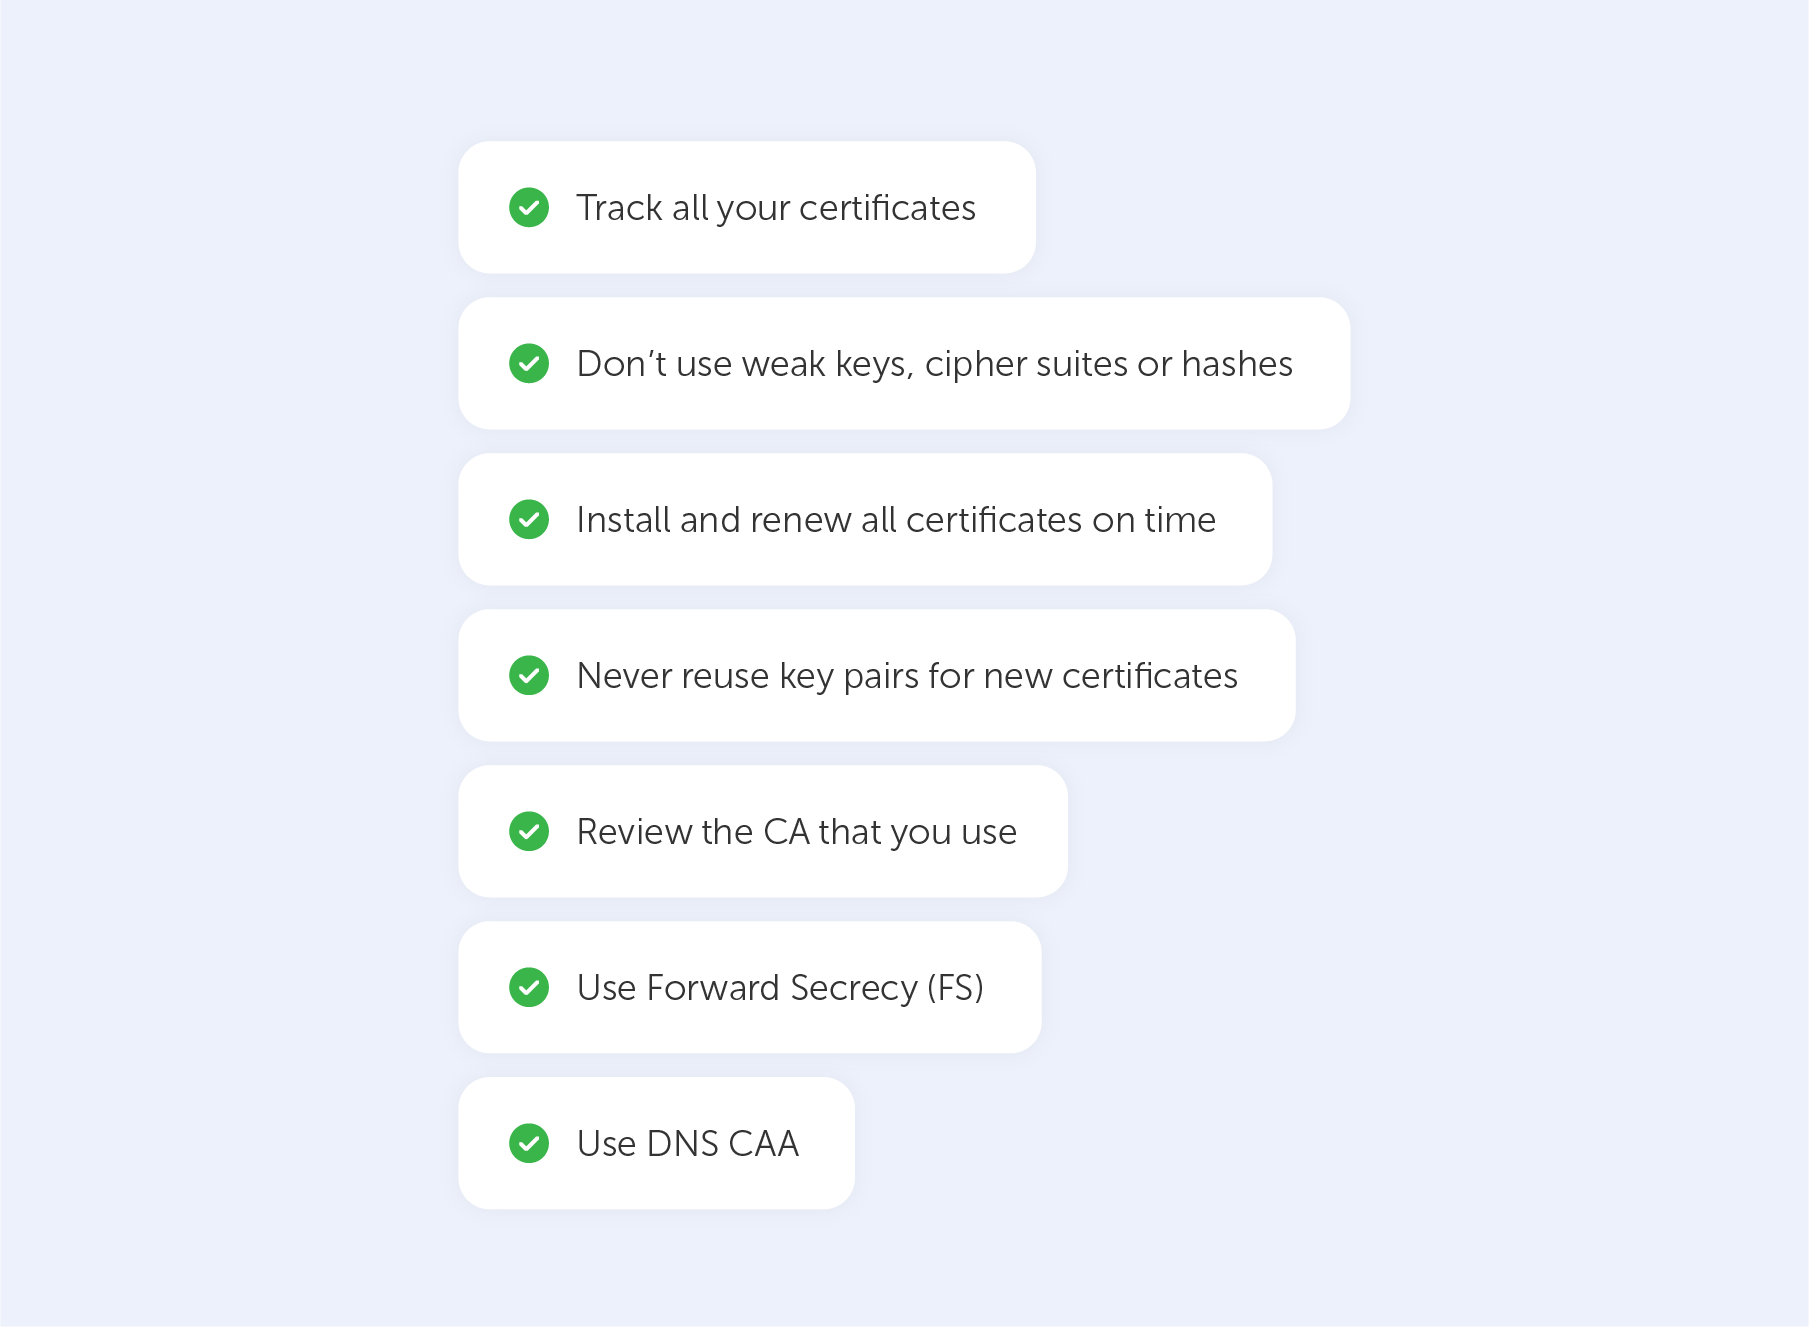
This guide will provide you with a short ‘checklist’ to keep in mind when setting up or maintaining SSL/TLS with a focus on security. All information is accurate and up to date as of December 2021 and is based on both our experience and other guides made on this topic.

Track all your certificates

First and foremost, you should check up on all existing certificates that are used by you and your organisation. This covers all information about them, such as their owners, locations, expiration dates, domains, cipher suites, and TLS versions.

If you don’t know about, or don’t track existing certificates as well as weak keys and cipher suites, you expose yourself to security breaches connected to expiring certificates.

An easy way to list all your certificates is to get them from your CA. This may not work if you used self-signed certificates, which require additional attention in terms of tracking/listing. The second way, which is typically quite effective, is to obtain certificates using network scanners. Hopefully, the enormous number of certifications that you were unaware of will not surprise you. Your certificate ‘inventory’ should focus on details such as OS and applications like Apache, just because your organization could be vulnerable to exploits that attack specific versions of things like OpenSSL (i.e., Heartbleed).

So, your list of certificates should include:

  1. Certificates issued
    • Certificate types
    • Key sizes
    • Algorithms
    • Expiration dates
  2. Certificate locations
  3. Certificate owners
  4. Web server configurations
    • O/S versions
    • Application versions
    • TLS versions
    • Cipher suites

Don’t use weak keys, cipher suites or hashes

Every certificate has a public key and a signature, both of which may be vulnerable if they were created with outdated technology. On public web servers, certificates with key lengths of less than 2048 bit or those that employ older hashing algorithms like MD5 or SHA-1 are no longer allowed. These may, however, be found on your internal services. If that's the case, you'll need to upgrade them.

The requirement to check TLS/SSL versions and cipher suites supported on your web servers is much more crucial than finding certificates with weak keys or hashes.

The following versions are outdated and must never be used:
• SSL v2
• SSL v3
• TLS 1.0
• TLS 1.1
Instead, enable TLS 1.2 and TLS 1.3.

The following cipher suites are vulnerable, and must be disabled:
• DES
• 3DES
• RC4
Instead, use modern ciphers like AES.

Install and renew all certificates on time

We recommend renewing a certificate at least 15 days before it expires to allow time for testing and reverting to the prior certificate if any problems arise.

Users should be notified when certificates expire, regardless of the mechanism you employ. Before expiration, the system should alert users automatically and at regular intervals (e.g., 90 days). Self-signed certificates should never have an expiration date of more than 30 days.

Never reuse key pairs for new certificates

By the same token, never reuse CSRs (Certificate Signing Requests) — this will automatically reuse the private key. Reusing keys leads to key pair vulnerability. Don’t be lazy when it comes to your security.

Review the CA that you use

Your certificates are only as trustworthy as the CA that issues them. All publicly trusted CAs are subject to rigorous third-party audits to maintain their position in major operating system and browser root certificate programs, but some are better at maintaining that status than others.

Use Forward Secrecy (FS)

Also known as perfect forward secrecy (PFS), FS assures that a compromised private key will not also compromise past session keys. To enable it, use at least TLS 1.2 and configure it to use the Elliptic Curve Diffie-Hellman (EDCHE) key exchange algorithm. The best practice here would be to use TLS 1.3 as it provides forward secrecy for all TLS sessions using the Ephemeral Diffie-Hellman key exchange protocol ‘out of the box’.

Use DNS CAA

DNS CAA is a standard that allows domain name owners to restrict which CAs can issue certificates for their domains. In September 2017, the CA/Browser Forum mandated CAA support as part of its certificate issuance standard baseline requirements. The surface area prone to attack is certainly shrunk with CAA in place, effectively making sites more secure. If CAs have an automated mechanism in place for certificate issuance, they should check for DNS CAA records to prevent certificates from being issued incorrectly. It is advised that you add a CAA record to your certificate to whitelist a CA. Add certificate authorities (CAs) that you trust.

Keep in mind that encryption is not an option.

Enforce encryption across your entire infrastructure — no 'bald spots' should remain. Leaving elements of your infrastructure unprotected is like forgetting to lock the door when you leave — it's not a good idea.

The practices that we’ve mentioned in this list are more about common sense, rather than knowledge acquired through the ultra-secret bureau. When it comes to security, you should always keep your infrastructure up-to-date. New vulnerabilities pop up every day, but still, we, humans, pose the biggest threat of all. In other words, human error has more to answer for than we might first believe. Because of this, double-check everything you do. Security protocols should be easy to follow not only by the person who creates them but also by everyone who interacts with your infrastructure — users and employees alike.

With such a checklist, it’s impossible to shine a light on each and every nook and cranny, so for those of you who want to ensure that you’re following all best practices, consider checking out this list.

SSL best practices to improve your security

Nov 25, 2021 — 7 min read

Most web servers across the internet and intranets alike use SSL certificates to secure connections. These certificates are traditionally generated by OpenSSL – a software library containing an open-source implementation of the SSL and TLS protocols. Basically, we’re looking at a core library, providing us with a variety of cryptographic and utility functions. Because of its ease-of-use and, most importantly, because it’s open-source (so, free), it managed to make its way to the top, and now, it’s the industry standard.

OpenSSL is available for Windows, Linux and MacOS. So, before you get started, make sure that you have OpenSSL installed on your machine. Here’s a list of precompiled binaries for your convenience. But, to be honest, the OS doesn’t really matter here too much – the commands are going to be identical in our case.

In this tutorial, we’ll show you how easy it can be to generate self-signed certificates with OpenSSL.

Such a self-signed certificate is great if you want to use HTTPS (HTTP over TLS) to secure your Apache HTTP or Nginx web server, and you know that your certificate doesn’t need to be signed by a CA.

How should I use OpenSSL?

OpenSSL is all about its command lines. Below, we’ve put together a few common OpenSSL commands that regular users can fiddle about with to generate private keys. After each command, we’ll try to explain what that exact line of code does by breaking it down into its constituent parts. If you fancy studying all of the commands, take a look at this page.

How can I generate self-signed certificates?

Let’s start! First and foremost, we want to check whether we have OpenSSL installed. To do that, we need to run:

openssl version -a

If you get something like this, you’re on the correct path:

OpenSSL 3.0.0 7 sep 2021 (Library: OpenSSL 3.0.0 7 sep 2021)
built on: Tue Sep  7 11:46:32 2021 UTC
platform: darwin64-x86_64-cc
options:  bn(64,64)
compiler: clang -fPIC -arch x86_64 -O3 -Wall -DL_ENDIAN -DOPENSSL_PIC -D_REENTRANT -DOPENSSL_BUILDING_OPENSSL -DNDEBUG
OPENSSLDIR: "/usr/local/etc/openssl@3"
ENGINESDIR: "/usr/local/Cellar/openssl@3/3.0.0_1/lib/engines-3"
MODULESDIR: "/usr/local/Cellar/openssl@3/3.0.0_1/lib/ossl-modules"
Seeding source: os-specific
CPUINFO: OPENSSL_ia32cap=0x7ffaf3bfffebffff:0x40000000029c67af

This code effectively specifies the SSL version that you have installed and some other details.

Now, the first important thing on our agenda is to generate a Public/Private keypair. To do this, we ought to punch in the following command:

openssl genrsa - out passwork.key 2048

genrsa – is the command to generate a keypair with the RSA algorithm;

-out passwork.key – this is the output key file name;

2048– key size. Make sure to double-check your requirements at this stage, because that value may change depending on your use case.

Now we have the file ‘passwork.key’ in a directory that we’ve specified. Once we’ve created a file we can, for example, extract the public key by running:

openssl rsa -in passwork.key -pubout -out passwork_public.key

rsa – we ought to specify the algorithm that we used;

-in passwork.key – we take the existing keypair;

-pubout – here, we take only public key;

-out passwork_public.key – we’re exporting this as a file with name passwork_public.key.

Now we may proceed to creating a CSR – Certificate Signing Request. In a real production scenario, such a CSR is forwarded to the CA which signs it on your behalf, so you get a certificate. But for the sake of our tutorial, we’ll create a CSR and self-sign it.

The command to create a CSR is as follows:

openssl req -new -key passwork.key -out passwork.csr

req -new – here, we’re specifying that we want to create something new;

-key passwork.key – here, we’re specifying the key that we will use;

-out passwork.csr – here, we’re specifying the output file.

After pressing ‘Enter’ you’ll see something like this:

You are about to be asked to enter information that will be incorporated
into your certificate request.
What you are about to enter is what is called a Distinguished Name or a DN.
There are quite a few fields but you can leave some blank
For some fields, there will be a default value,
If you enter '.', the field will be left blank.

Enter the required data. For the purposes of our tutorial, we’ve entered the following fake values:

-----
Country Name (2 letter code) [AU]:US
State or Province Name (full name) [Some-State]:FL
Locality Name (eg, city) []:Tallahassee
Organization Name (eg, company) [Internet Widgits Pty Ltd]:Passwork
Organizational Unit Name (eg, section) []:.
Common Name (e.g. server FQDN or YOUR name) []:*.passwork.com
Email Address []:[email protected]
Please enter the following 'extra' attributes
to be sent with your certificate request
A challenge password []:
An optional company name []:

One of the most important fields is Common Name, which should match the server name or FQDN where the certificate is going to be used.

After all the above-mentioned steps, we’ll have our CSR file fully generated. In the real world, at this stage, we’d want to verify our CSR file, just so we’re not passing the wrong file to the CA. Also, it’s good practise to double-check whether the FQDN is correct.

Having all that in mind, we run:

openssl req -text -in passwork.csr -noout -verify

The output, in our case, would be:

Certificate request self-signature verify OK
Certificate Request:
   Data:
      Version: 1 (0x0)
      Subject: C = US, ST = FL, L = Tallahassee, O = Passwork, CN = *.passwork.com, emailAddress = [email protected]
      Subject Public Key Info:
         Public Key Algorithm: rsaEncryption
            Public-Key: (2048 bit)
            Modulus:
               00:dd:c9:5a:27:82:00:0e:cc:43:c2:99:3a:e7:0a:
               b7:c2:96:06:f1:30:d6:3e:de:7c:6d:f1:98:66:cf:
               9d:8a:9c:09:43:a9:ab:59:0f:19:29:44:ec:2d:73:
               47:38:94:78:1b:4f:16:b6:4a:2b:45:55:0f:39:56:
               96:c3:53:e6:65:db:f7:91:b1:cb:36:e7:4b:cd:cd:
               bb:6b:36:9e:92:c9:5e:cc:09:de:f6:ca:43:66:14:
               21:b1:f9:37:56:22:6a:4f:3c:c5:08:5a:ab:81:19:
               88:a3:ee:87:9c:c6:1c:d5:42:71:35:33:cd:f4:ed:
               59:81:c6:eb:f3:02:da:43:e0:ce:f9:a5:6a:ca:d4:
               39:81:b3:17:68:4b:9a:a4:e0:41:55:c7:46:5d:38:
               05:f7:cc:7b:0b:80:b8:63:f4:91:81:d8:80:7c:00:
               11:e0:55:19:07:23:4a:5d:08:8e:8d:fc:c6:05:59:
               12:d1:7a:de:50:c4:d3:41:5f:b2:73:33:8b:2d:b7:
               80:a3:f4:66:b1:80:d1:22:01:71:b7:5d:75:a7:df:
               ae:e8:bd:22:32:30:71:54:56:ae:a6:b3:38:be:29:
               bb:af:be:01:65:fb:d4:66:84:b0:f0:fb:4b:58:c2:
               0e:3e:ee:9c:01:05:2e:02:7a:e1:42:71:c2:66:80:
               f7:27
            Exponent: 65537 (0x10001)
      Attributes:
         (none)
         Requested Extensions:
   Signature Algorithm: sha256WithRSAEncryption
   Signature Value:
      84:db:c8:7c:62:f3:54:85:c4:df:b9:c5:f5:2d:7a:c9:01:b1:
      2b:2b:69:a4:d6:ff:e8:8c:ef:39:dd:27:52:de:ba:58:67:5e:
      9a:37:c2:5c:2e:1c:58:7e:5b:f6:5d:cf:c5:f7:39:17:20:5f:
      82:bb:a5:52:bb:23:b9:b4:1a:c5:99:8d:1e:68:c9:1c:7e:a1:
      e1:39:9b:5e:b6:d4:22:17:38:fe:c8:8e:a5:82:da:ab:c9:ae:
      63:e6:42:5a:e0:09:50:a5:86:5a:8b:82:0c:0b:df:40:54:0d:
      9f:ec:b5:71:79:08:84:04:85:fc:6c:7b:63:38:37:b0:6d:20:
      10:2b:51:8a:dd:36:e6:92:c0:b6:9c:2e:86:c9:5a:55:3c:52:
      26:2b:8c:3d:80:35:fa:2a:40:c0:9e:d3:f2:e5:0e:78:e8:ea:
      d2:6f:ef:00:77:45:e5:1b:cc:df:da:52:b2:14:c9:23:09:f0:
      9b:5e:f5:9d:7d:df:e6:82:d1:b7:3a:a4:34:b5:df:bb:d6:fa:
      fe:85:47:6e:63:51:c3:d2:9d:11:43:16:2c:3e:df:44:0b:a7:
      08:1a:58:d5:f3:3d:49:a0:52:b7:6f:85:06:5d:da:3f:10:db:
      33:4f:71:38:6d:f6:e2:0e:ad:e1:74:35:27:09:a5:90:92:18:
      fc:96:30:54

As you can see, it lists crucial data that you provided when you answered questions related to the CSR. Check the values and if something is wrong – simply re-generate the CSR before you pass it on to the CA.

As we mentioned before, instead of passing our CSR to the CA, we’ll create a self-signed certificate. In order to do that, we ought to enter the following:

openssl x509 -in passwork.csr -out passwork.crt -req -signkey passwork.key -days 30

The  ‘X509’ command is our multi purpose certificate utility;

-in passwork.csr represents our CSR;

-out passwork.crt is the name and file extension for our certificate;

-req signkey passwork.key – here, we’re specifying the keypair that we want to use to sign our certificate;

-days 30 – this is an expiration time interval for our certificate.

The passwork.crt certificate file has now been generated, so it’s ready to go! Pretty easy, right? Well, it gets a lot easier when we remember that we can generate a self-signed certificate by just entering:

openssl req \
-newkey rsa:2048 -nodes -keyout passwork.key \
x509 -days 365 -out domain.crt

Here, a temporary CSR is generated, so we don’t have to enter all the data manually.

Please bear in mind that in real-life situations, you should follow best practice when creating a private key, they can be easily generated and therefore compromised.

Conclusion

We’ve barely touched the functionalities within OpenSSL, but as you can see, it’s not as complicated as many people first think – that’s why it’s loved far and wide. If you’ve still got any unanswered and burning questions, feel free to check out the frequently-asked questions (FAQ) page on the OpenSSL project’s website. If that’s not enough and you’re really looking for a deep dive – we can’t recommend this free e-book highly enough.

What OpenSSL is used for?

Nov 17, 2021 — 5 min read

Stuck between a proxy and a hard place

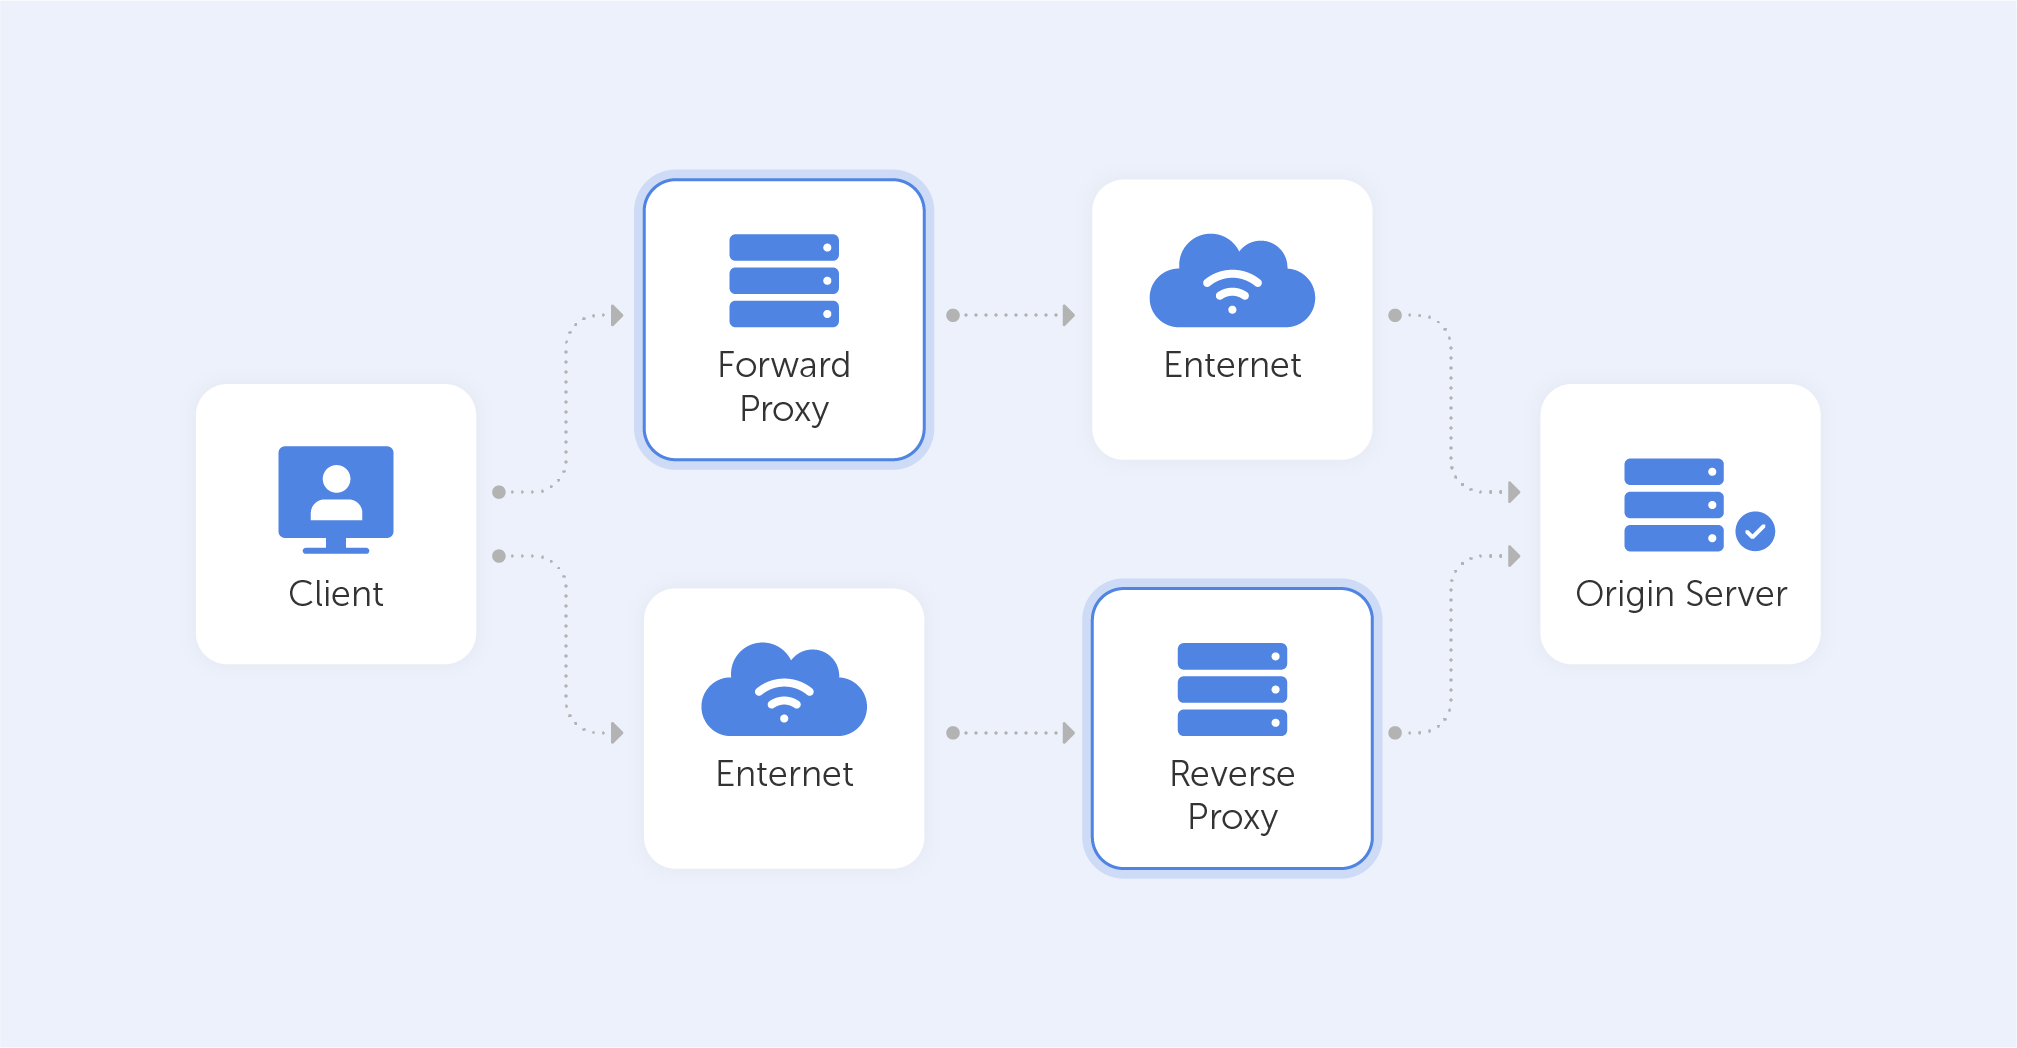
Let’s imagine that you’re managing a small team, all of whom are coming back to work after a relaxing furlough period. Of course, you’re going to notice a drop in productivity; your team has become accustomed to browsing YouTube between Zoom calls and messaging their friends on Facebook. The solution? A ‘forward proxy’, which is the kind of proxy you’re likely to be familiar with. This will make sure that employees are prompted to get the ‘Pass’ back to work, should they try to access social networking.

Now, perhaps you have an update scheduled for your website, but you’re still not sure whether you’ve caught all the bugs. Or, maybe you want to scale your infrastructure in a ‘plug'n'play’ way. How are you going to test out new features on a certain percentile of your users? Here, you’ll find faithful solace in the almighty powers of the ‘reverse proxy’.

Whether you’re looking to learn more about forward or reverse proxies, today we’ll take a deep dive and explore how you can level up your business’ IT infrastructure through their use.

So, what’s a proxy server?

A proxy server is effectively a gateway between networks or protocols. They usually separate the end-user from the server. They also can alter or redirect the connection or data that passes through. Moreover, proxies come in a variety of 'tastes and colours' depending on their use case, the system complexity, privacy requirements, and so on.

If you’re using a proxy server, any data you send to the external network ought to flow through it beforehand. Also, it works both ways, so you, the client, cannot be reached by someone on the external net without that data first being sent through the proxy.

Importantly, there are two main types of proxies: Forward Proxies and Reverse Proxies. And even though the principle behind these two is similar, their use cases differ greatly.

Forward Proxies

In your day-to-day life, you’ll encounter forward proxies the most – these kinds of proxies sit between the client and the external network. They evaluate outbound requests and take action on them before relaying those requests to the external resources. Forward proxy servers allow the redirecting of traffic, meaning that if you have a proxy server installed within your local enterprise or on your home network, you’re able to effectively block choice websites. Maybe you don't want your kids to watch Netflix, or Dave from accounting keeps stalking his ex on Facebook when he should be writing up a report – in both cases, installing a proxy is a great solution. VPNs have a very similar function but feature encrypted traffic flows, if you’re on the market for such a tool, we recommend ExpressVPN. We’d also recommend steering clear of free proxies as there have been notable instances of traffic logging and sale on the black market.

Now, when using proxies, servers outside your network can’t understand who the client is, so by the same token, individuals or companies using forward proxies may access material that would otherwise be banned in their country or office. That’s exactly how the ‘GreatFirewall of China’ works, and it’s also how you’re able to stream a season on Netflix that would otherwise be banned in your country. This is why your office should restrict software downloads and access to in-browser forward proxies. Otherwise, Dave is just going to fight fire with fire.

So generally speaking, forward proxies are used to filter or unfilter Web content (depending on which side of the fence you sit).

Reverse proxies

Now that we’ve explained how a forward proxy works, disguising the client’s identity from the server, you can probably guess that the reverse proxy works vice-versa; the client doesn't know what exact server it is contacting. That may be used, for example, to help you rebalance the bandwidth between your service’s servers. That way, you can connect users to servers with the lowest load, or the smallest ping. Or, if your servers have a lot of static data - such as js scripts or HTML files on your website, they can be cached on a proxy server. Big social networks use reverse proxies to distribute the traffic among users' locations and corresponding data centers. The end-user, in most cases, remains oblivious to your internal process.

Still, most webmasters use the NGINX Reverse Proxy as it allows you to easily pass any request to a proxied server, configure buffers and choose the outgoing IP address.

The benefits of using a reverse proxy for your backend infrastructure are very straightforward:

  • Load balancing – you’re able to set up your proxy server to choose the least loaded server each time a client makes a call. This will, of course, make the end-user experience incredibly smooth.
  • Caching – as mentioned before, if your users perform identical calls to your server, you can store some data on the proxy server instead of loading your servers with heaps of requests (however, don't forget that caching on a proxy can sometimes be dangerous, so approach with caution).
  • Isolating internal traffic – one of the best features indeed! You can run all your internal server architecture within a completely isolated DMZ. Also, it would remain a secret. All your port preferences, containers, virtual servers and physical servers shan’t be exposed to the outer world. This, of course, adds another layer of security to your infrastructure.
  • Logging – you can log all internal network events on your reverse proxy. This means that if one of your servers returns an error – you can query and debug it on your proxy server. Moreover, it allows you to monitor the overall performance of your infrastructure easily from a single node.
  • Canary Deployment – this means you can test some new features on only a selected percentage of users, You can also perform other AB tests. All of this allows you to significantly reduce risks when deploying updates to your service – your API calls are the same, the ports are the same, but your content is able to change dramatically.
  • Scalability – if you need more servers, set them up and add them to the list of proxied servers. That's as simple as it gets.

There are plenty of scenarios and use cases in which having a reverse proxy can make all the difference when looking to improve the speed and security of your corporate network. By providing you with a point at which you can inspect traffic and route it to the appropriate server, or even one where you may transform the request entirely, a reverse proxy can be used to achieve a variety of different goals.

Using forward and reverse proxies allows you to significantly simplify your internal infrastructure. Not only are you bound to increase efficiency by keeping Dave off of Facebook, but you’re also adding another layer of security for both your employees and your servers. Logging will allow you to track your network usage and debug certain issues. In addition, caching definitely offers a smoother and more consistent experience to your end-users. So, throw your doubts to the wind and get involved. After all, most of the other successful services do it too.

What is a Proxy Server and How Does it Work?

Nov 2, 2021 — 4 min read

Let’s imagine that somehow you’re in the driver’s seat of a start-up, and a successful one too. You’ve successfully passed several investment rounds and you’re well on your way to success. Now, big resources lead to big data and with big data, there’s a lot of responsibility. Managing data in such a company is a struggle, especially considering that data is usually structured in an access hierarchy – Excel tables and Google Docs just don’t cut the cake anymore. Instead, the company yearns for a protocol well equipped to manage data. The company yearns for LDAP.

What is LDAP?

The story of LDAP starts at the University of Michigan in the early 1990s when a graduate student, Tim Howes, was tasked with creating a campus-wide directory using the X.500 computer networking standard. Unfortunately, accessing X.500 records was impossible without a dedicated server. Additionally, there was no such thing as a ‘client app’. As a result, Howes co-created DIXIE, a directory client for X.500. This work set the foundations for LDAP, a standards-based version of DIXIE for both clients and servers – an acronym for the Lightweight Directory Access Protocol.

It was designed to maintain a data hierarchy for small bits of information. Unlike ‘Finder’ on your Mac, or ‘Windows Explorer’ on your PC, the ‘files’ inside the directory tree, although small, are contained in a very hierarchical order – exactly what you need to organize, for example, your HR structure, or when accessing a file. Compared to good old Excel, it is not a program, but rather a protocol. Essentially, a set of tools that allow users to find the information that they need very quickly.

Importantly, this protocol answers three key questions regarding data management:

Who? Users must authenticate themselves in order to access directories.
How? A special language is used that provides for query or data manipulations.
Where? Data is stored and organized in a proper manner.

Let’s now go through these key questions in greater detail.

Who?

It’s bad taste to provide internal data to any old Joe. That’s why LDAP users cannot access information without first proving their identity.

LDAP authentication involves verifying provided usernames and passwords by connecting with a directory service that uses the LDAP protocol. All this data is stored in what is referred to as a core user. This is a lot like logging into Facebook, where you’re only able to access a user’s feed and photos if they’ve accepted your friend request, or if their profile has been set to public.

Some companies that require advanced security use a Simple Authentication and Security Layer (SASL), for example, Kerberos, for the authentication process.

In addition, to ensure the maximum safety of LDAP messages, as soon as data is accessed via devices outside the company’s walls, Transport Layer Security (TLS) may be used.

How?

The main task of a data management system is to provide “many things to many users”.

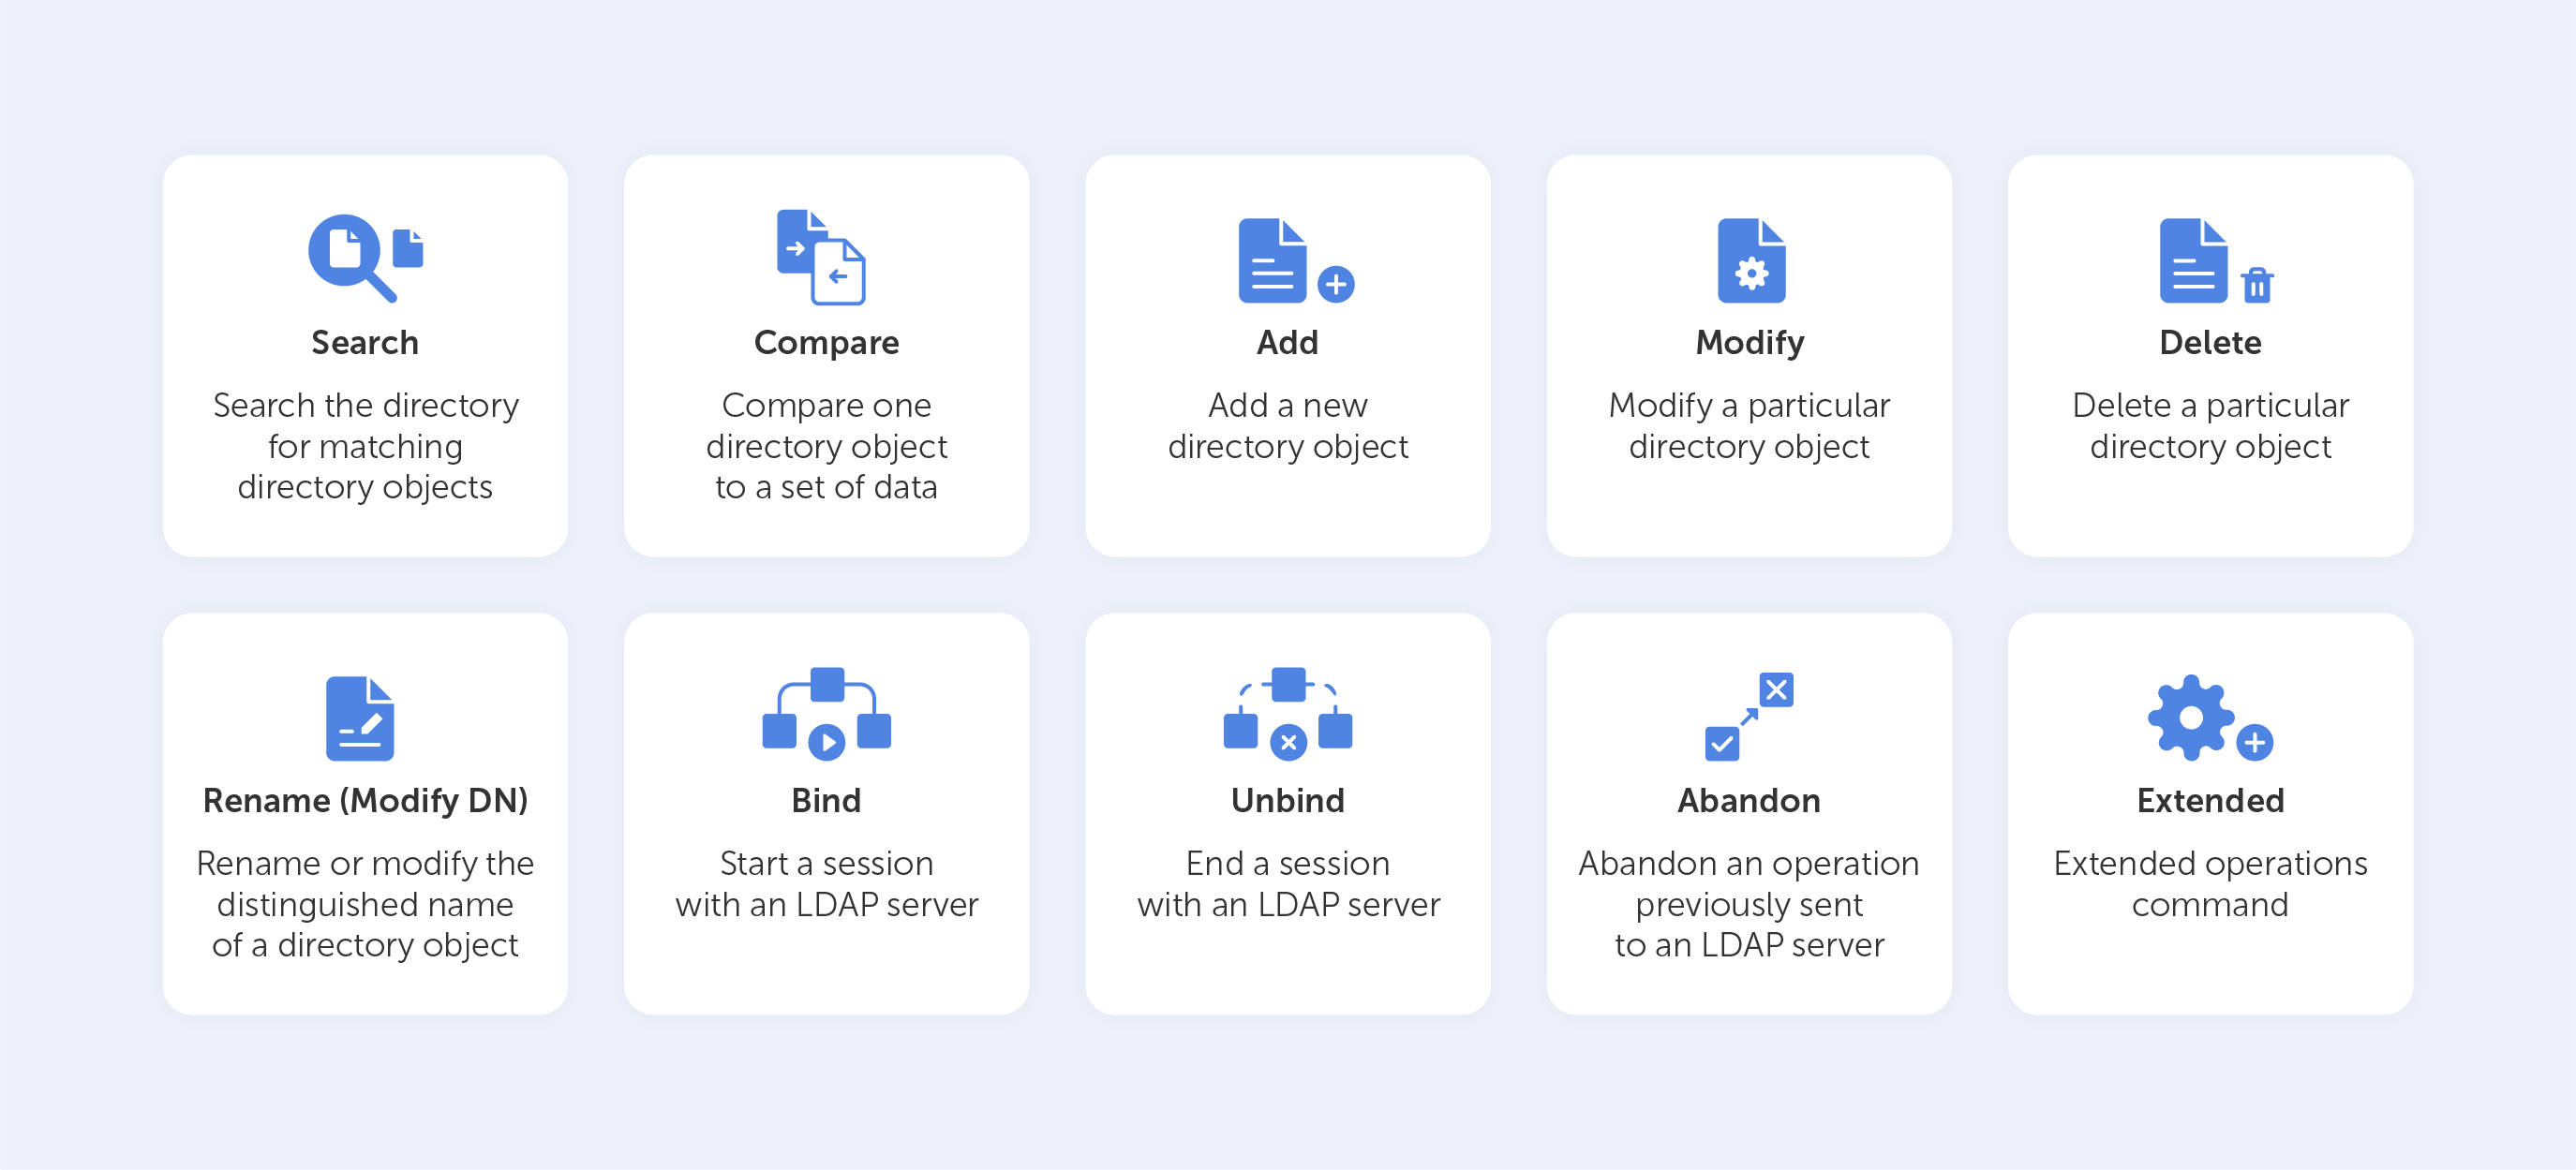
Rather than creating a complex system for each type of information service, LDAP provides a handful of common APIs (LDAP commands) to do this. Supporting applications, of course, have to be written to use these APIs properly. Still, the LDAP provides the basic service of locating information and can thus be used to store information for other system services, such as DNS, DHCP, etc.

Basic LDAP commands

Let’s look at the ‘Search’ LDAP command as an example, if you’d like to know which group a particular user is a part of, you might need to input something like this:

(&(objectClass=user)(sAMAccountName=BradleyC)
(memberof=CN=Perohouse,OU=Users,DC=perohouse,DC=com))

Isn’t it beautiful? Not quite as simple as performing a Google search, that’s for sure. So, your employees will perform all their directory services tasks through a point-and-click management interface like Varonis DatAdvantage.

All those interfaces may vary depending on their configuration, which is why new employees should be trained to use them, even if they’ve used LDAP before.

Where?

As we mentioned before, LDAP has the structure of a tree of information. Starting with the roots, it contains hierarchical nodes relating to a variety of data, by which the query may then be answered.

The root node of the tree doesn't really exist and can't be accessed directly. There is a special entry called the root directory specific entry, or rootDSE, that contains a description of the whole tree, its layout, and its contents. But, this really isn't the root of the tree itself. Each entry contains a set of properties, or attributes, in which data values are stored.

The tree itself is called the directory information tree (DIT). Branches of this tree contain all the data on the LDAP server. Every branch leads to a leaf in the end – a data entry, or directory service entry (DSE). These entries contain actual records that describe objects such as users, computers, settings, etc.

For example, such a tree for your company could start with the description of a position held, starting with you at the top as the director, finishing at the bottom with Joe Bloggs, the intern.

Each position would be tied to a person with a set of attributes, complete with links to subordinates. The attributes for a person may include their name, surname, phone number, email, in addition to their responsibilities. Each attribute would have a value inside, like ‘Joe’ for name and ‘Bloggs’ for surname.

The actual data contents may vary, as they totally depend on use. For example, you could have data issuing rights to certain people regarding the coffee machine. So, no Frappuccino for our intern Joe.

Sure, you can add more sophisticated data regarding each individual – their personal family trees, or even voice samples for instance, but typically, the LDAP would just point to the place where such data can be found.

Is it worth it?

LDAP is able to aggregate information from different sources, making it easier for an enterprise to manage information. But as with any type of data organization, the biggest difficulty is creating a proper design for your tree. There is always trial and error involved while building a directory for a specific corporate structure. Sometimes this process is so difficult that it even results in the reorganization of the company itself in favour of the hierarchical model. Despite this, for almost thirty years, the LDAP has held its title as the most efficient solution for the organization of corporate data.

What is LDAP and how does LDAP authentication work?

Aug 30, 2021 — 7 min read

Information technology is developing by leaps and bounds. There are new devices, platforms, operating systems, and a growing range of problems, which need to be solved by developers.

But, it’s not so bad—new development tools, IDEs, new programming languages, methodologies, etc., rush to help programmers. The list of programming paradigms is impressive, and with the modern multi-paradigm PL (e.g., C#), it is reasonable to ask: «What is the best way to handle it? What to choose?»

Let’s try to figure this answer out.

From where did so many paradigms come?

In fact, the answer has already been stated in this post—different types of tasks are now easier and faster to solve, using the appropriate paradigm. Accordingly, new types of problems have appeared with the IT evolution (or the old ones become relevant), and solving them using the old approach is not suitable and it is inconvenient, which resulted in rethinking things and the development of new techniques.

What to choose?

Everything depends on what is required. It is worth noting that all the development tools are different. For example, PHP with a «standard» set of modules does not support aspect-oriented programming. Therefore, the choice of methodology is quite closely linked to the development platform. Oh, and do not forget that you can combine different approaches, which leads us to the choice of stacking paradigms.

For paradigm categorization, I used to use four dimensions that are inherent in almost any task:

Data
Any program somehow works with data: stores, processes, analyzes, reports.

Actions
Any program should do something—the action is usually connected with the data.

Logic
Logic or business logic defines the rules that govern the data and actions. Without the program, logic does not make sense.

Interface
How the program interacts with the outside world.

We can go further and get deeper into this idea to come up with quality characteristics for these four measures, creating strict rules and adding in a little math, but this is perhaps a topic for another post. I think most system architects determine the characteristics of the data for a specific task on the basis of their knowledge and experience.

Once you analyze your problem to these four dimensions, it is likely that you will see that a certain dimension is expressed stronger than the other. And this in turn will determine the programming paradigm, as they usually focus on some singular dimension.

Consider this example

Orientation to the data (Data-driven design)

Data is in the consideration, rather than how they are related to each other

Types of suitable applications:

1. Grabbers/crawlers (collect data from different sources, save somewhere)
Various admin interfaces to databases; everything with a lot of simple CRUD operations.
2. Cases, when the resource is already defined, for example, it requires the development of a program and the database already exists and you can’t change the schema of the data. In this case, it may be easier to focus on what is already done, rather than creating additional wrappers over data and data access layers. Using an ORM often leads to data-driven, but it is impossible to say in advance if it is good or bad (see below).

Orientation to actions—imperative approaches to development

Event-driven Programming, Aspect-oriented Programming, etc.

Orientation to logic: Domain-driven design (DDD) and everything connected with it

Here we have an important subject area task. We pay attention to the modeling of objects, analysis of the relationships and dependencies. This is mainly used in business applications, and it is a declarative approach, and partly functional programming (tasks that are well described by mathematical formulas) is a part of DDD as well.

Orientation on the interface

Used when it is first important as the program interacts with the outside world.
An applications development with a focus only on the interface is a situation that is quite rare. Although some of the books I’ve read mention the fact that such an approach was considered seriously, and is based on the user interface, meaning it takes what the user sees directly and, on this basis, designs the data structures and everything else.

Orientation to the user interface in business applications is often manifested indirectly. For example, the user wants to see the specific data that is difficult to obtain due to what additional structures the architecture acquires (e.g., forced redundancy data). Formally, event-driven programming is included here.

What about real life?

Based on my experience, I can say that two approaches are indicated: focus on data (data-driven) and focus on logic (domain-driven). In fact, they are competing methodologies, but in practice can be combined in symbiosis, which is often known as anti-patterns.

One of the advantages of data-driven over domain-driven is the ease of use and implementation. Therefore, data-driven is used where it is necessary to apply the domain-driven (and often this happens unconsciously). Problems arise from the fact that the data-driven is hardly compatible with the concepts of object-oriented programming (of course, if you do use OOP). In small applications, these problems are almost invisible. In medium-sized applications, these problems are already visible and begin to lead to anti-patterns. On major projects, problems become serious and require appropriate action.

In turn, domain-driven wins on major projects, but on small, it complicates the solution and requires more resources for development, which is often critical in terms of business requirements (to bring the project to the market «asap», for a small budget).

To understand the differences in the approaches, consider a more concrete example. Suppose we want to develop a system of accounting for sales orders. We have things such as:

1. Product
2. Customer
3. Quote
4. Sales Order
5. Invoice
6. Purchase Order
7. Bill

Deciding what the scope is at a glance, we begin to design the database. Create the appropriate tables, run the ORM, generate essential classes (well, in the case of a smart ORM, put this scheme somewhere separately, for example, XML, and generate a database and essential classes). Finally, we get an independent class for each essence. Enjoy life; it’s easy and simple to work with objects.

Time passes, and we need to add additional logic in the program, for example, to find the products with the highest price. There may already be a problem if your ORM does not support external communication (i.e., essential classes do not know anything about the context of the data). In this case, it is necessary to create a service, which is a method, to return the suitable product for the order. But our good ORM can work with external relations, and we simply add a method to the class order. Enjoy life again; the goal is achieved, the method is added in a class, and we have almost the real OOP.

Time passes, and we need to add the same method for the quote, for the invoice, and for other similar entities. What to do? We can simply add this method in all classes, but it will, in fact, code duplication and backfire with the support and testing. We want to avoid complicating and simply copy methods in all classes. Then there are similar methods, and the essential classes begin to swell with the same code.

Time passes, and there is a logic that can’t be described by the external connections in the database. In this case, there is no way to place it in an essential class. We begin to create services that perform these functions. As a result, we find that the business logic is scattered by essential classes and services, and understanding where to look for the correct method is becoming increasingly difficult. Decide to refactor and to move out repetitive code in services—highlight common functionality into the interface (for example, make the interface IProductable, i.e., something that contains products). Services can work with these interfaces, thereby winning a little in abstraction. But it does not fundamentally solve the problem; we get more methods in the services and solutions for the unity of the painting techniques to transfer all the essential services in the classes. Now we know where to look for methods, but our essential classes lost any logic, and we got the so-called «anemic model.»

At this stage, we are completely gone from the concept of OOP—the object stores only the data, all the logic is in separate classes, and there is no encapsulation and no inheritance.

It is worth noting that this is not as bad as it may seem—nothing prevents implementing unit testing and the development through testing (TDD) to integrate dependency management patterns (IoC, DI), etc.. In short, we can live with it. Problems arise when the application will grow large—when we get so many entities that it’s unrealistic to keep in mind. In this case, the support and development of such an application would be a problem.

As you have probably guessed, this scenario describes the use of the data-driven approach and its problems.
In the case of domain-driven, we would proceed as follows. Firstly, there is no database designing in the first stage. We would need to carefully analyze the problem domain context, model it, and move on to OOP language.

For example, we can create an abstract model of the document, which would have a set of basic properties. Inherit from this a document that has the products, to inherit from this a «payment» document, with the price and billing address, and so on. With this approach, it’s pretty easy to add a method that finds the most expensive product—we just add it to the appropriate base class.

As a result, the scope of the problem will be described using the OPP to the fullest.
But there are obvious problems: how to store data in the database? Actually, it will require the creation of a function for mapping data from models to the fields in the database. Such a mapper can be quite complex, and when you change models, you also need to change the mapper.

Moreover, you are not immune from errors in the modeling, which can lead to complex refactoring.

Summary:
Data-driven vs Domain-driven

Data-driven

Pros

1. Allows you to quickly develop an application or prototype
2. Convenient to design (code generation, scheme, etc.)
3. Can be a good solution for small or medium-sized projects

Cons

1. Can lead to anti-patterns and loss of the OOP
2. Leads to chaos on large projects, complex support, etc.

Domain-driven

Pros

1. Use the power of OOP
2. Allows you to control the complexity of the scope (domain)
3. There are a number of advantages that are not described in the article, for example, the creation of the domain of language and the use of BDD
4. Provides a powerful tool for developing complex and large solutions

Cons

1. Requires significantly more resources for the development, which leads to greater solutions cost
2. Certain parts are becoming harder to support (mapper data, etc.)

So, what the hell should I choose?

Unfortunately, there is no single answer. Analyze your problem, resources, prospects, goals, and objectives. The right choice is always a compromise.
Application design: Data-driven vs Domain-driven