According to a survey conducted in February 2021, 46% of participants stated that on average, they spent five to six hours on their phone on a daily basis.
That means for almost half of you, a quarter of your life’s security will be dictated by your choice of mobile platform. However, how safe are these popular phone platforms? Because mobile devices have grown to be so important and pervasive in people's lives, they have piqued the interest of criminal hackers looking to steal your personal information.
The technology itself is always advancing, and that’s why we’re not looking to compare specific Android or iOS versions today, but rather the core principles and philosophy behind Apple and ‘the rest’ — which importantly, have consequences in terms of privacy and security.
Let’s start with the most common threat.
App Control
Usually, when it comes to installing an app, there is only one common method to do it — via a specific Store — for example, Google Play or the AppStore. On both platforms, the uploaded application will next go through an app review procedure to verify that it is not dangerous and does not breach any developer policies.
These rules are designed to guarantee that the app's content is suitable, that it doesn't copy other applications or people, that it follows monetization standards, and that it meets the minimum functionality criteria (it should not crash all the time, and it should respect the user experience, for instance).
The problem is that employees tasked with determining whether applications meet particular requirements may be unaware of what the app actually does with personal data. The number of Android and iOS applications (as well as their creators) is constantly growing, and as a consequence, corporations have had to recruit more reviewers in recent years.
And we all know what happens when a firm adds thousands of people all at once: the learning management system becomes difficult to scale, and not all employees are effectively onboarded.
As far as we can tell, the greatest difference in approach is that Apple has actual people checking each app 100 percent of the time, while Google attempts to automate this process as much as possible — and it consistently causes difficulties for them.
According to a report issued in November 2020 by the NortonLifeLock Research Group, between 10% and 24% of 34 million apps scattered over 12 million Android devices might be classified as harmful or possibly undesired apps, depending on your classifications.
Of those applications, 67% were installed from the Google Play Store. The researchers mention that:
"The Play market is the main app distribution vector responsible for 87% of all installs and 67% of unwanted installs”
So, if you’re a person that loads tons of apps while searching for “the perfect one” — consider deleting the underdogs — the fewer apps you have on your phone, the better.
Permission control and telemetry
The most serious danger to your mobile security comes from apps that request too many access permissions and subsequently leak your information.
While the app store is mostly responsible for filtering out malware riffraff that affects a disproportionate number of Android users, iPhone users are not immune to assaults.
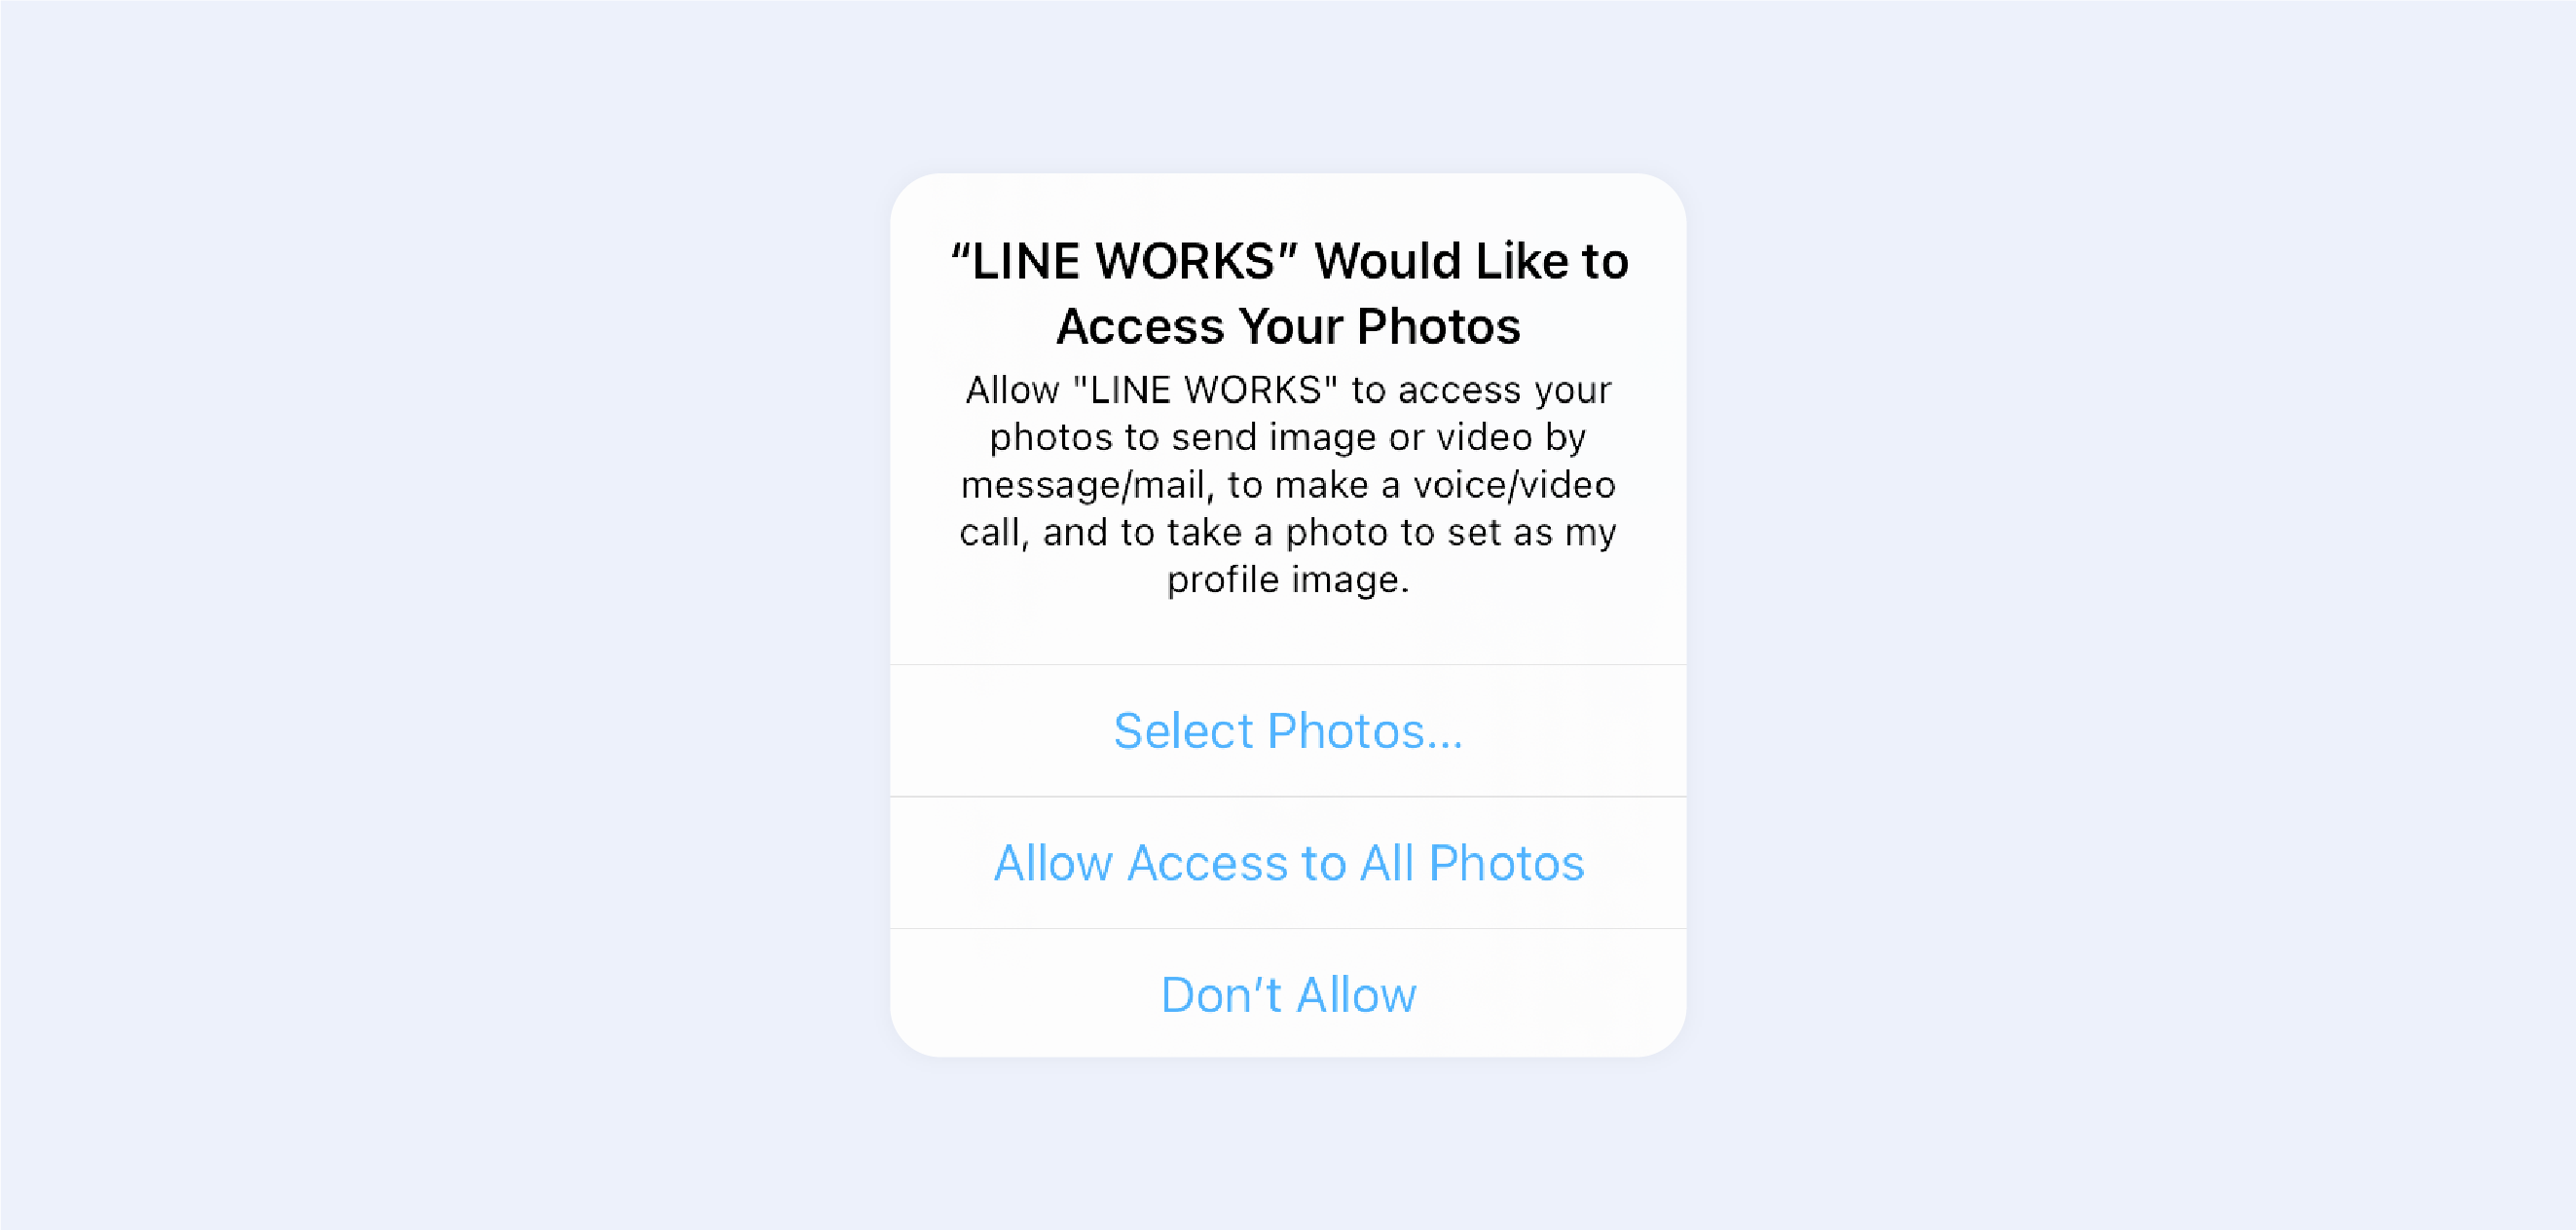
And what we mean is that while most iOS users believe they are secure, they are not. First and foremost, when an app gains access to, say, 'All photos,' few users realize that the app may load all of your images in the background, use machine learning to find NSFW content, and discreetly submit it all to a server. Moreover, you won't get the cool camera access dot appearing if the app does that.

Furthermore, even if you disable all of the app's permissions, the app may still gather and monitor a range of data. Every app can monitor 29 highly detailed data points about your iPhone, according to an examination by researchers at privacy software firm Lockdown and The Washington Post, including your IP address, free storage, your current volume level (to 3 decimal points), and even your battery status (to 15 decimal points).
But what about Android?
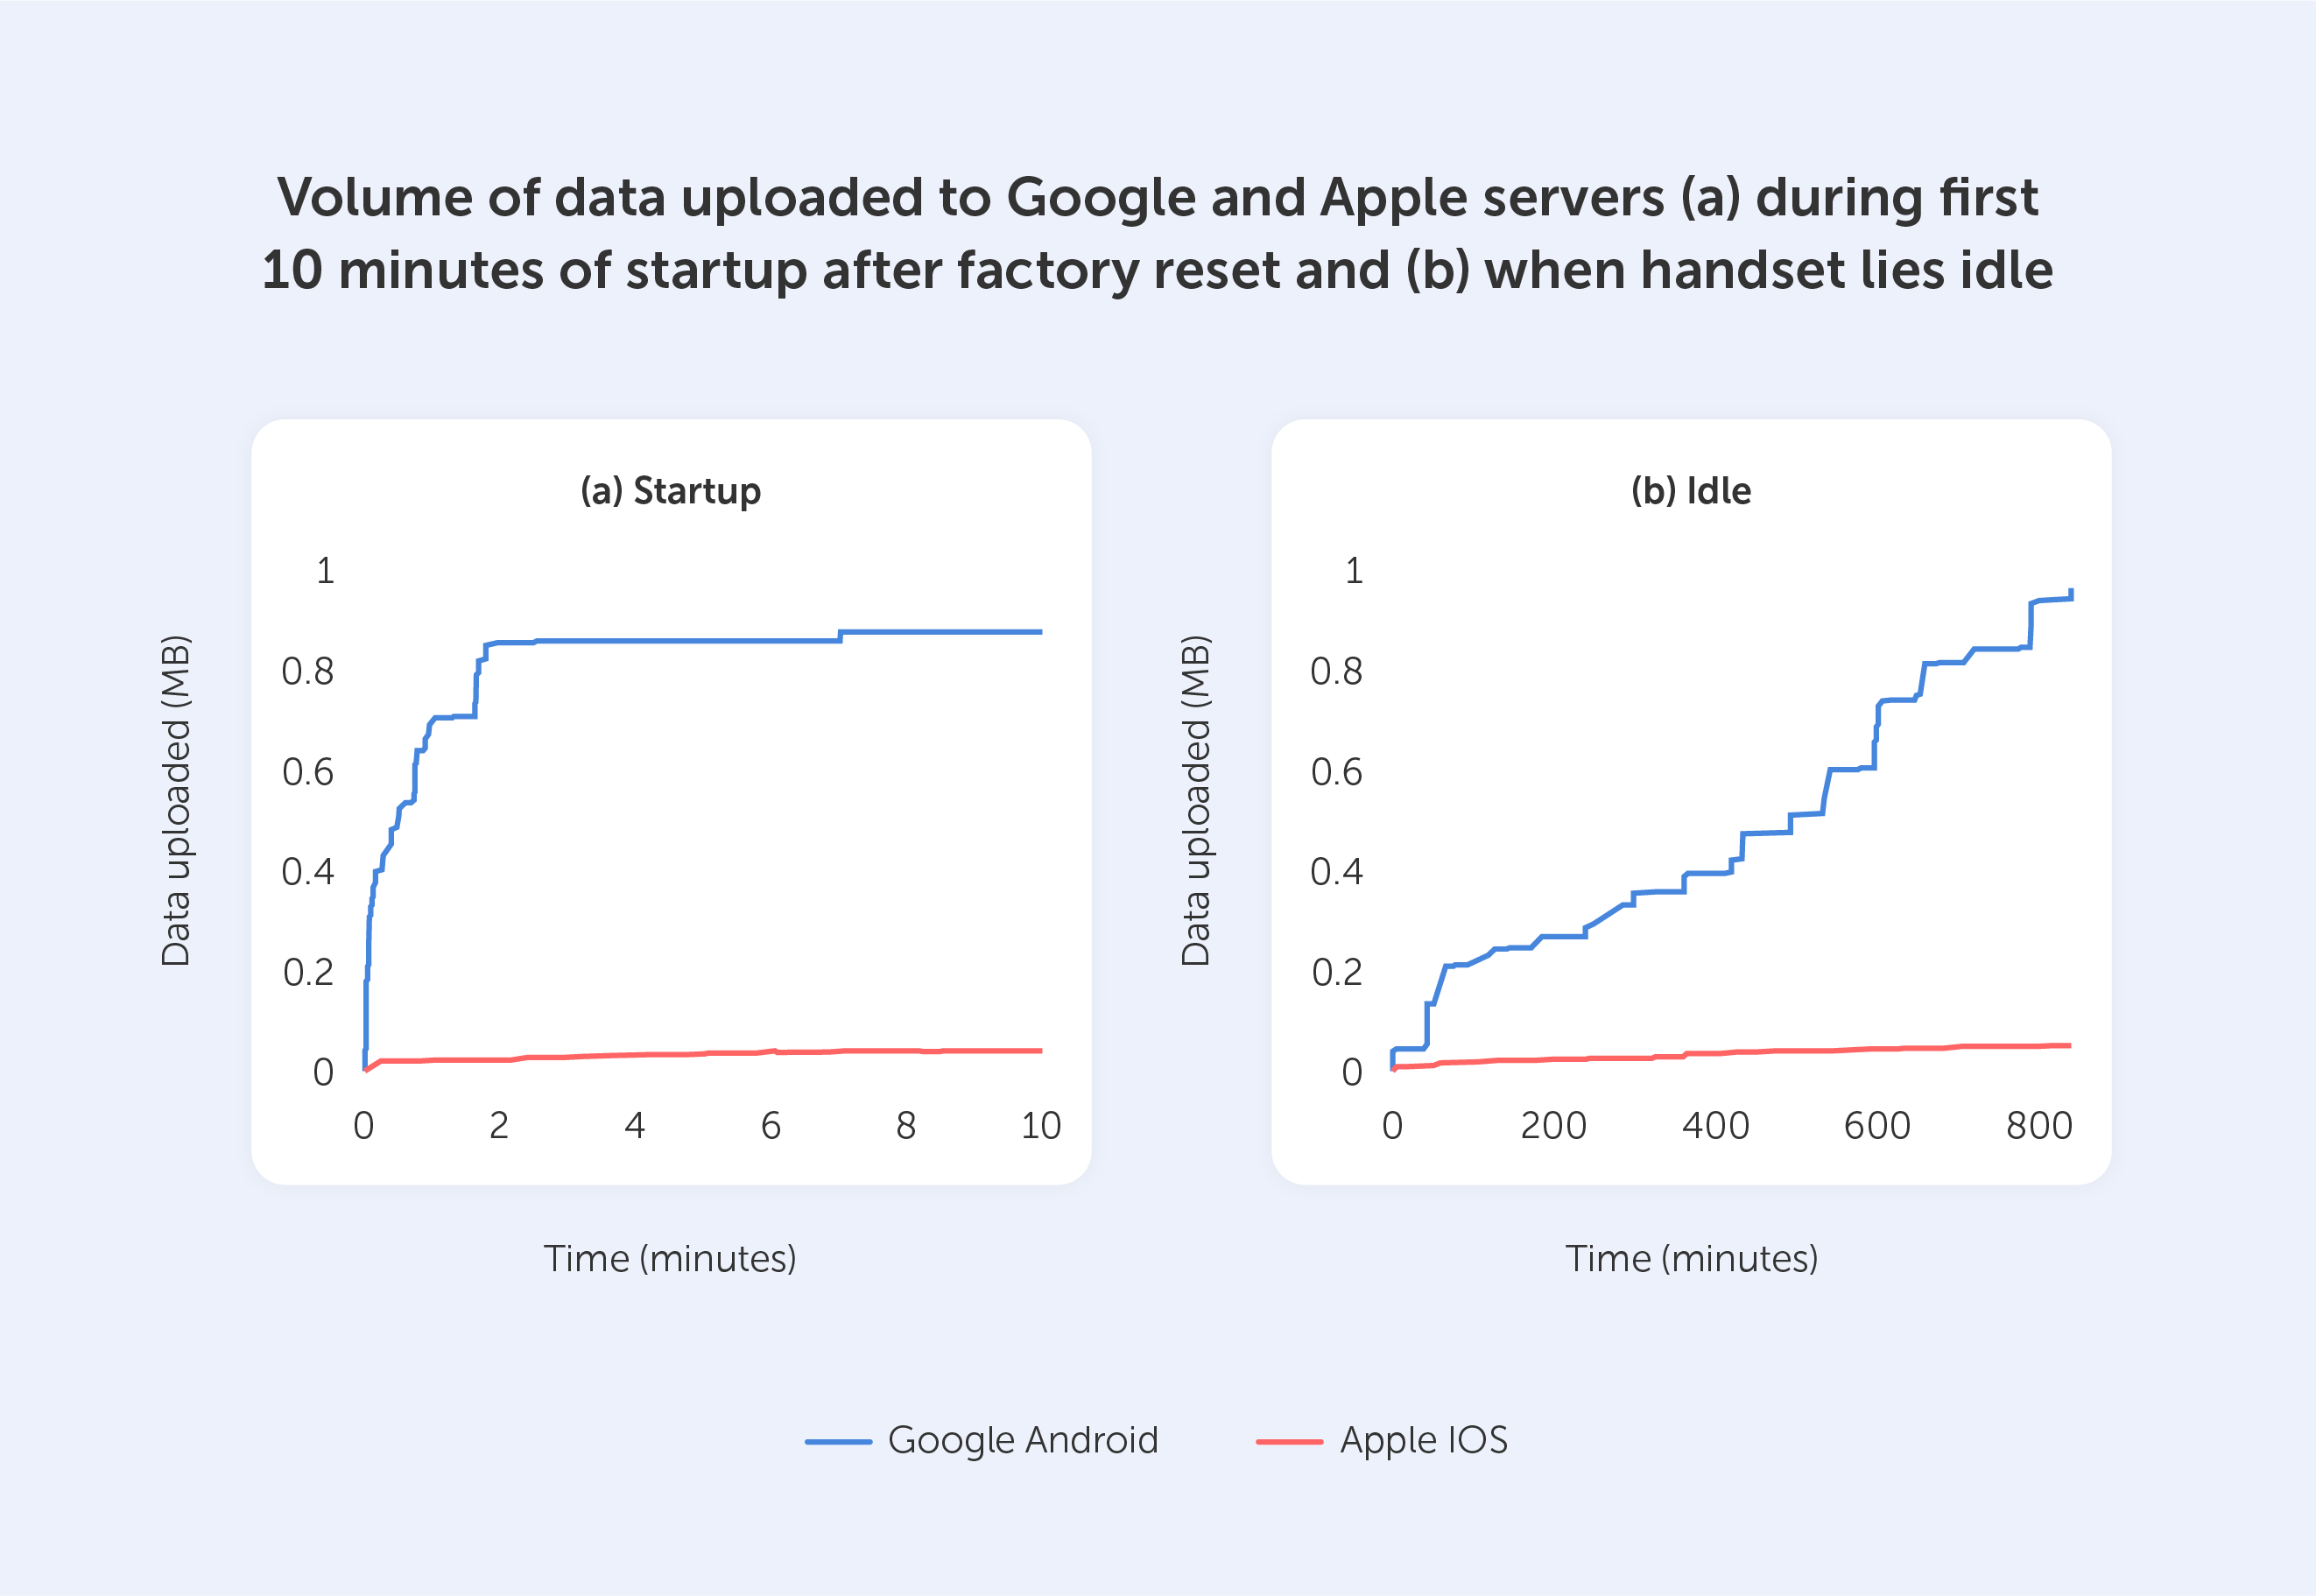
Well, we have bad news for its consumers as well: according to a study undertaken by Douglas Leith of Trinity College Dublin, Google gathers more than twenty times the amount of data from a typical Android device than Apple does from an iPhone.
This observation remains true even when a user has specifically opted out of telemetry collection. Every 4.5 minutes, both Android and iOS devices send data to Google and Apple's servers, and there's nothing you can do about it as a user.
According to these researchers, smartphones with default privacy settings communicate information such as the IMEI, SIM serial number, phone number, hardware serial number, location, cookies, local IP address, neighboring Wi-Fi MAC addresses, and even the advertising ID.
Both companies, by the way, disagree with the results, claiming that they just expose what is required to keep phones functioning properly.
Updates
Keeping your phone's operating system up to date is the simplest approach to keeping it safe. Updates aid in the mitigation of software vulnerabilities, which are a kind of security flaw detected in an operating system. Hackers make use of this flaw by building code that targets a particular vulnerability, which is often packaged as malware. Simply visiting a website, reading a compromised email, or playing malicious media might infect your smartphone. This is what occurred when the bank credentials of 300,000 Android users were exposed by regular applications on the Google Play store.
When it comes to transmitting upgrades to your palm, Apple still has the manufacturing infrastructure, carrier network contracts, and underlying programming in place to make it happen quickly and painlessly. While some consumers continue to complain about iOS' famed lack of customization, Apple's well-policed walled garden has also ensured that iPhone users are essentially impervious to viruses without even realizing it.
Google, on the other hand, still can’t fix the Android update problem.

Because each Android smartphone has its own hardware, when Google pushes an update, it may take up to a year for other smartphone makers to upgrade their devices, and that's only if they intend to do so. Other Android phones, apart from the Google Pixel series, seldom get all upgrades for an extended period of time — and there are various reasons for this. The first factor to evaluate is the number of models available from each manufacturer. Apple only adds around four iPhones to its portfolio per year, so the total number of iOS devices it needs to support is quite modest when compared to that of android — which is why the 7-year-old iPhone 6s is still getting the latest upgrades in 2022.
Conclusion
The most significant distinction between iOS and Android in terms of security and safety is their ideology. Because iOS is a closed ecosystem, it is entirely under Apple's control when it comes to security. The reason is that, as far as we know, Apple does not gain profit from advertisements (apart from program advertisements in the AppStore), hence it is not interested in gathering and selling your data to third parties.
Google, on the other hand, earns the majority of its revenue from advertisements, which implies that its success is dependent on its ability to target its adverts as precisely as possible. Even though Android is a free and open-source operating system, the Google Play Services that gather data are not.
In the end, Android has a lower degree of security out of the box, but custom Android versions may give a high level of protection.
How secure are iOS and Android, really?
Why do you actually need a VPN?
Virtual Private Networks (VPNs) encrypt your data and hide your online activity from third parties, allowing you to surf the web anonymously.
Web servers collect information about your computer's IP address and other information about your browsing history when you visit a website that is hosted on their servers. Your data is scrambled and far more difficult for third parties to monitor when you use a VPN that first connects to a private server.
Consumer VPNs are mostly used for anonymous web surfing. Some people can also use a VPN at home to connect to computers and files on your local network from a different place.
What are the possibilities of using a VPN?
Because a VPN alters your Internet Protocol (IP) address, it may perform a wide range of functions. When a computer is linked to the internet, it has a unique IP address that notifies other computers where it is situated. When you use a VPN, you first connect to a remote computer (a server) to fool other computers into thinking you're in a different place. When using a virtual private network, it is possible to choose a fake location for yourself.
PrivacyJournal offers reviews of the best VPN providers out there.
There are many options available to you when you get a new IP address. The material available on streaming services like Spotify and Netflix, for example, can change. Using a VPN allows you to access streaming libraries in other countries.
A VPN may also be used to circumvent censorship. A practice known as geo-blocking may be used by certain government agencies to ban websites and services in certain regions or territories. Through the use of a VPN, you may cultivate the illusion that you’re in a different place, masking your real IP address and as a result, accessing restricted media.
In terms of the ‘dark side’, individuals use VPNs to download copyrighted material and engage in other illicit actions online as there is an obfuscation of responsibility.
Does a VPN provide ultimate privacy?
Encryption is a crucial component of a VPN. All you need to know about encryption is that it scrambles your data so that only the right key can decode it. We'll go into more detail about encryption in the following section. To put it another way, it's a deadbolt lock for your computer's hard drive.
Before it reaches the internet, all of your data travels via an encrypted tunnel, where it is inaccessible to everyone else. As a result, when you visit a website, your browser does not transmit any information along with it. Browsers carry a lot of data, like your time zone, language, operating system, and even your screen resolution.
Although none of this data directly identifies you, the full collection is likely unique to you and may be used to identify you via a technique known as browser fingerprinting. Government authorities, marketers and hackers may use this information against you.
A VPN conceals all of your browser information, as well as your browsing history. While you’re connected, no one, even your internet service provider, can tell what you’re doing online.
A VPN isn’t a one-stop-shop for internet privacy, however. Anything you do while connected to the internet is fair game, including websites you log into and services you utilize. Many browsers utilize an account to move information like your browsing history and cookies between devices. This data isn’t safeguarded by your VPN tunnel, either.
How does it work?
VPNs provide an additional layer of protection for your online activity. As previously stated, using a private VPN server enables you to mask your IP address and make it look as if you're connected to the open internet via a different location.

All of this is possible because of VPN protocols, which are used by VPN service providers. VPN protocols are simply a set of instructions for your computer to follow while connecting to a server. The protocol also specifies encryption requirements in addition to a ‘how to’ of setting up and managing your connection.
Encryption is a major reason to use a VPN. All but a small percentage of web surfing now takes place in a secure environment. Despite the fact that you're using an encrypted connection, your personal information is still being sent.
Think of your internet connection as a passageway through which you move information. In order to keep your online activities private, this tunnel is protected by a layer of encryption. Whenever you connect to your Twitter account, for example, you're doing it over a secure tunnel that only you and Twitter can see.
As with a VPN, this is the case. Instead of directly connecting to the internet, your data is routed via a VPN server, where it is encrypted and rendered anonymous. The AES cipher with a 256-bit key is used by most VPN services. AES is a widely used block cipher for encrypting and decrypting data.
By establishing an encrypted connection, the VPN server verifies that you are indeed connected to a certain private network. Data and browser history are then shielded from prying eyes outside the tunnel and never leave it.
To summarize, a VPN creates an encrypted path for your data to travel through on its way to and from the VPN server. In most cases, there’s no way for anybody to know who you are or where you’re from when connected to a VPN server.
Is it a panacea?
When it comes to the effectiveness of VPNs, there's no secret sauce. A renowned VPN service like NordVPN or TorGuard is all you need to ensure that your VPN works. Individual product evaluations are of course necessary.
There's a short test you can do to determine whether your VPN connection is functioning. For free, ipleak.org and ipleak.net provide tools for checking your IP address, DNS queries, and WebRTC data (basically, everything a VPN should, in theory, obfuscate). Verify that the information is different when your VPN is active. As long as it is, your VPN is running as it should.
What is a VPN?
Since the dawn of the internet, the world of chat programs has seen drastic transformations. Given that not that much time has passed since the creation of the first chat app — CompuServe's CB Simulator — the rate of progress and development is quite astounding.
Chat protocols and frameworks are the subject of this article, and we're going into great detail about everything from their history to their security issues. At Passwork, we’re also very interested in the security solutions that are intertwined with these chat protocols, so without further ado, let’s explore the most popular ones:
WebRTC — Web Real-Time Communication
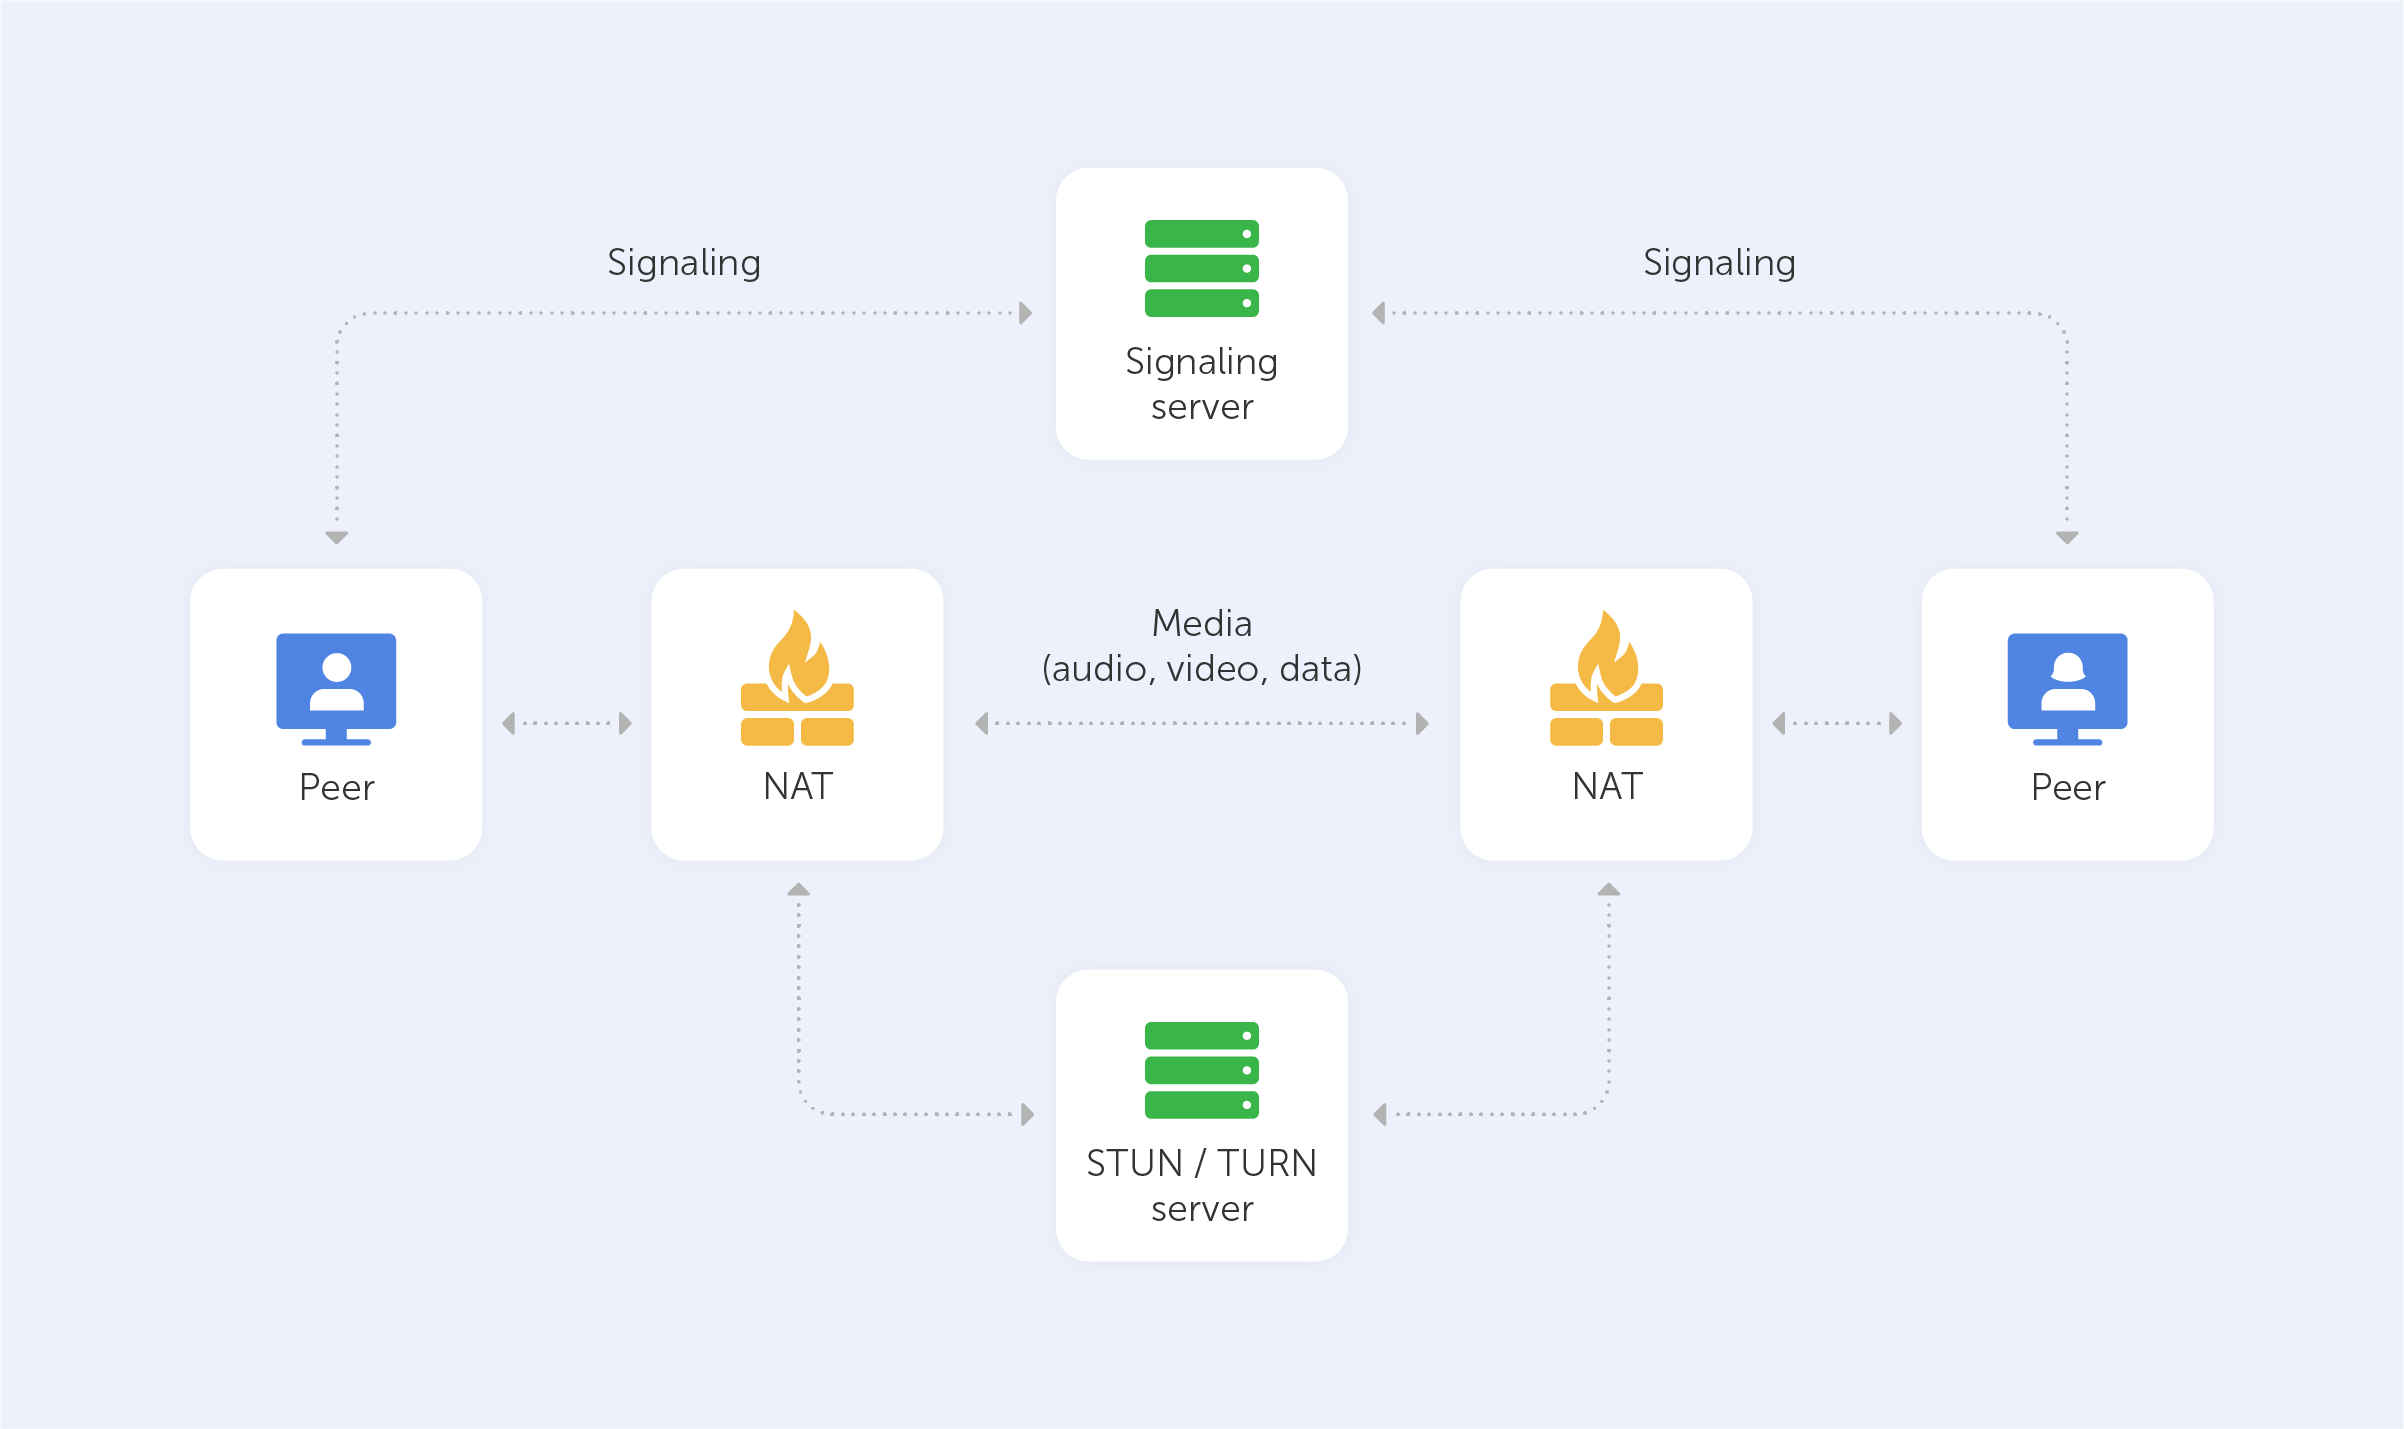
Using WebRTC, you may participate in rich, real-time multimedia conversations. Most web-based video and audio chat systems need you to download third-party plugins or applications. As a result, most browsers already have WebRTC, which utilises APIs to link peers. As an open-source initiative developed by Google, WebRTC enables real-time communication in your web browser.
By default, WebRTC uses UDP (the User Datagram Protocol). However, if there is a firewall between the two devices, WebRTC is able to use TCP (the Transmission Control Protocol).
When it comes to WebRTC, it’s primarily used to provide an immersive multimedia experience without the requirement for third-party applications or services.
Direct and unmediated communication with your consumers is one of the main advantages of WebRTC. If you're looking for complete control over customer communication channels, this is the ideal solution for you. As an additional bonus, there is no rate limit or price adjustments due to the absence of a third-party provider.
To construct a chat solution using WebRTC, you'll need access to a developer who is familiar with the technology.
Discord, Google Hangouts, and Facebook Messenger are just a few of the numerous chat apps that make use of WebRTC.
Security:
WebRTC enforces or supports essential security practises in all major areas since it was, after all, created with security in mind. As a result, in addition to being made safe, it encourages WebRTC developers to take security seriously as well.
WebRTC is now considered by some to be one of the most secure VoIP technologies available as a consequence of a significant emphasis on secure communication. The basic idea of having encryption enabled by default is that a call is always private. Encryption and security are no longer regarded as optional features. To top it off, WebRTC is open source, making it a compelling and dependable platform on which developers may wish to construct their next product.
Of course, we anticipate a rise in the number of communication services that provide significantly enhanced security to their consumers in the near future. But, for the time being, WebRTC is one of the frontrunners.
WebSocket
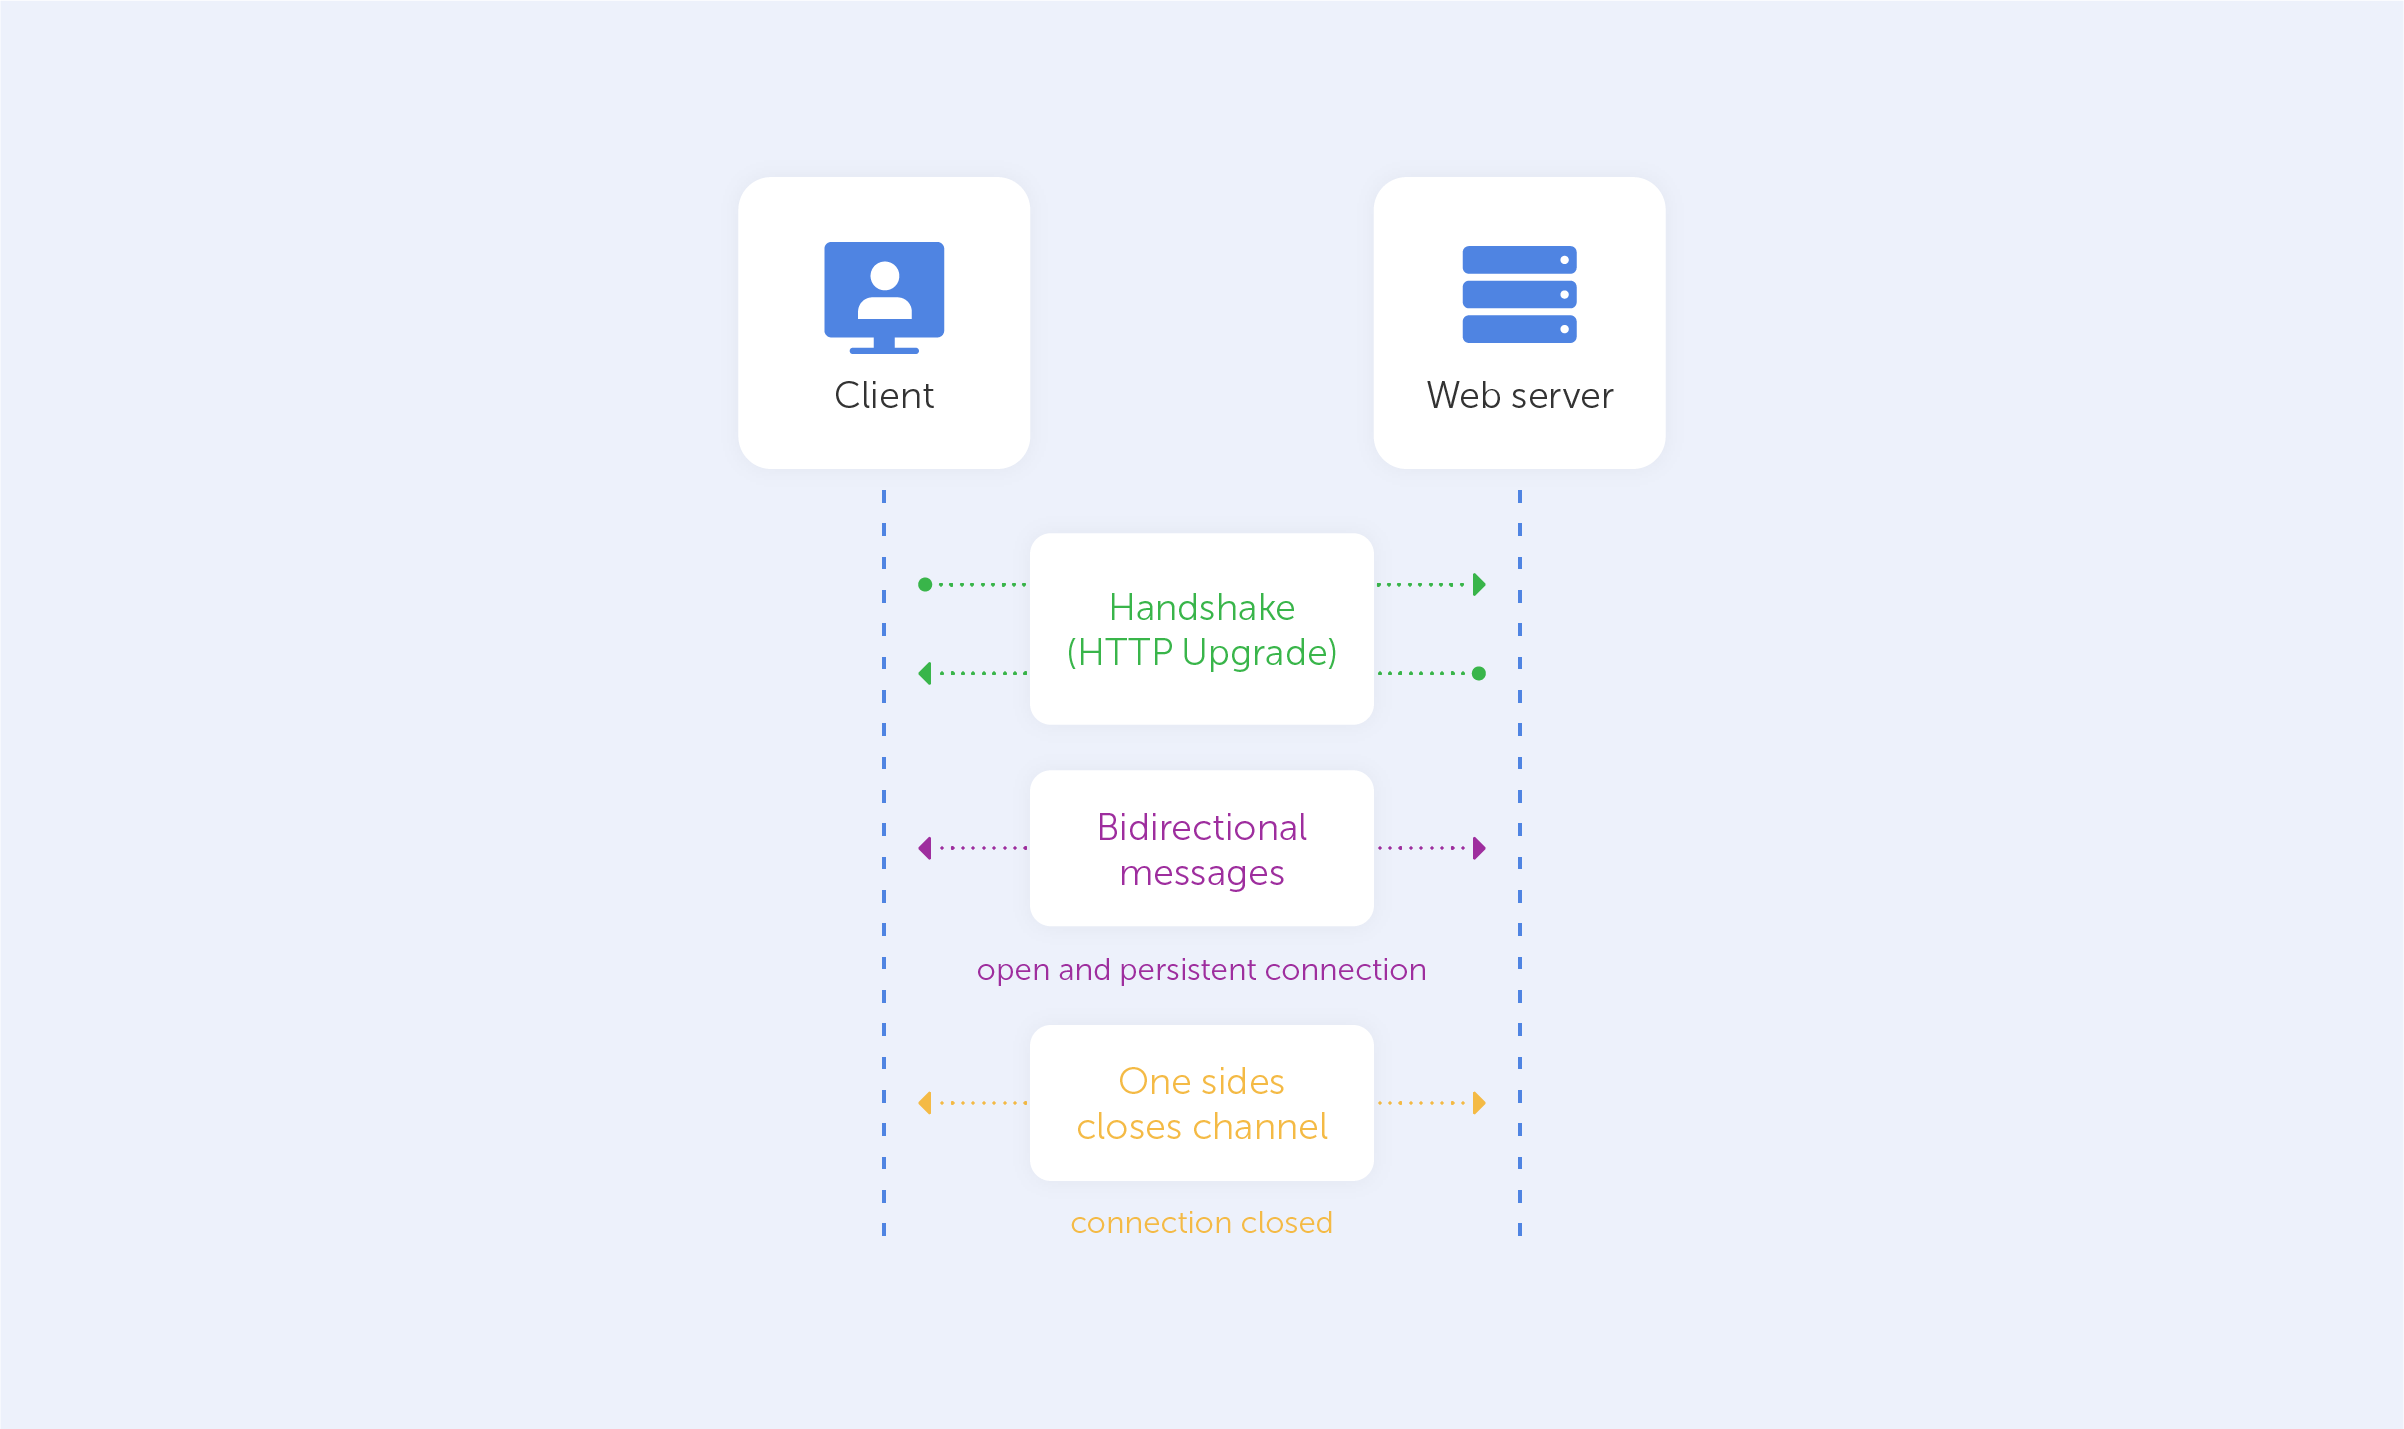
WebSocket, one of the most widely used communication protocols, establishes a low-latency, near-real-time connection between the client and the server via the use of sockets. As it aims to achieve the lowest latency feasible, it is most often utilised for online gaming, chat apps and the real-time updating of social feeds, for example.
In contrast to a standard HTTP system, in which communication may only be started by the client, a WebSocket connection allows communication to take place both ways. The WebSocket API is supported by all current browsers, and data is transferred through a TCP port, similar to the HTTP protocol.
When a series of conversations around the inclusion of a TCP-based socket API in the HTML5 standard began in June 2008, WebSocket was one of the ideas that emerged.
WebSocket is a technology that is used by many websites that demand real-time updates. WebSocket is used by several large chat apps, such as Slack, as part of their technology stack.
Security:
WebSocket as a technology has some inherent security issues:
- WebSocket permits an infinite number of connections with the target server, resulting in the server's resources being depleted as the result of a DOS attack;
- WebSockets may be utilised over unencrypted TCP channels, which can expose sensitive data to serious defects like those described in the OWASP Top 10 A6-Sensitive Data Exposure list;
- WebSockets are subject to malicious input data assaults, resulting in Cross-Site Scripting attacks (XSS).
XMPP: Extensible Messaging and Present Protocol
With the launch of Jabber in 1999, Jeremie Miller brought XMPP to the world.
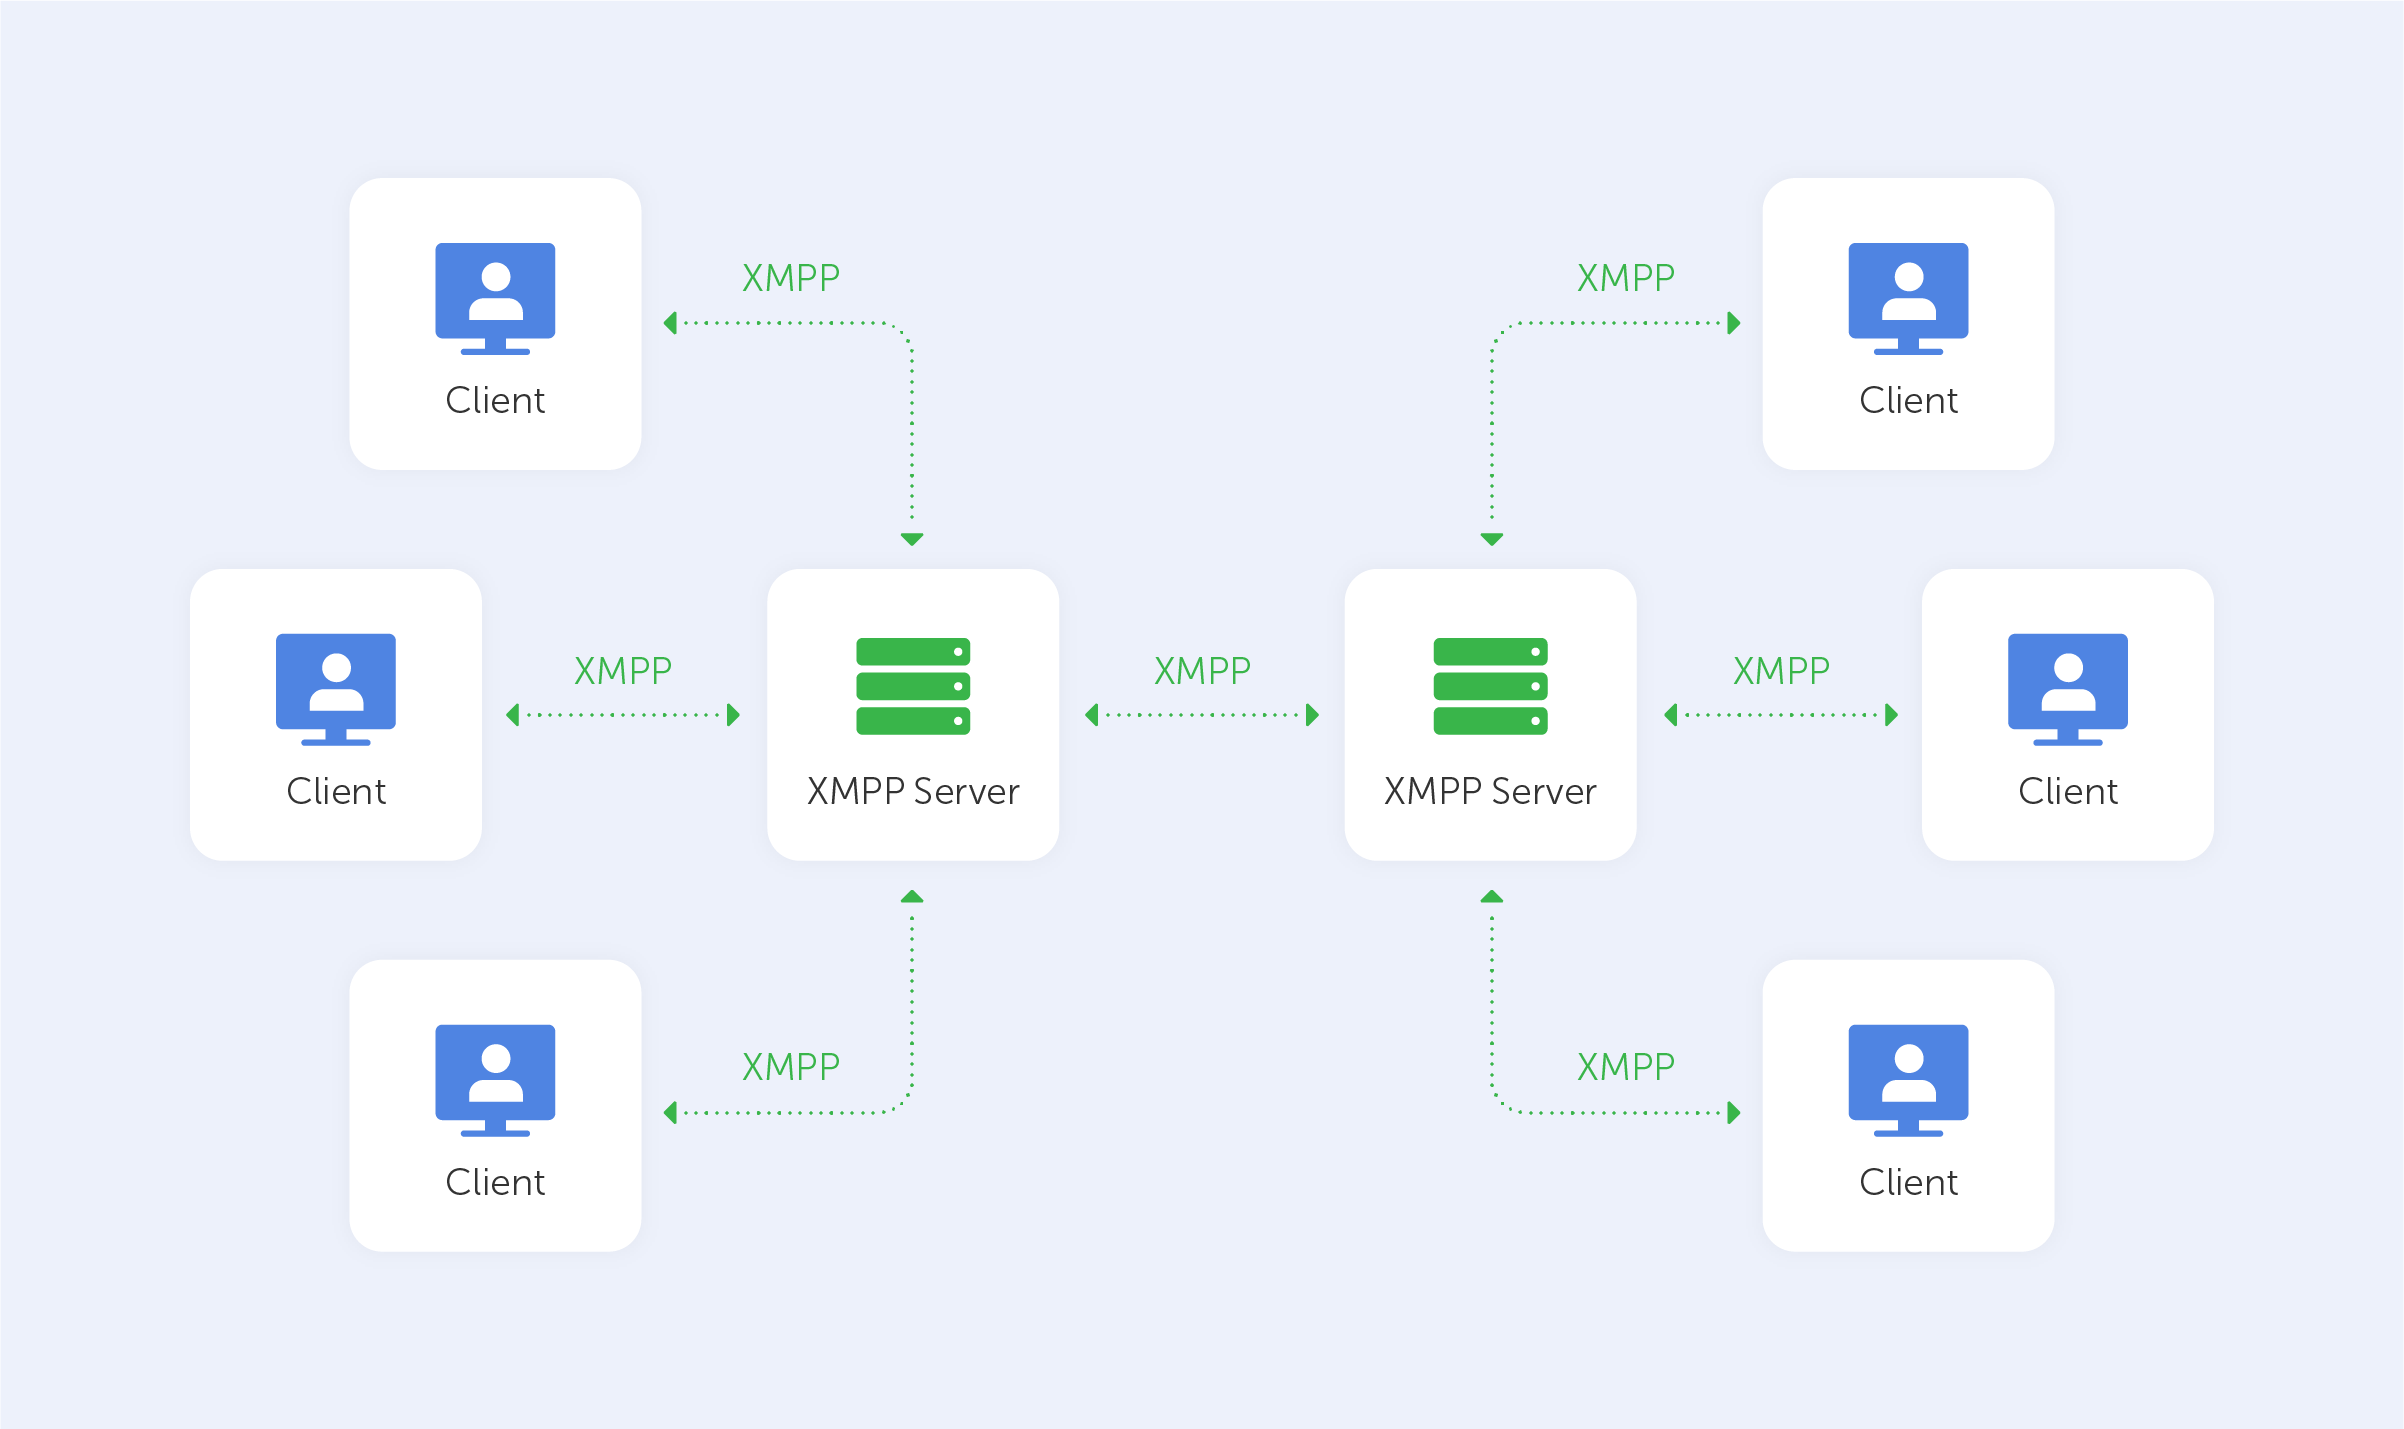
XMPP is a protocol for sending XML (Extensible Markup Language) data over the internet. It facilitates real-time communications by improving the push method between clients. XMPP aims to create a network of linked devices that can communicate with one another using their own trusted servers.
It's a cross-platform protocol that can be used with the XMPP client on the Web, Android, and iOS platforms. The enormous number of open-source and free clients is one of XMPP's distinctive selling advantages, allowing for a very simple installation procedure.
Instant messaging, multi-party conversations, content dissemination, and multimedia streaming, such as audio and video calls, are all examples of the protocol’s applications. Many big chat programs, such as WhatsApp and Zoom, employ XMPP.
Google Talk, ICQ, and Cisco Meeting provide excellent illustrations of what can be accomplished when using an XMPP client.
Security:
XMPP has had its security vetted by the experts at the IETF, and so has native support for pluggable authentication (via SASL) and leading-edge security (via TLS).
Still, that doesn’t stop some hackers from finding vulnerabilities:
An unauthenticated, remote attacker might utilise a vulnerability in the Cisco Meeting Server software's Extensible Messaging and Presence Protocol (XMPP) capability to create a denial of service (DoS) scenario for users of XMPP conferencing apps. The flaw is caused by XMPP packets that haven't been properly validated. An attacker could take advantage of this flaw by sending specially crafted XMPP packets to a vulnerable device, or even by inducing process crashes and denial-of-service scenarios in XMPP conferencing apps — either way, it's not great for the users.
You can read about this exploit more here.
Comparison of instant messaging protocols
If the concept of ‘quantum cryptography' sounds complicated to you, you're right. That’s why this ‘encryption tutorial for dummies’ shall demystify the concept and provide an explanation in layman’s terms.
Quantum cryptography, which has been around for a few decades, is becoming more and more important to our daily lives because of its ability to protect essential data in a manner that conventional encryption techniques cannot.
What is it?
Cryptography, as we all know, is a technique that aims to encrypt data by scrambling plain text so that only those with the appropriate ‘key’ can read it. By extension, quantum cryptography encrypts data and transmits it in an unhackable manner using the principles of quantum mechanics.
While such a concept seems straightforward, the intricacy resides in the quantum mechanics that underpin quantum cryptography. For example:
- The particles that make up the cosmos are fundamentally unpredictable, and they may exist in several places or states of existence at the same time;
- A quantum attribute cannot be measured without causing it to change or be disturbed;
- Some quantum attributes of a particle can be cloned, but not the whole particle.
How does it work?
Theoretically, quantum cryptography operates by following a model that was first published in 1984.
Assume there are two people called Alice and Bob who want to communicate a message in a safe manner, according to the model of quantum cryptography. Alice sends Bob a key, which serves as the signal for the communication to begin. One of the most important components is a stream of photons that go in just one direction. Each photon corresponds to a single bit of data — either a 0 or a 1 — in the computer's memory. However, in addition to traveling in a straight path, these photons are oscillating, or vibrating, in a certain fashion as they move.
The photons pass via a polarizer before reaching Alice, the sender, who then commences the transmission. When some photons pass through a polarizer with the same vibrations as before, and when others pass through with different vibrations, the filter is said to be ‘polarized’. There are many polarization states to choose from, including vertical (1 bit), horizontal (0 bit), 45 degrees right (1 bit) and 45 degrees left (0 bit). In whatever system she employs, the broadcast has one of two polarizations, each encoding a single bit, which is either 0 or 1.
From the polarizer to the receiver, the photons are now traveling via optical fiber to Bob. Each photon is analyzed using a beam splitter, which determines the polarization of each photon. After receiving the photon key, Bob does not recognize the right polarization of the photons, so he chooses one polarization at random from a pool of available options. Alice now compares the polarizers Bob used to polarize the key and informs Bob of the polarizer she used to deliver each photon to the receiver. Bob checks to see whether he used the right polarizer at this point. The photons that were read with the incorrect splitter are then eliminated, and the sequence that is left is deemed the key sequence.
Let's pretend there is an eavesdropper present, who goes by the name of Eve. Eve seeks to listen in and has the same tools as Bob in order to do so successfully. However, Bob has the benefit of being able to converse with Alice in order to check which polarizer type was used for each photon, but Eve does not. Eve is ultimately responsible for rendering the final key.
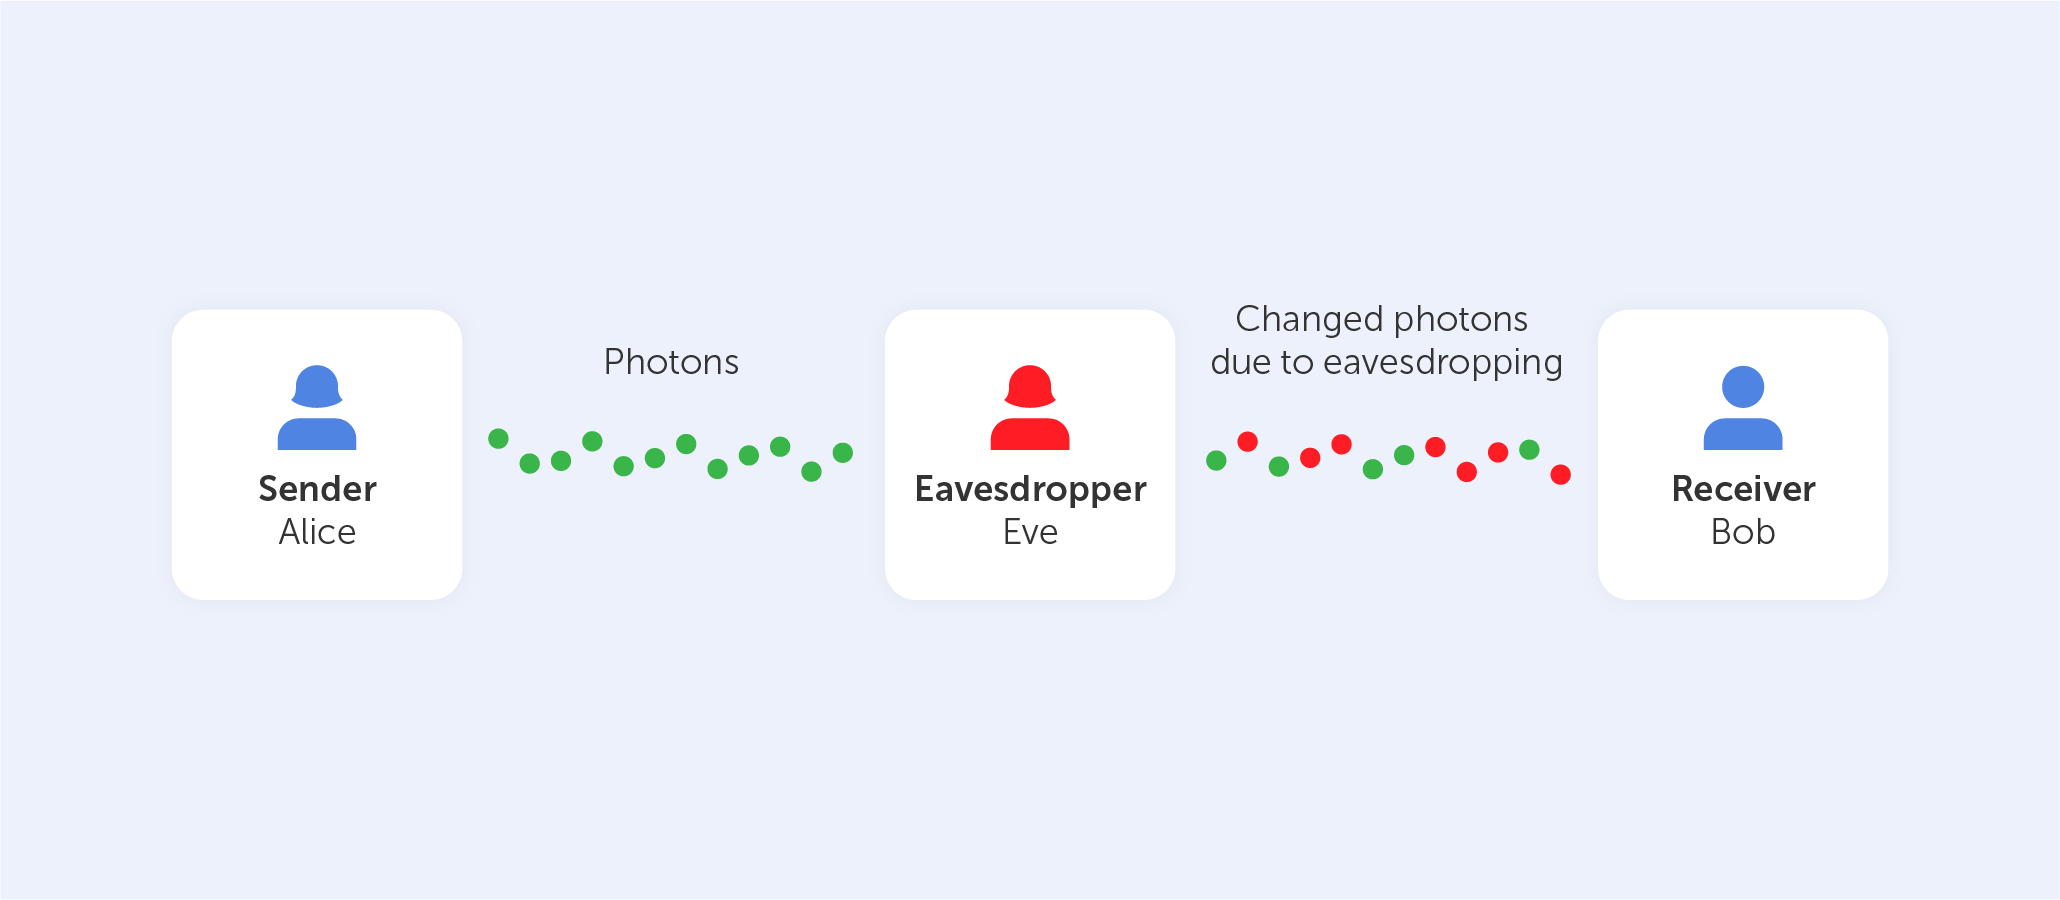
Alice and Bob would also be aware if Eve was listening in on their conversation. After Eve observes the flow of photons, the photon locations that Alice and Bob anticipate to see will be altered as a result of her observations.
Well, that’s all pretty mind-blowing, but for us, the general public, the biggest question is…
Is it really used?
Although the model described above has not yet been fully developed, there have been successful implementations of it, including the following:
- The University of Cambridge and the Toshiba Corporation collaborated to develop a high-bit-rate quantum key distribution system based on the BB84 quantum cryptography protocol;
- DARPA's Quantum Network, which operated from 2002 to 2007, was a 10-node QKD (Quantum Key Distribution) network constructed by Boston University, Harvard University, and IBM Research. It was operated by the Defense Advanced Research Projects Agency;
- Quantum Xchange created the first quantum network in the United States, which is comprised of over 1,000 kilometers of optical fiber;
- The development of commercial QKD systems was also carried out by commercial businesses such as ID Quantique, Toshiba, Quintessence Labs, and MagiQ Technologies Inc.
As you can see, these rare implementations are pretty far from what you’d expect to use every day. But hopefully, that will change in the near future.
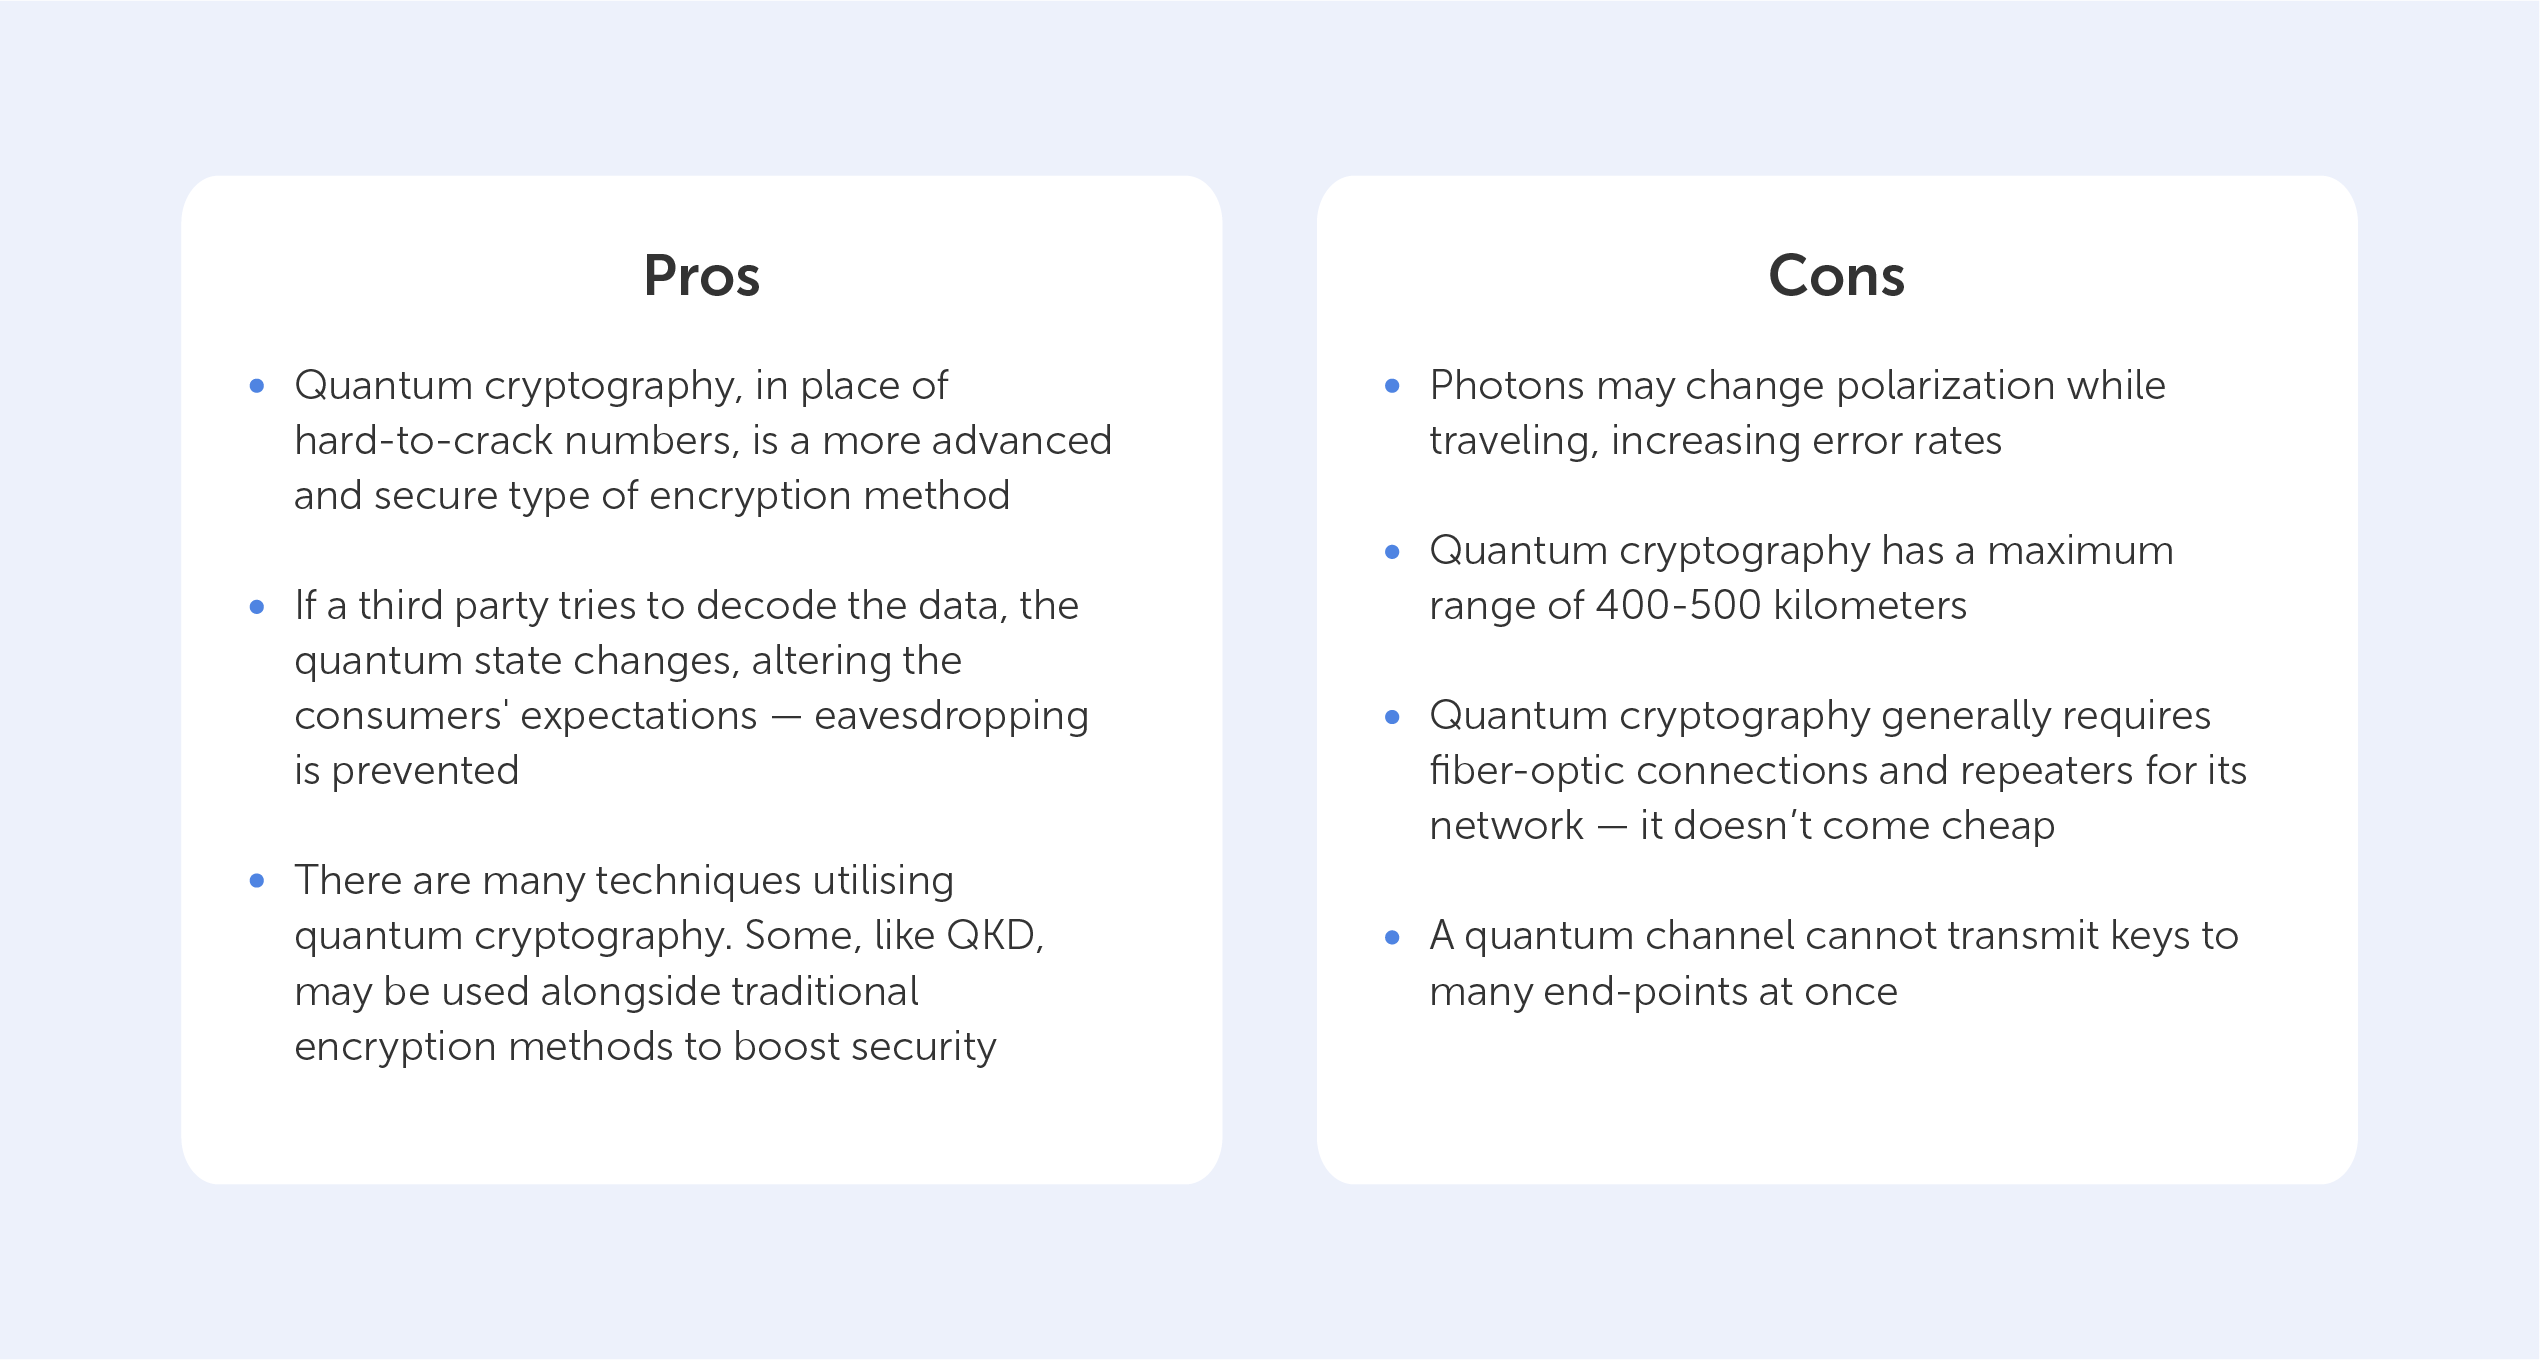
The pros and cons of quantum cryptography
As with any developing technology, the state of it now (2022), may be very different to its state in the future. Thus, the following table may change dramatically. We do believe, however, that we’ll see fewer points in the ‘Limitations’ column as the years go on.
The need for unbreakable encryption is right there staring us down. The development of quantum computers is on the horizon, and the security of encrypted data is now in jeopardy due to the threat of quantum computing. We are fortunate in that quantum cryptography, in the form of QKD, provides us with the answer we need to protect our information long into the future — all while adhering to the difficult laws of quantum physics.
What is quantum cryptography?
I’d like you to reflect on your personal interactions when it comes to the internet. Consider the impact that the internet has had on society. Have these two things changed with time? Of course. Indeed, with more social media platforms and apps for mobile devices than ever before, we’ve yet another fundamental transition on the horizon…
The Web's Evolution
The web has developed a lot over the years, and its applications are nearly unrecognizable. Web 1.0, Web 2.0, and Web 3.0 are often used as benchmarks to describe the web's progression.
Web 1.0
Web 1.0 was the original web. Most participants were content consumers, while producers were mostly web developers who built websites with mostly text or graphic material. Web 1.0 ran from 1991 until 2004. Web 1.0 sites served static material rather than dynamic HTML. Sites had little to no interactivity and data was supplied through a static file system rather than a database. Web 1.0 is the ‘read-only’ web.
Web 2.0
Most of us have only used the web in its present incarnation (Web2). Web2 is the social and interactive web. You don't have to be a developer to create in the Web2 universe. Many applications are designed so that anybody may create. You can create and share a concept with the world. You can also post a video for millions of others to see, connect with your viewers, and comment on the video itself. Web2 is easy, and because of that, more and more individuals are becoming content creators. The web as it is now is fantastic in many aspects, but there are still several issues.
Privacy and security
Web2 applications are plagued by data breaches on an almost daily basis. If you want to know when your personal information has been leaked, there are websites devoted to keeping track of these incidents and alerting you.
Your data and how it is handled are completely out of your hands when it comes to Web2. When it comes to tracking and storing user data, many organizations do so without their customers' permission. The firms in charge of these platforms then possess and manage all of this data. Also at risk are users who reside in nations where exercising one's First Amendment rights might have unintended repercussions. Authorities often take down sites or confiscate funds if they suspect someone is disseminating information contrary to the official line. Governments can easily interfere, control, or shut down programs using centralized servers. By the same token, banks are digital and under centralized control — governments typically meddle in this area as well. During times of volatility, severe inflation, or other kinds of political instability, they have the ability to close bank accounts or restrict access to cash.
By starting from the bottom up, Web3 seeks to fix many of these flaws by reimagining how we design and interact with the internet and entities within it.
What exactly is Web 3.0?
Web2 and Web3 differ in a few ways, yet decentralization is a common theme in both. Web3 adds a few new features to the internet that we already use. It can be defined as the following:
- Verifiable
- Trustless
- Self-governing
- Permissionless
- Distributed and robust
- Stateful
- With built-in payments
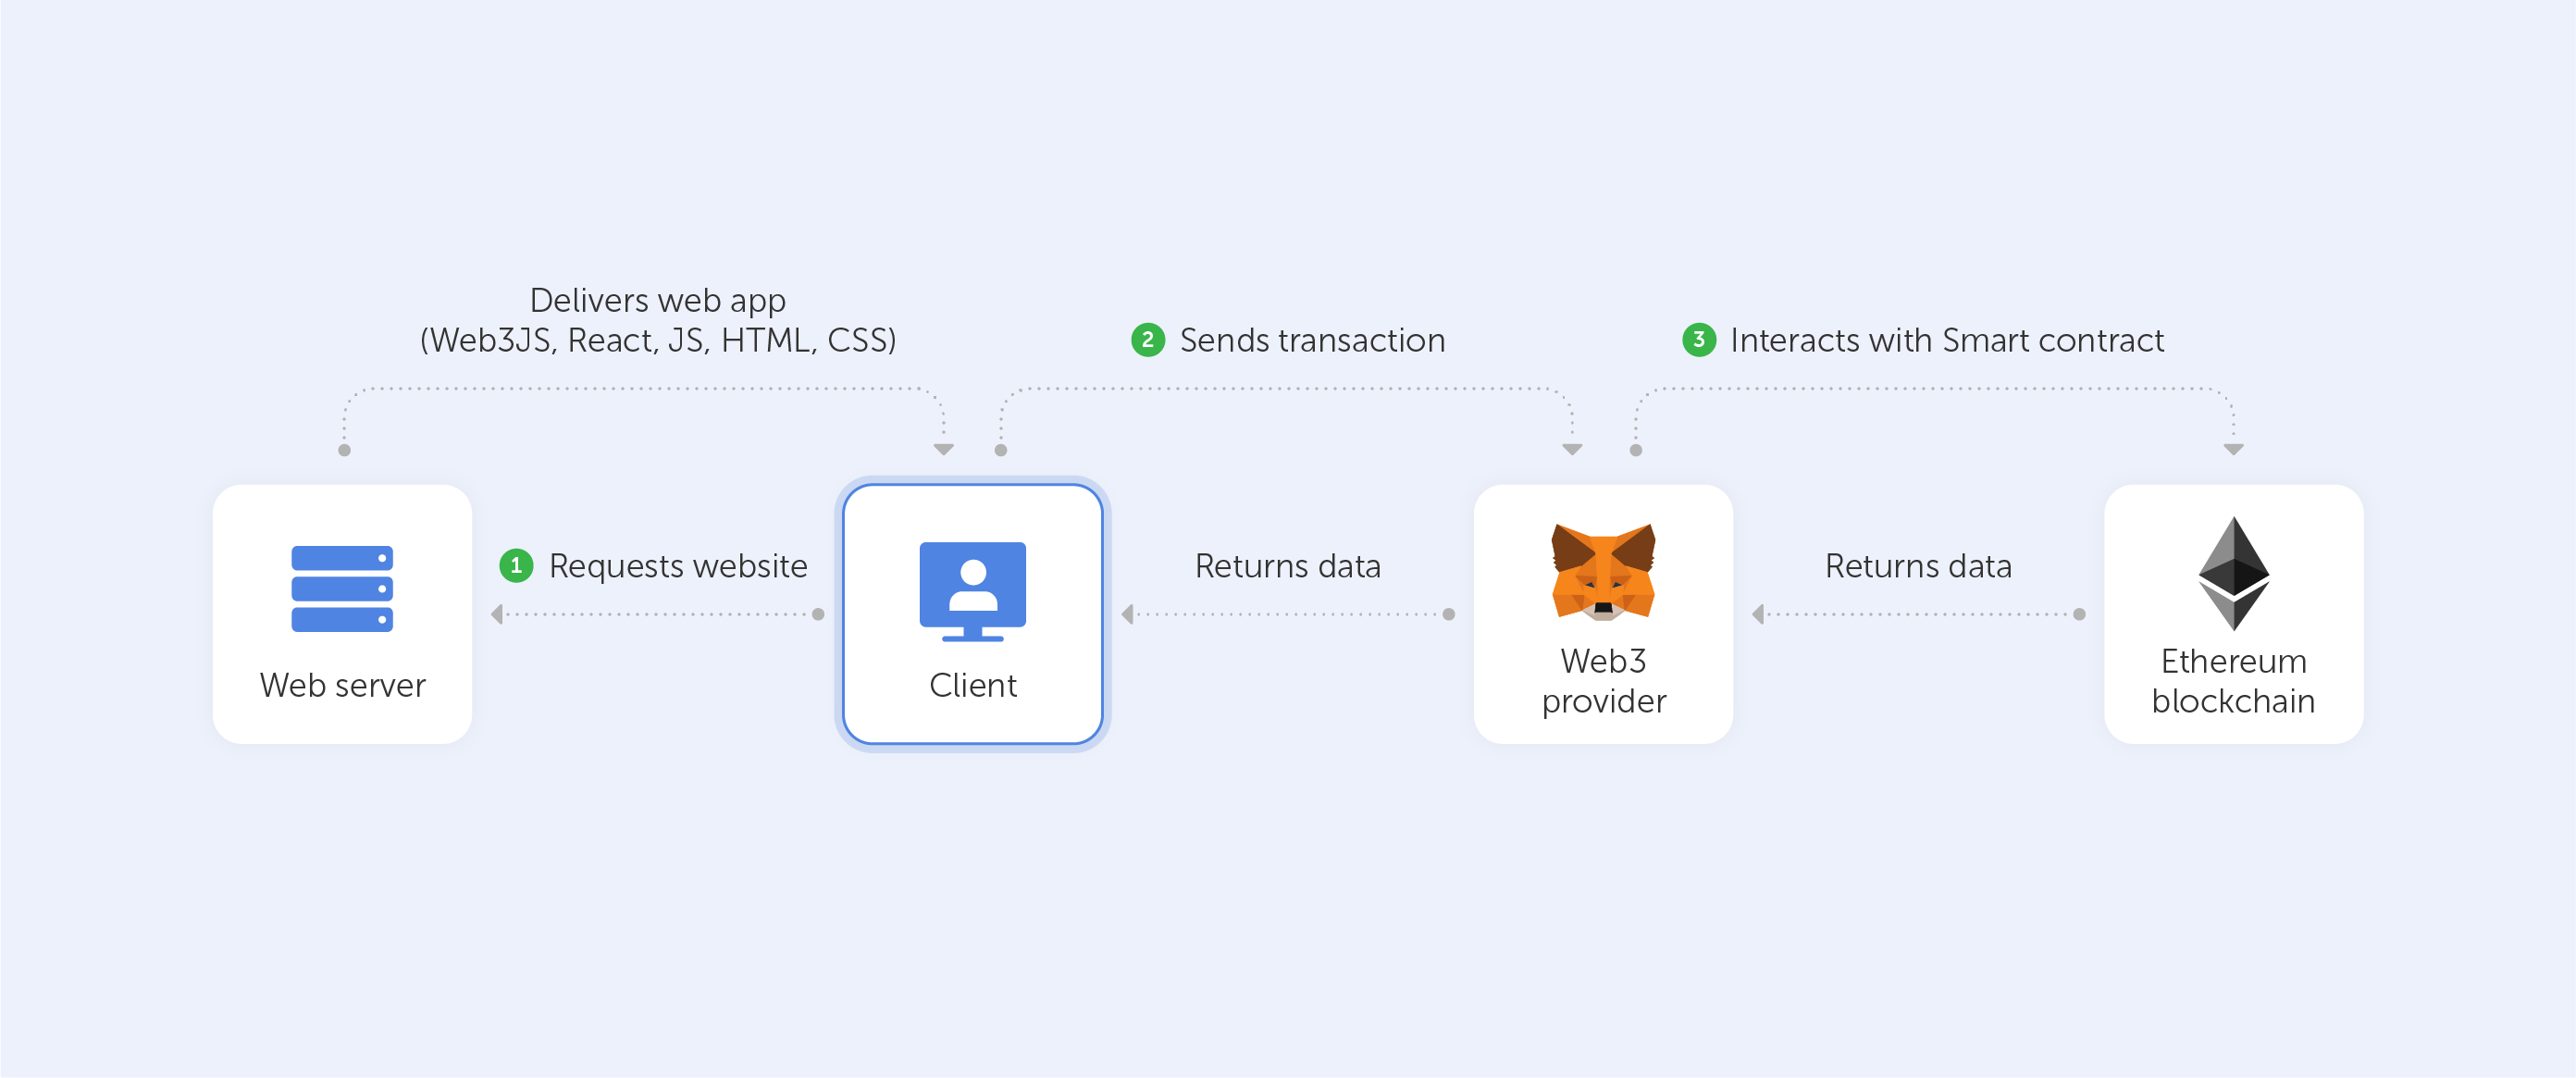
When working with Web3, programmers seldom create and deploy applications that rely on a single server or database (usually hosted on and managed by a single cloud provider).
Instead, Web3 applications either run on blockchains, decentralized networks of many peer to peer nodes (servers), or a combination of the two that forms a crypto-economic protocol. Many people in the Web3 community refer to these applications as "dapps" (decentralized apps), a word that you’ll see swimming around quite often.
An incentive for network members (developers) to deliver the best service possible is a key component of a robust and secure decentralized network.
Web3 is often discussed in conjunction with cryptocurrencies. This is due to the fact that many of these protocols rely heavily on cryptocurrencies. Anyone who wishes to become involved in one of the projects is given tokens (a cash incentive) in exchange for their time and effort.
In the past, cloud providers offered a wide range of services, including computation, storage, bandwidth, identity, hosting, and other online services.
Participating in the protocol in a variety of ways, both technical and non-technical, might be a source of income.
The protocol is often paid for by users in the same way that a cloud service provider like AWS charges its customers today. In Web3, however, the money flows directly to the network members. The elimination of middlemen that are both unneeded and inefficient is a hallmark of this sort of decentralization.
There are utility tokens provided by several online infrastructure protocols including Filecoin, LivePeer, Arweave, and The Graph. Many tiers of the network are rewarded with these tokens. This is how even native blockchain systems like Ethereum work.
How Web3 Handles Identity and Privacy
Here, at Passwork, security is paramount. This is where, technically, Web3 shines the most. Identity is handled quite differently within Web3. The wallet address of the user engaging with the app is usually used to link identities in Web3 applications. This means that wallet addresses, unlike Web2 authentication methods like OAuth or email + password, are fully anonymous until the user wishes to publicly link their identity to it.
It is possible for a user to build up their reputation over time if they choose to use the same wallet for various decentralized applications (dapps).
Authentication and identification layers may be replaced with self-sovereign identity protocols and tools like Ceramic and IDX. An RFP for a "Sign in with Ethereum" standard is currently being worked on by the founders of Ethereum.
Conclusion
Web 3.0's set of capabilities has the potential to fundamentally alter the way we see and utilize the internet, giving people more agency, spawning new sectors, and enabling networks to operate without a centralized authority or single point of failure. It’s just a matter of time until Web 3.0 becomes the new global standard.
As far as answering the question raised in the title — on paper, Web3 should eliminate most of the privacy and security issues faced with Web2. In practice — this is still not yet certain.
What is Web3?
Most of us have heard of torrents, and have likely also used torrents to download movies, books, music, TV shows, games, and so on. But, you’ve probably still got one question that remains unanswered — what are they? BitTorrent is well-known as a technology for piracy, although its genius isn’t limited to that. It's a useful, decentralized peer-to-peer protocol that outperforms other protocols in many different ways.
In this article, we’ll break it down to be as simple as possible while also explaining several terms that might pass you by every day.
Why do I need BitTorrent?
When you download data from the internet, most of the time, your computer connects to the webserver and immediately downloads the data from a certain server. This is how the cohort of online traffic operates. Even though we have fancy technologies to reroute this traffic through many different servers, there’s still a bottleneck in terms of the maximum speed that may be provided to the end-user. But what if you know someone who already has the file that you need, wouldn’t it be better to AirDrop it, instead of uploading it to a server, and then downloading it once again? Well, that’s what Bram Cohen created his BitTorrent protocol for.
How does BitTorrent work?
BitTorrent is effectively a peer-to-peer protocol, which means that computers in a BitTorrent ‘swarm’ (a collection of computers downloading and uploading the same torrent) exchange data without the use of a central server.
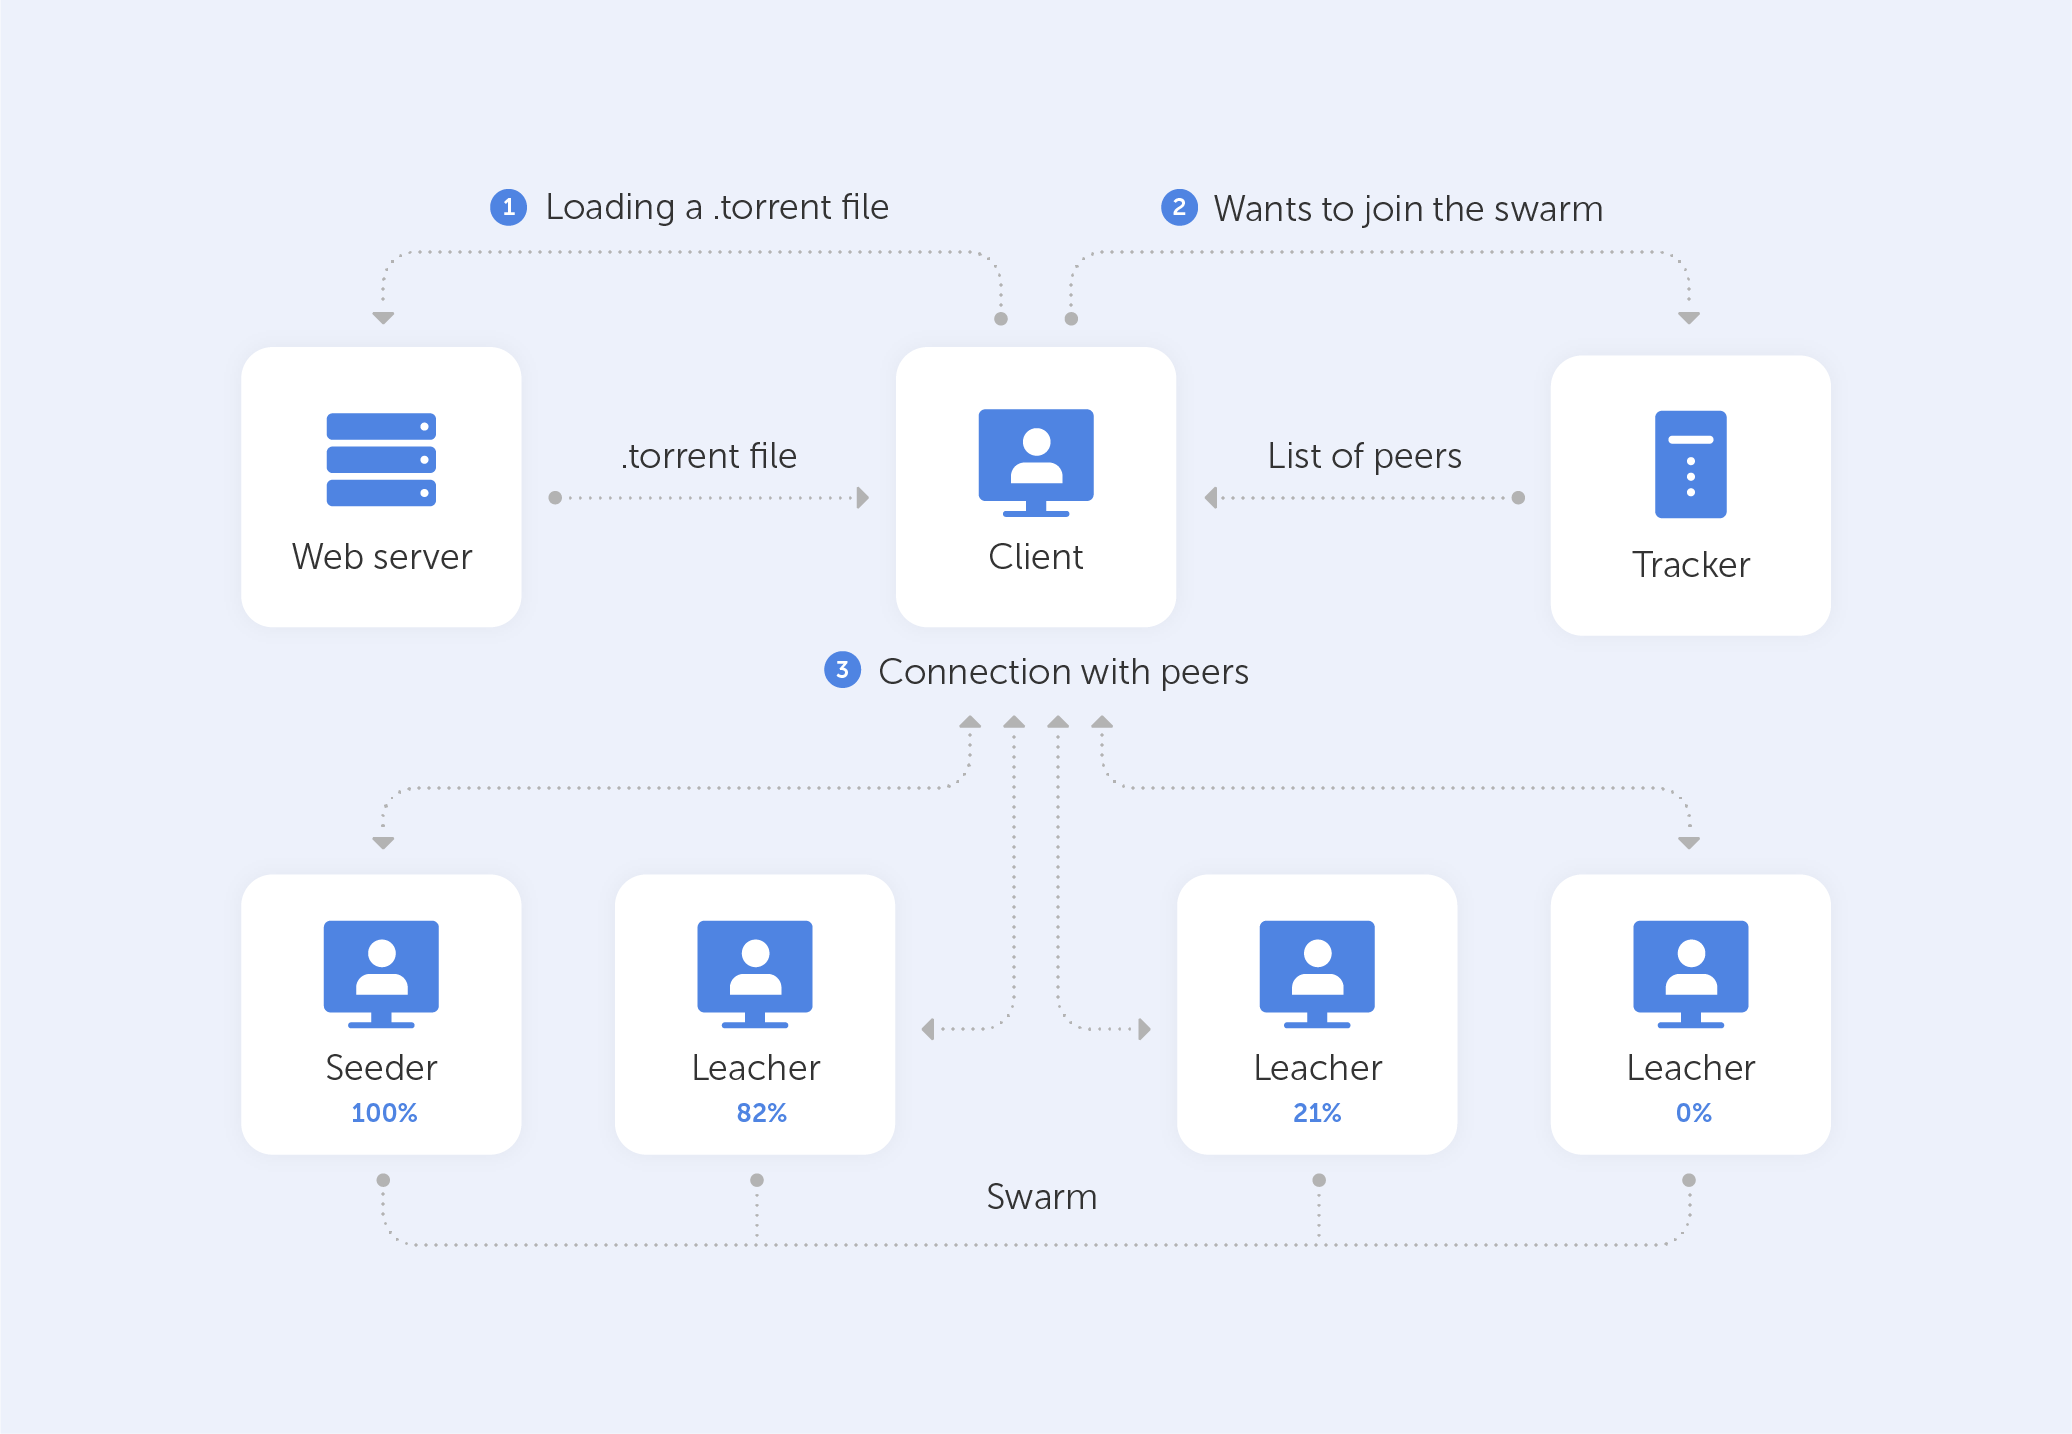
A machine traditionally joins a BitTorrent swarm by loading a .torrent file onto a BitTorrent client. The BitTorrent client communicates with a ‘tracker’ defined in the .torrent file. The tracker is a dedicated server that keeps track of the computers that are linked to it. The tracker exchanges IP addresses with other BitTorrent clients in the swarm, allowing them to communicate with one another. That’s exactly why it is called a ‘tracker’ — it tracks the participants of any given communicative endeavour.
Once connected, a BitTorrent client downloads tiny chunks of the torrent's contents, in fact, as much as it can. As soon as the BitTorrent’s client has any data downloaded, it may start uploading it to other BitTorrent clients in the swarm. As a result, everyone who downloads a torrent is also uploading the same torrent — all the pieces that a user has at the moment. This increases the download speed for everyone. When 10,000 users download the same file, the central server is not overburdened. Instead, each downloader shares their upload capacity with other downloaders, ensuring that the torrent remains as fast as possible.
Importantly, BitTorrent clients never download files directly from the tracker. The tracker simply participates in the torrent by keeping track of the BitTorrent clients that are connected to the swarm, not by downloading or uploading data.
‘Seeds’, ‘Peers’, and ‘Leeches’
If you're a torrent user, you've probably come across the words ‘seeds’, ‘peers’, and ‘leeches’. Let's take a look at what these terms actually mean.
The seed is the user who has already downloaded the entire file and is now sharing it with peers while not downloading any parts of the file from others. To download a torrent, one seeder – who has a full copy of all the files in the torrent — must first join the swarm so that other users may download the data. If a torrent has no seeders, it cannot be downloaded since no connected user possesses the entire file.
Leechers or peers are people who are simultaneously downloading and uploading — so, the vast majority, basically. In the BitTorrent world, people who give more — get more. In other words, the BitTorrent client prefers to send data to clients who contribute more upload bandwidth rather than sending data to clients who upload at a very slow speed.
This improves download rates for the whole swarm and compensates those who donate more upload bandwidth.
Moreover, we bet you encountered times when the file you wished to download via the torrent network wasn’t very popular, resulting in low speeds, or no download at all. This could have resulted, for example, because all the seed users were offline. It’s good to know that our ability, as highly-evolved primates, to create new technologies is limitless. Indeed, as a result, we did manage to mitigate the aforementioned, to an extent.
Magnet links
Apart from the .torrent file, you might be familiar with something called ‘magnet links’.
A magnet link includes a unique identifier, different data based on the torrent's exact nature, and, most significantly, a cryptographic hash of the torrent’s contents. And that’s really cool because you can search for different torrents that lead to the same file. Now, a magnet link uses that identifier to ‘attract’ all torrents that can help download those files, meaning more seeders, meaning more peers, meaning greater speeds and stability! All this fancy technology is done by what is called the DHT protocol, and according to its specification, "each peer effectively becomes a tracker." This implies that BitTorrent’s clients no longer require a centralized server to manage a swarm. Rather, BitTorrent evolves into a completely decentralized peer-to-peer file-sharing system.
Does this have applications outside of PirateBay?
Of course. Here are just some examples:
- To deliver updates for games, including World of Warcraft, StarCraft II, and Diablo 3, Blizzard uses a special BitTorrent client. This enhances everyone's downloads by allowing users to share their upload bandwidth with others, utilizing idle bandwidth ensuring quicker downloads for everyone;
- Wikileaks released files using BitTorrent, which relieved the tremendous strain on their systems;
- BitTorrent is used by Linux distributions to help disseminate ISO disc images.
Is it safe?
A big problem is that virus-ridden pirated content makes up a concerning chunk of all available torrents nowadays; that’s a huge threat to your security for obvious reasons. However, the biggest problem with torrents is that all BitTorrent users may see the ISP addresses of all users as well as the data they send. And of course, copyright holders, the police, advertising organizations, and hackers frequently monitor this data. Because of this, it’s critical for torrent users to maintain total online security by utilizing internet security software and installing operating system updates as soon as they become available. Encrypting an internet connection and masking the IP address with a virtual private network (VPN) also helps, but not to a full extent. So the short answer is — it’s not very safe.
In the end, downloading via BitTorrent is worth it, most of the time, especially when it comes to big files. While lacking in security, BitTorrent is the Web2 version of Web3 that we’re all allowed to try right now, as long as it doesn’t infringe on copyright laws.
What is BitTorrent?
Despite the fact that Wi-Fi is a trademark owned by the Wi-Fi Alliance, an organization committed to certifying that Wi-Fi equipment fulfills the IEEE's set of 802.11 wireless standards, the name ‘Wi-Fi’ is associated with wireless access in general nowadays.
These specifications, which include 802.11b (pronounced "Eight-O-Two-Eleven-Bee," omitting the "dot") and 802.11ac, are part of a family of specifications that began in the 1990s, which is still growing today. Improvements to wireless speed and range, as well as the usage of additional frequencies as they become available, are codified in the 802.11 standards.
What do those standards represent?
The IEEE 802.11 standard is a collection of technological advancements that have been created over a long period of time. Each new breakthrough is specified by a one- or two-letter suffix to "802.11," which represents the modification to the standard. Only the 2.4-GHz band was supported by the initial 802.11 standard, which allowed for speeds of up to 2 Mbps. New coding algorithms were implemented to 802.11b to enhance the speed to 6 Mbps. 802.11a included 5-GHz support and Orthogonal Frequency Division Multiplexing (OFDM) coding techniques, boosting speed to 54 Mbps. The 802.11g standard brought OFDM from the 802.11a standard to the 2.4-GHz range. 802.11n introduced a slew of high-throughput enhancements that increased throughput by a factor of ten, allowing high-end business access points to reach signaling throughputs of 450 Mbps.
As you may have noticed, the IEEE naming method for the standard is a little confusing, so the Wi-Fi Alliance has come up with some shorter names to make it easier to comprehend.
The alliance refers to 802.11ax Wi-Fi as Wi-Fi 6 — the current emerging standard. Wi-Fi 5 is now 802.11ac, while Wi-Fi 4 is now 802.11n. According to the Wi-Fi Alliance, the goal is to make it easier for the end-user to navigate through the myriads of routers and client devices.
Meanwhile, it's crucial to note that the Wi-Fi Alliance hasn't come up with new names for all of the 802.11 standards, so familiarity with the old ones is essential. Furthermore, the IEEE, which is still working on further versions of 802.11, has not accepted these new names, making it more difficult to find out information about them using the new names.
How secure is it?
The authentication security protocols defined by the Wireless Alliance, such as Wired Equivalent Privacy (WEP) and Wi-Fi Protected Access (WPA), are used to secure wireless security. There are now four wireless security protocols available:
- Wired Equivalent Privacy (WEP);
- Wi-Fi Protected Access (WPA);
- Wi-Fi Protected Access 2 (WPA 2);
- Wi-Fi Protected Access 3 (WPA 3).
To be sure your network is secure, you must first identify which network yours falls under.
WEP
The first security protocol to be implemented was Wired Equivalent Privacy (WEP). It was designed in 1997 and is now outdated, however, it is still used with older devices in present times.
WEP employs a data encryption technique based on a mix of user and system-generated key values. However, hackers have devised strategies for reverse-engineering and breaking the encryption mechanism, making WEP the least secure network type.
WPA
The Wi-Fi Protected Access (WPA) protocol was created to address the weaknesses in the WEP protocol. WPA includes features like the Temporal Key Integrity Protocol (TKIP), a dynamic 128-bit key that proved more difficult to crack than WEP's static, unchanging key.
It also had encryption features like the Message Integrity Check, which looked for any tampered packets transmitted by hackers and the Pre-shared key (PSK), among others.
As detailed in this article, both WEP and WPA are very hackable, so please, take our advice and never use them.
WPA2
WPA2 introduced substantial updates and new features to the wireless security gambit in 2004. WPA2 substituted TKIP with the Counter Mode Cipher Block Chaining Message Authentication Code Protocol (CCMP), which is a significantly more sophisticated kind of encryption technology.
Since its creation, WPA2 has represented the industry standard; on March 13, 2006, the Wi-Fi Alliance specified that any future products using the Wi-Fi trademark must employ WPA2.
WPA2-PSK
To connect to a wireless network, WPA2-PSK requires only one password. It's often assumed that using a single password to access Wi-Fi is safe, but only if you trust the people who use it. This is obviously not very secure, considering the fact that this key may fall into wrong hands. As a result, this protocol is most commonly used for home or open Wi-Fi networks.
To encrypt a network with WPA2-PSK, you ought to provide your router with a plain-English password between 8 and 63 characters long, rather than an encryption key. CCMP is used to create unique encryption keys for each wireless client using that passcode and the network SSID. Moreover, the encryption keys are updated on a regular basis.
WPA3
WPA3 is the most recent (and improved) version of WPA2, which has been in use since 2004. In 2018, the Wi-Fi Alliance began certifying WPA3-approved equipment.
Although WPA3 is more secure than WPA2, the Wi-Fi Alliance will continue to maintain and enhance WPA2 for the foreseeable future. When compared to WPA2, WPA3 includes the following noteworthy features:
- Stronger brute force attack protection: WPA3 defends against offline password guesses by allowing only one guess per user and forcing them to engage directly with the Wi-Fi equipment, requiring them to be physically present each time they wish to guess the password. In public open networks, WPA2 lacks built-in encryption and privacy, making brute force attacks a significant danger;
- Simultaneous Authentication of Equals protocol (SAE): This protocol is used to provide a secure handshake between a network device and a wireless access point, in which both devices interact to verify authentication and connection. Even if a user's password is weak, WPA3 uses Wi-Fi DPP to give a more secure handshake;
- Individualized data encryption: When connecting to a public network, WPA3 uses a mechanism other than a shared password to sign up a new device. WPA3 employs the Wi-Fi Device Provisioning Protocol (DPP), which allows users to let devices onto the network via NFC tags or QR codes. WPA3 security also employs GCMP-256 encryption instead of 128-bit encryption.
WPA3 functionality will not be extended to all devices automatically. Users who want to use WPA3-approved devices must either purchase new routers that enable WPA3 or hope that the device's manufacturer implements updates to support the new protocol.
We, at Passwork, highly recommend using the latest security protocols while constantly updating your router’s firmware. When you ignore critical updates, you risk exposing holes in your security that allow hackers to take control of your network. Use sophisticated and long passwords at all times. Even if we’re talking about your home Wi-Fi network – remember, if your password is ‘12345678’, your neighbours can easily hack into your network and spoof the data.
What is the IEEE 802.11 Standard and its security?
End-to-end encryption has been introduced by many communication providers in recent years, notably WhatsApp and Zoom. Although those companies have tried to explain the concept to their user base several times, we believe they failed. Whilst it's clear that these platforms have increased security, most don’t know how or why. Well, encryption is a rather simple concept to understand: It converts data into an unreadable format. But what exactly does "end-to-end" imply? What are the advantages and disadvantages of this added layer of security? We'll explain this as simply as possible without diving too much into the underlying math and technical terminology.
What is end-to-end encryption?
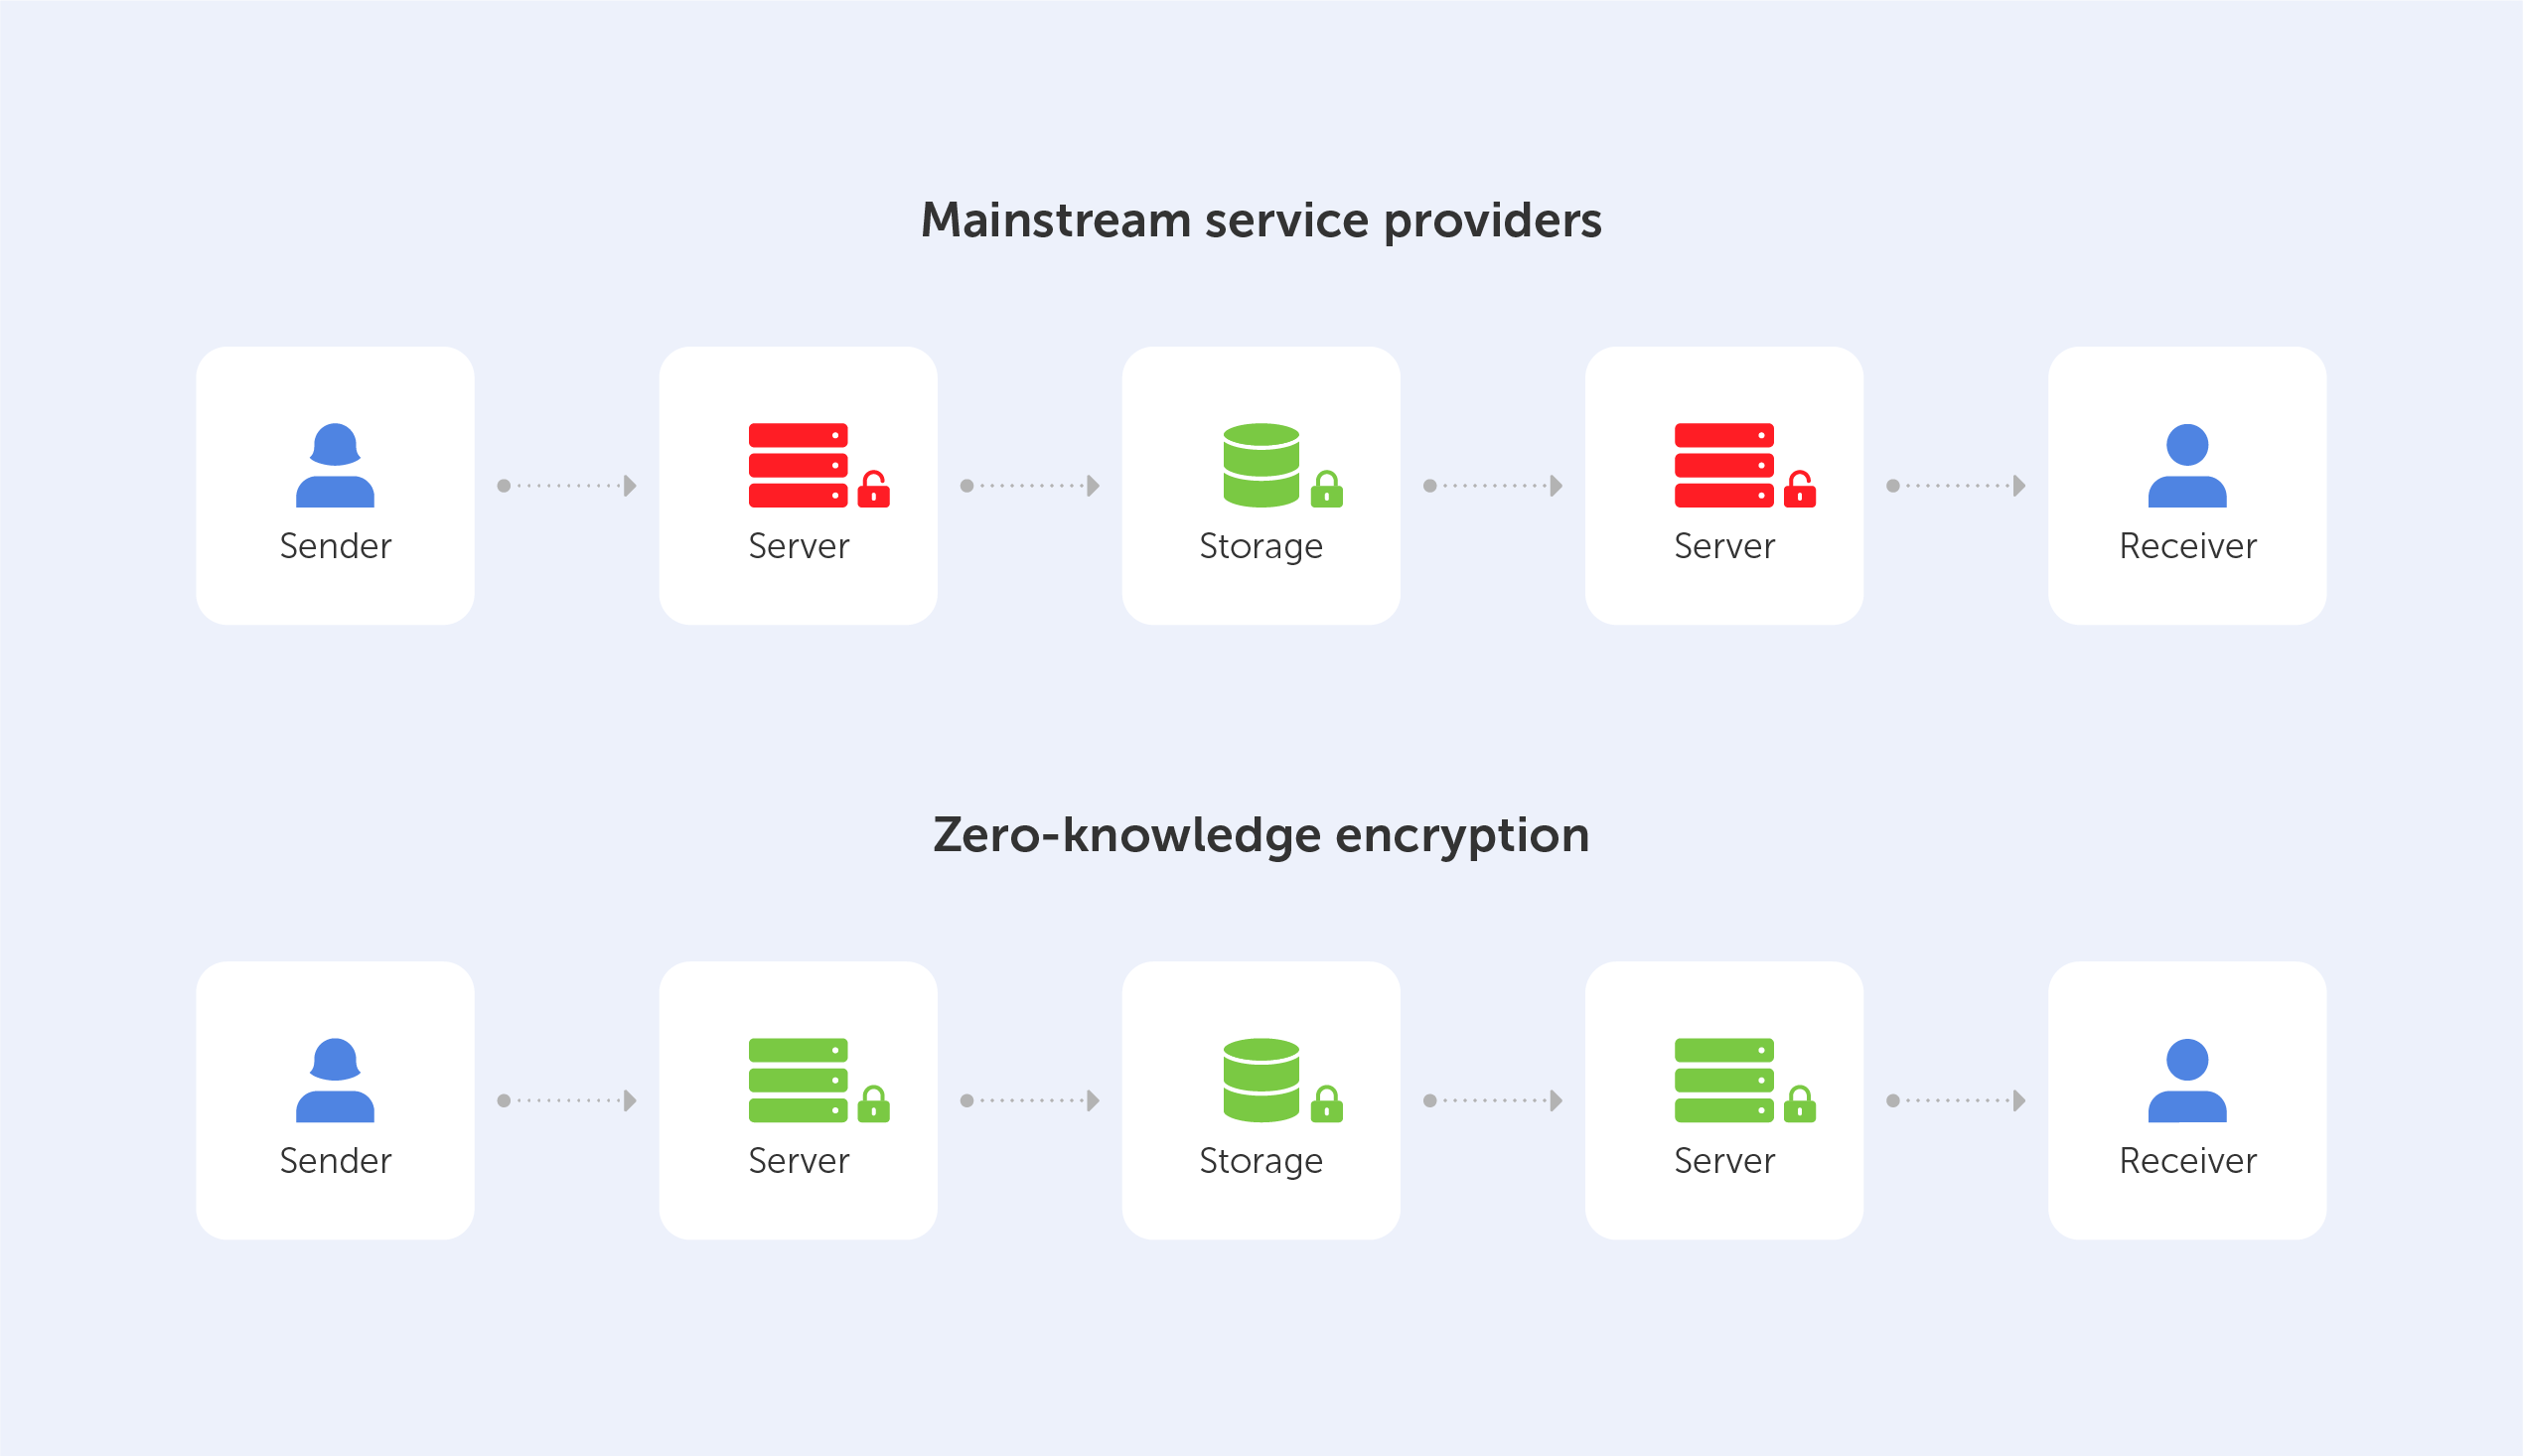
End-to-end encryption (E2EE) is a state-of-the-art protocol for communication security. Only the sender and the intended recipient(s) have access to the data in an end-to-end encrypted system. The encrypted data on the server is inaccessible to both hackers and undesirable third parties.

End-to-end encryption is best understood when compared to the encryption-in-transit approach, so let’s perform a quick recap. If a service employs encryption-in-transit, it is usually encrypted on your device before being delivered to the server. It’s then decrypted for processing on the server before it’s re-encrypted and routed to its final destination. When the data is in transit, it’s encrypted, but when it’s ‘at rest’, it’s decrypted. This safeguards the data during the most dangerous stage of the journey, transit — when it’s most exposed to hackers, interception, and theft.
End-to-end encryption, on the other hand, is the process of encrypting data on your device and not decrypting it until it reaches its destination. When your message travels through the server, not even the service that is delivering the data can view the content of your message.
In practice, this means that messengers using 'real' end-to-end encryption, like Signal, know only your phone number and the date of your last login – nothing more.
This is important for users that want to be sure their communication is kept secure from prying eyes. There are also some real-life examples that utilize end-to-end encryption for financial transactions and commercial communication.
How does it work?
The generation of a public-private key pair ensures the security of end-to-end encryption. This method, also known as asymmetric cryptography, encrypts and decrypts the message using distinct cryptographic keys. Public keys are widely distributed and are used to encrypt or ‘lock’ messages. Only the owner has access to the private keys, which are needed to unlock or decrypt the communication.
Whenever the user takes part in any end-to-end encrypted communication, the system automatically generates dedicated public and private keys.
If this sounds too complicated, here is a very simple metaphor:
You just bought a new Rolex for your buddy, who lives in Australia. Now, it’s already in a fancy green leather box, so you decide to put the stamp directly on it and send it. There is nothing wrong with that approach as long as you trust that the postal workers won’t steal it.
However, if you decide to put the Rolex box inside another box, hiding the nature of the gift from all interacting parties along the way, then you’ve effectively ensured (for all intents and purposes) that the Rolex is only visible to the intended recipient; when your mate from down under gets a hold of the box, he takes his pair of scissors and ‘decrypts’ the present. Indeed, you’ve ensured ‘end-to-end’ encryption.
You’re already using end-to-end encryption, daily
As we mentioned before, during an E2EE interaction, the server that delivers encrypted data between one "end" and the other "end" is unable to decode and read the data it sends. Even the servers' owners are unable to access the information since it is not saved on the servers themselves, only the "endpoints" (or the devices) of the discussion can decode the data.
If you’re daily using messengers like WhatsApp, iMessage, and Signal (where E2EE is enabled by default) or Telegram, Allo, and Facebook's ‘Secret Conversation’ function (where E2EE can be manually activated) – you’re already using end-to-end encryption.
What's more fascinating is that E2EE communication providers don't require you to trust them. And that’s great!
The fact that their systems can be hacked makes no difference to you because the transported data is encrypted and can only be read by the sender and receiver, which has enraged several organizations. There are known cases when such agencies asked for special ‘backdoors’ that would allow them to decrypt messages.
Why isn’t everything end-to-end encrypted?
End-to-end encryption is theoretically sound, but it lacks flexibility, thus it can't be utilized when the "two ends" that communicate data don't exist, such as with cloud storage.
This is why Zero-Knowledge Encryption was created, a solution that overcomes the problem by hiding the encryption key, even from the storage provider, resulting in an authentication request without the requirement for password exchange.
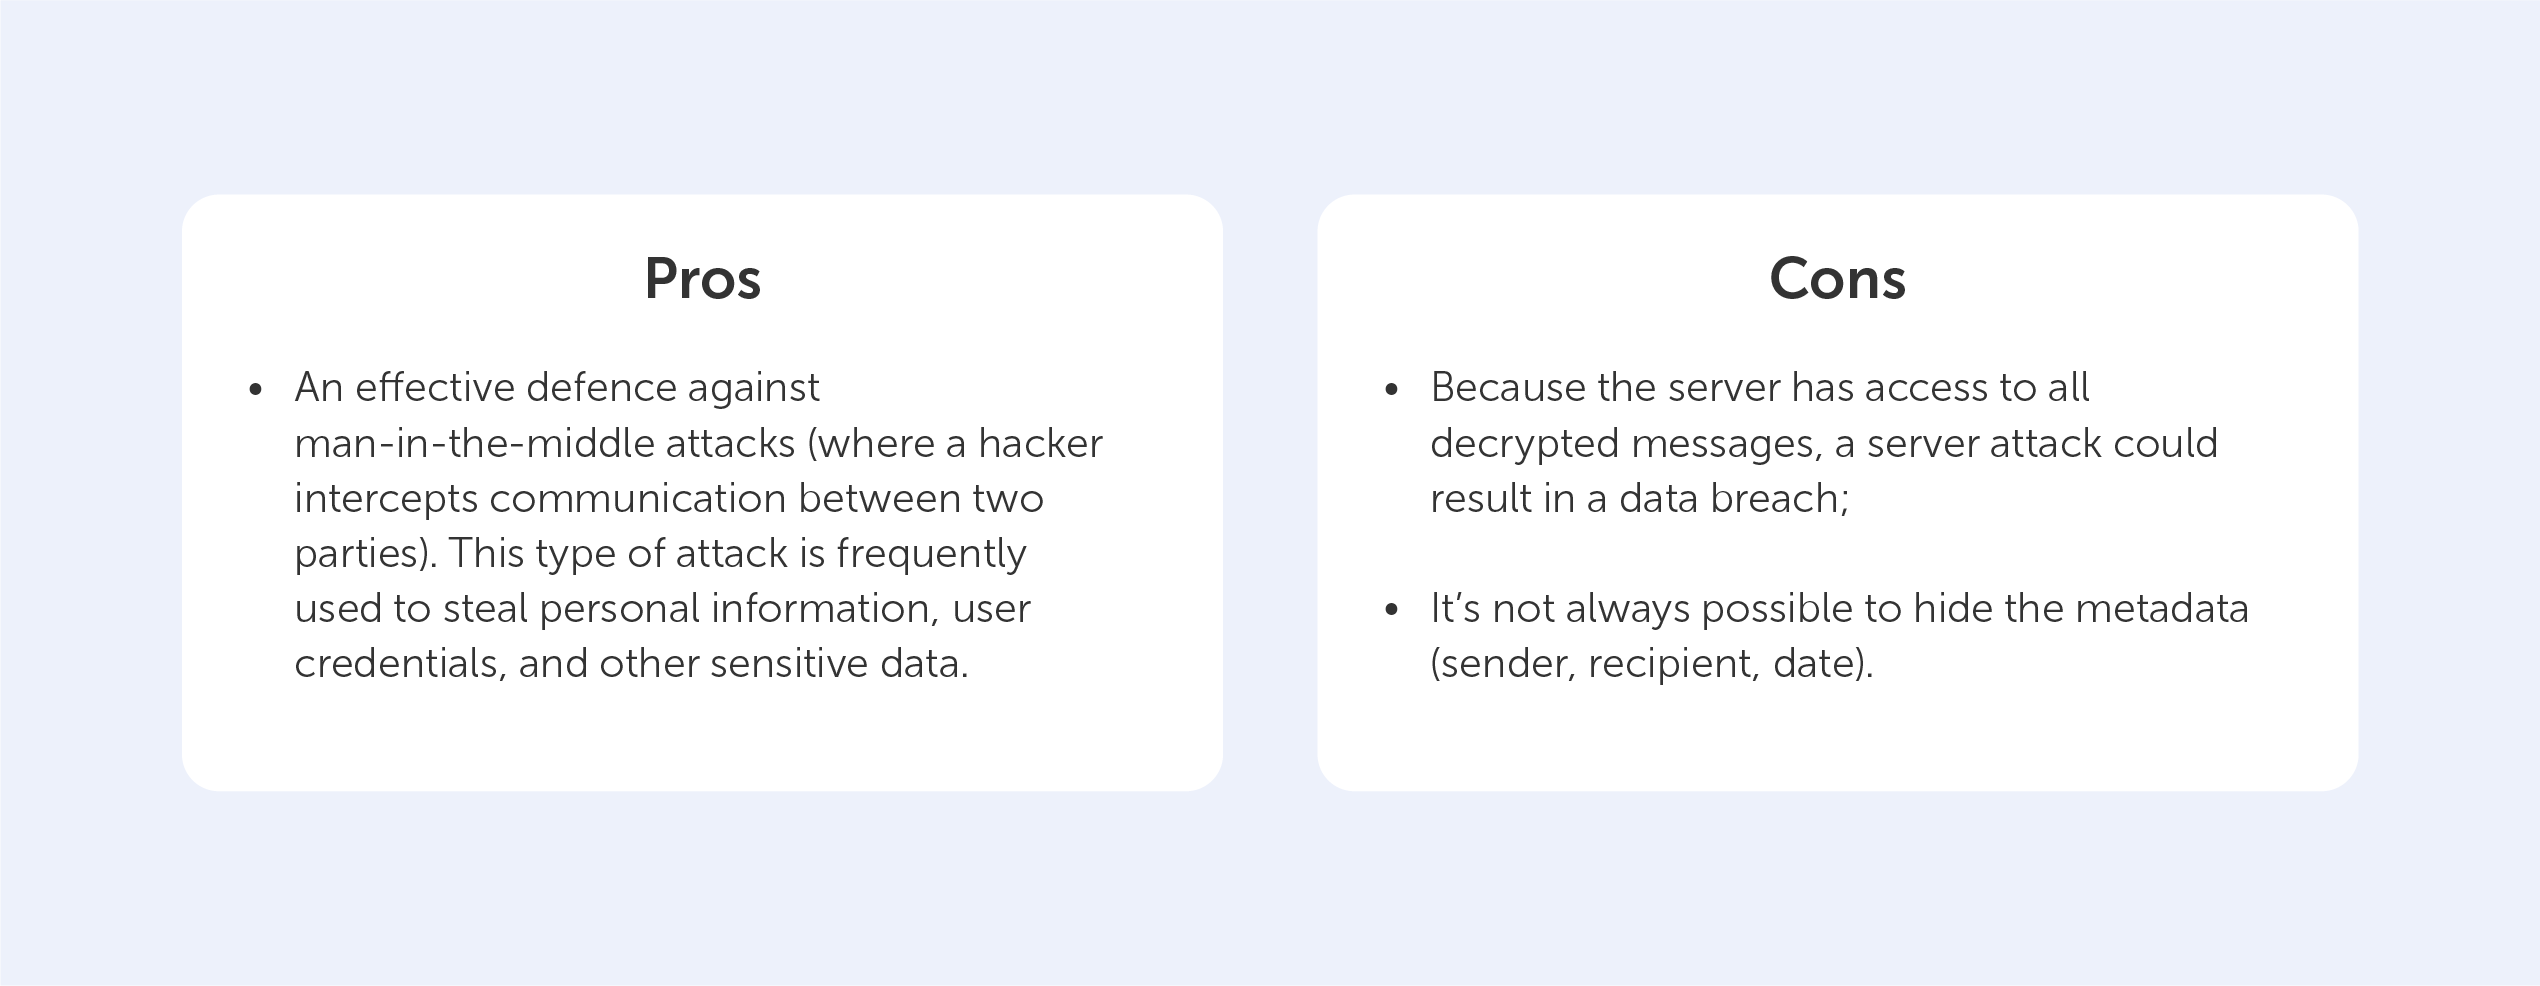
Moreover, end-to-end encryption does not hide information about the message, such as the date and time it was sent or the people who participated in the conversation. This metadata might provide indications on where the 'end-point' might be – not great if you are the target of a hacker.
The biggest problem, however, is that in reality, we never know whether the communication is end-to-end encrypted. Providers may claim to provide end-to-end encryption when what they truly deliver is encryption-in-transit. The information might be kept on a third-party server that can be accessed by anybody who has access to the server.
Conclusion
While it’s obvious that you shouldn’t be shipping Dave’s Rolex in its fancy green box, the reality is, if you’ve nothing to hide and you’re not transporting something incredibly valuable, encryption-in-transit is up to the job.
End-to-end encryption is a wonderful technology that enables a high level of security when properly implemented. But it doesn't really tackle the main issue – the end-user, still, to this day, needs to trust the system that they’re using to communicate. We hope that the next generation of encryption technologies such as ZKP will be able to change that.
What is End-to-end encryption?
In this year of our lord, 2022, the term ‘Zero-Knowledge Encryption’ equates to best-in-class data insurance. We’ve already written an article named “What is Zero-Knowledge Proof?”, so we’re not going to look at definitions here, but rather, we’re going to explore the pros and cons of Zero-Knowledge proof encryption when compared to other technologies.
But for those who don’t want to dive deep into technical details, here’s an explanation of what Zero-Knowledge Encryption means:
It simply implies that no one else (not even the service provider) has access to your password-protected data.
This is important because even if your files are completely encrypted, if the server has access to the keys, a centralized hacker attack can result in a data breach.
In order to gain a better understanding of the factors that led to the development of Zero-Knowledge Encryption, we've decided to present a succinct, yet comprehensive, assessment of the advantages and disadvantages of three existing options:
Encryption-in-transit
Data in-transit, also known as data in motion, is data that is actively flowing from one point to another, such as that over the internet or over a private network. Data protection in transit refers to the security of data while it is being transferred from one network to another or from a local storage device to a cloud storage device. Effective data protection measures for in-transit data are critical because data is often considered less secure while in transit. Think of it like hiring security guards to accompany your cash-in-transit vehicle’s trip to the bank.
This means that, while using this approach, stored docs are 100% decryptable, so vulnerable.
As for our everyday life, the following technologies use the ‘encryption-in-transit’ approach:
- Transport Layer Security (TLS), which is aimed at ensuring your security on the web;
- Secure/Multipurpose Internet Mail Extensions (S/MIME), which are often used for email message security.
Encryption-at-rest
Any data encryption is the process of converting one type of data into another that cannot be decrypted by unauthorized users. For example, you may have saved a copy of your passport. You obviously don't want this data to be easily accessed. If you store encrypted data on your server, it’s effectively "resting" there (which is why it’s called encryption-at-rest). This is usually accomplished by the use of an algorithm that is incomprehensible to a user who does not have access to the encryption key needed to decode it. Only an authorized person will be able to access the file, ensuring that your data is kept safe.
The Advanced Encryption Standard (AES) is often used to encrypt data at rest.
But, in order to access the data, you need a key — and that’s where the potential vulnerability lies.
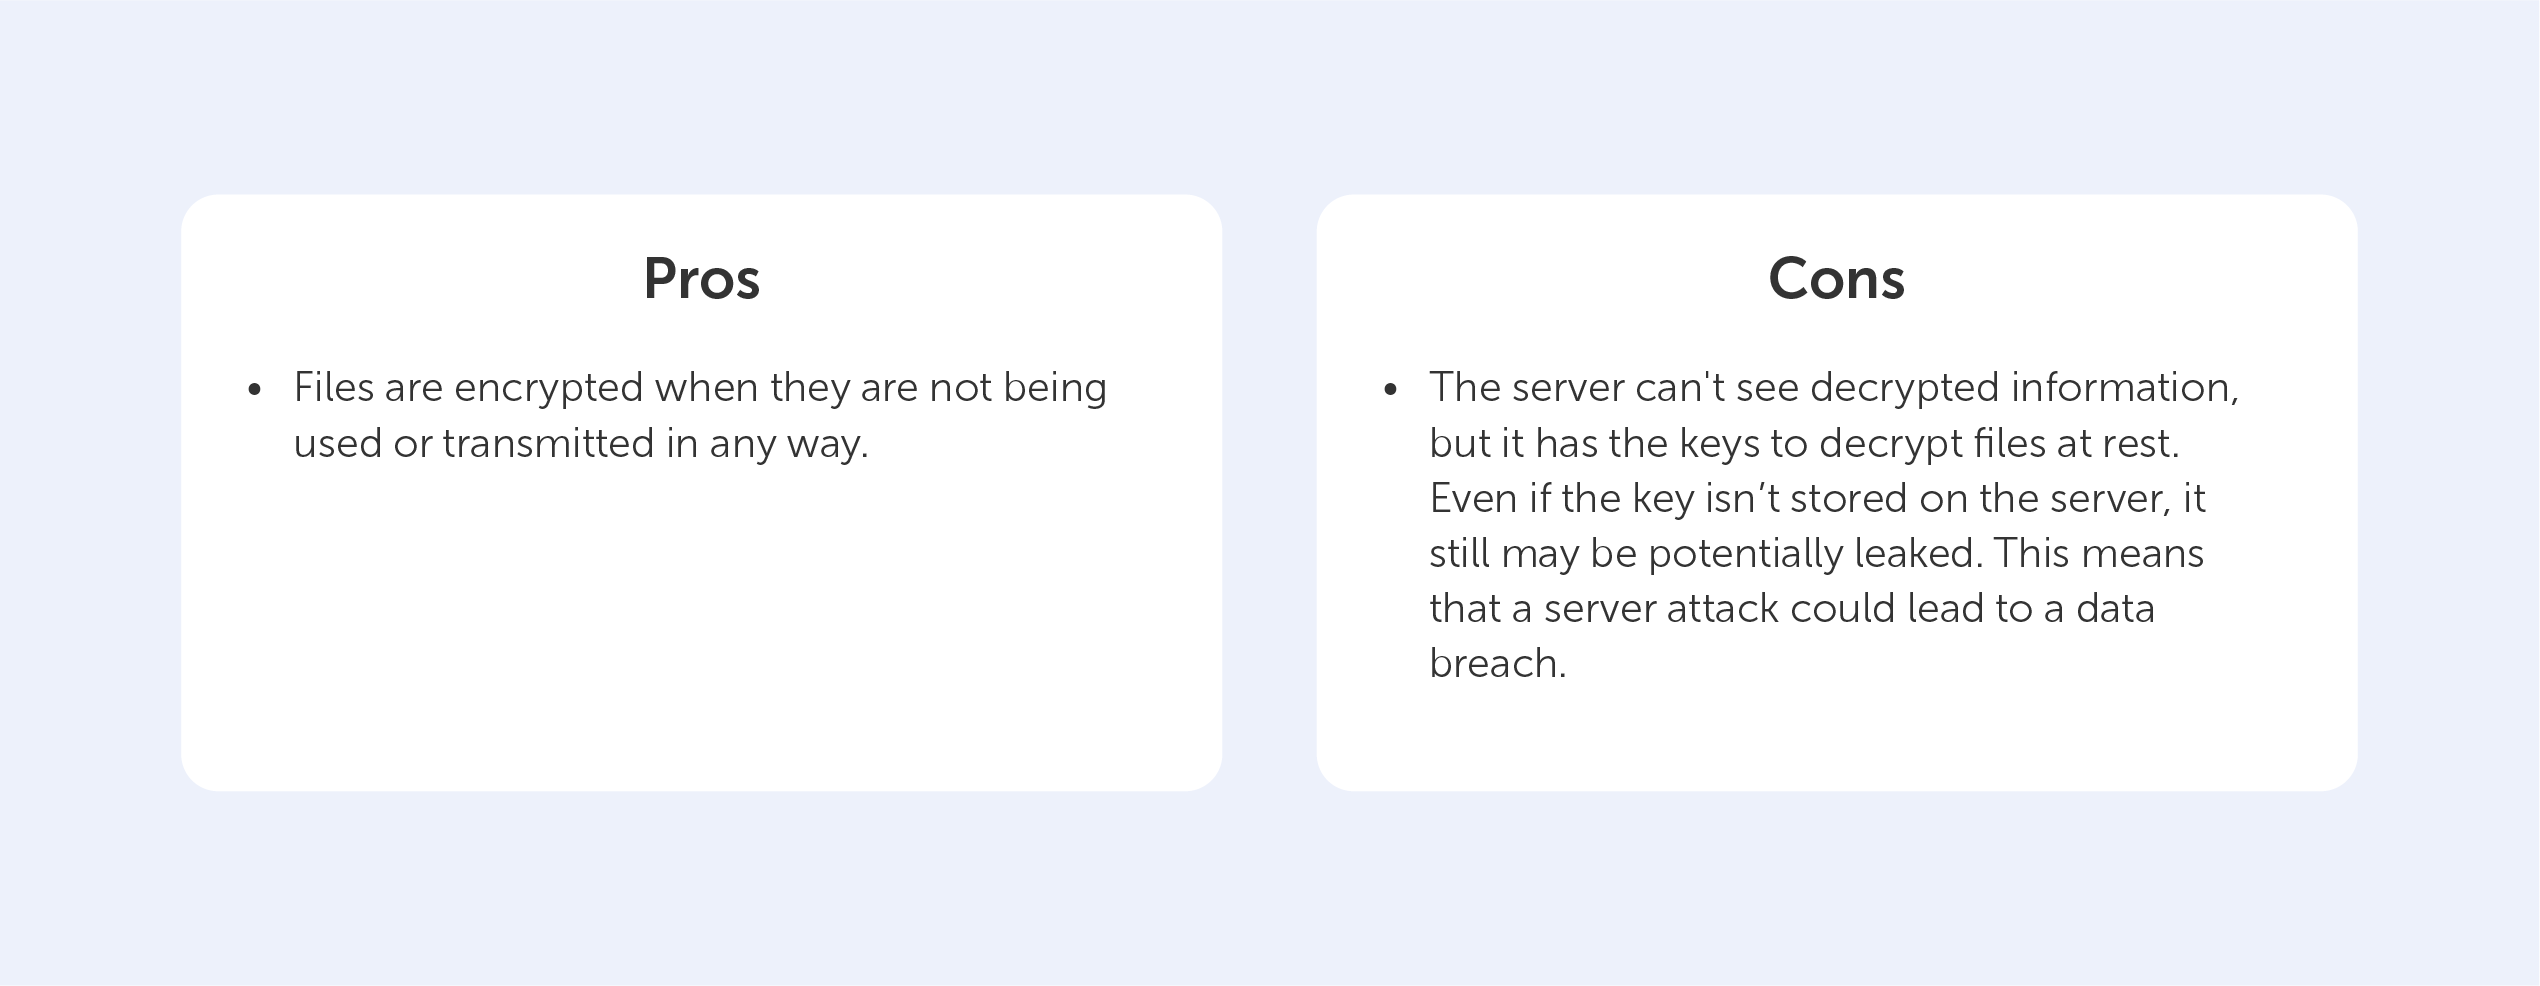
Encryption-at-rest is like storing your data in a secret vault, encryption-in-transit is like putting it in an armored vehicle with security guards for transport.
End-to-end Encryption
End-to-end encryption is the act of applying encryption to messages on one device so that only the device to which it is sent can decrypt it. The message travels all the way from the sender to the recipient in encrypted form.
In practice, it means that only the communicating users (who have the key) can read the messages.
End-to-end encryption has created an impregnable fortress for communication services (for example, messengers), going beyond the security "façade" of encryption-in-transit and encryption-at-rest solutions.
This is the most common approach when protecting oneself against data breaches nowadays, but it only works from "one end to the other," as the term implies. Even though this all sounds great, end-to-end encryption can only be used for a "communication system" like Whatsapp or Telegram.
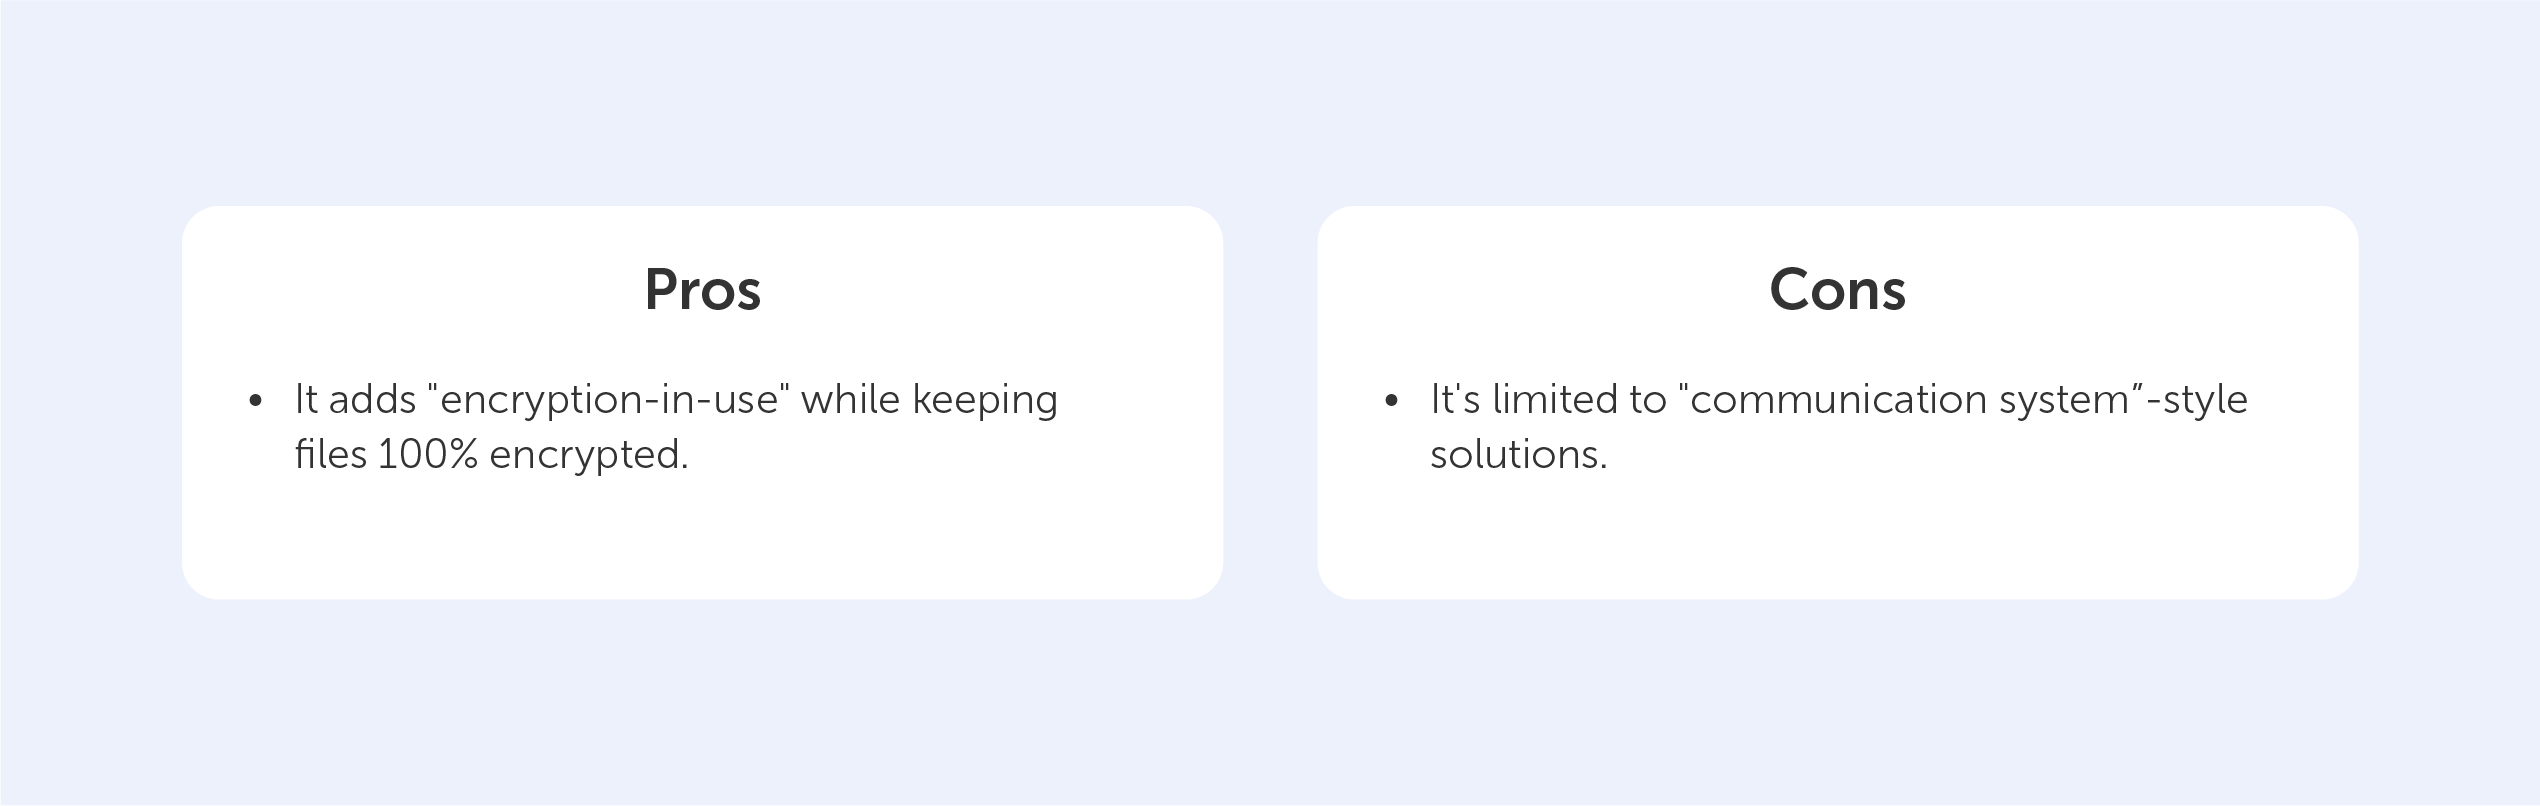
While theoretically sound, end-to-end encryption lacks flexibility, so it can’t be used when the "two ends" that share data don't exist, such as for cloud storage.
This is the motivation behind the development of Zero-Knowledge Encryption, a method that solves the problem by hiding the encryption key, even from the storage provider, resulting in an authentication request without the need for password exchange.
Zero-Knowledge Encryption
To log in to an account, you usually have to type in the exact password. In today's hyperconnected world, it's normal practice to tell the server your secret key ahead of time and test whether it matches.
Instead, there is another, more secure way, to manage this delicate process and that’s called Zero-Knowledge Encryption.
Without diving deep, The Zero-Knowledge relies on three main requirements:
- Completeness — an honest prover will be able to convince the verifier that he has the password by completing some process in the required way;
- Soundness — the verifier will almost certainly discover when the prover is lying;
- Zero-knowledge — if the prover has a password, the verifier receives no more information other than the fact that the statement is true.
Essentially, the system will check to see if you can demonstrate your knowledge several times by responding to various conditions. It’s like a brute force attack carried out backwards — you perform the same action many times in order to make sure that the prover isn’t lying.
Instead of concluding, let’s round up the pros and cons of Zero-Knowledge proof encryption when compared to the alternatives:
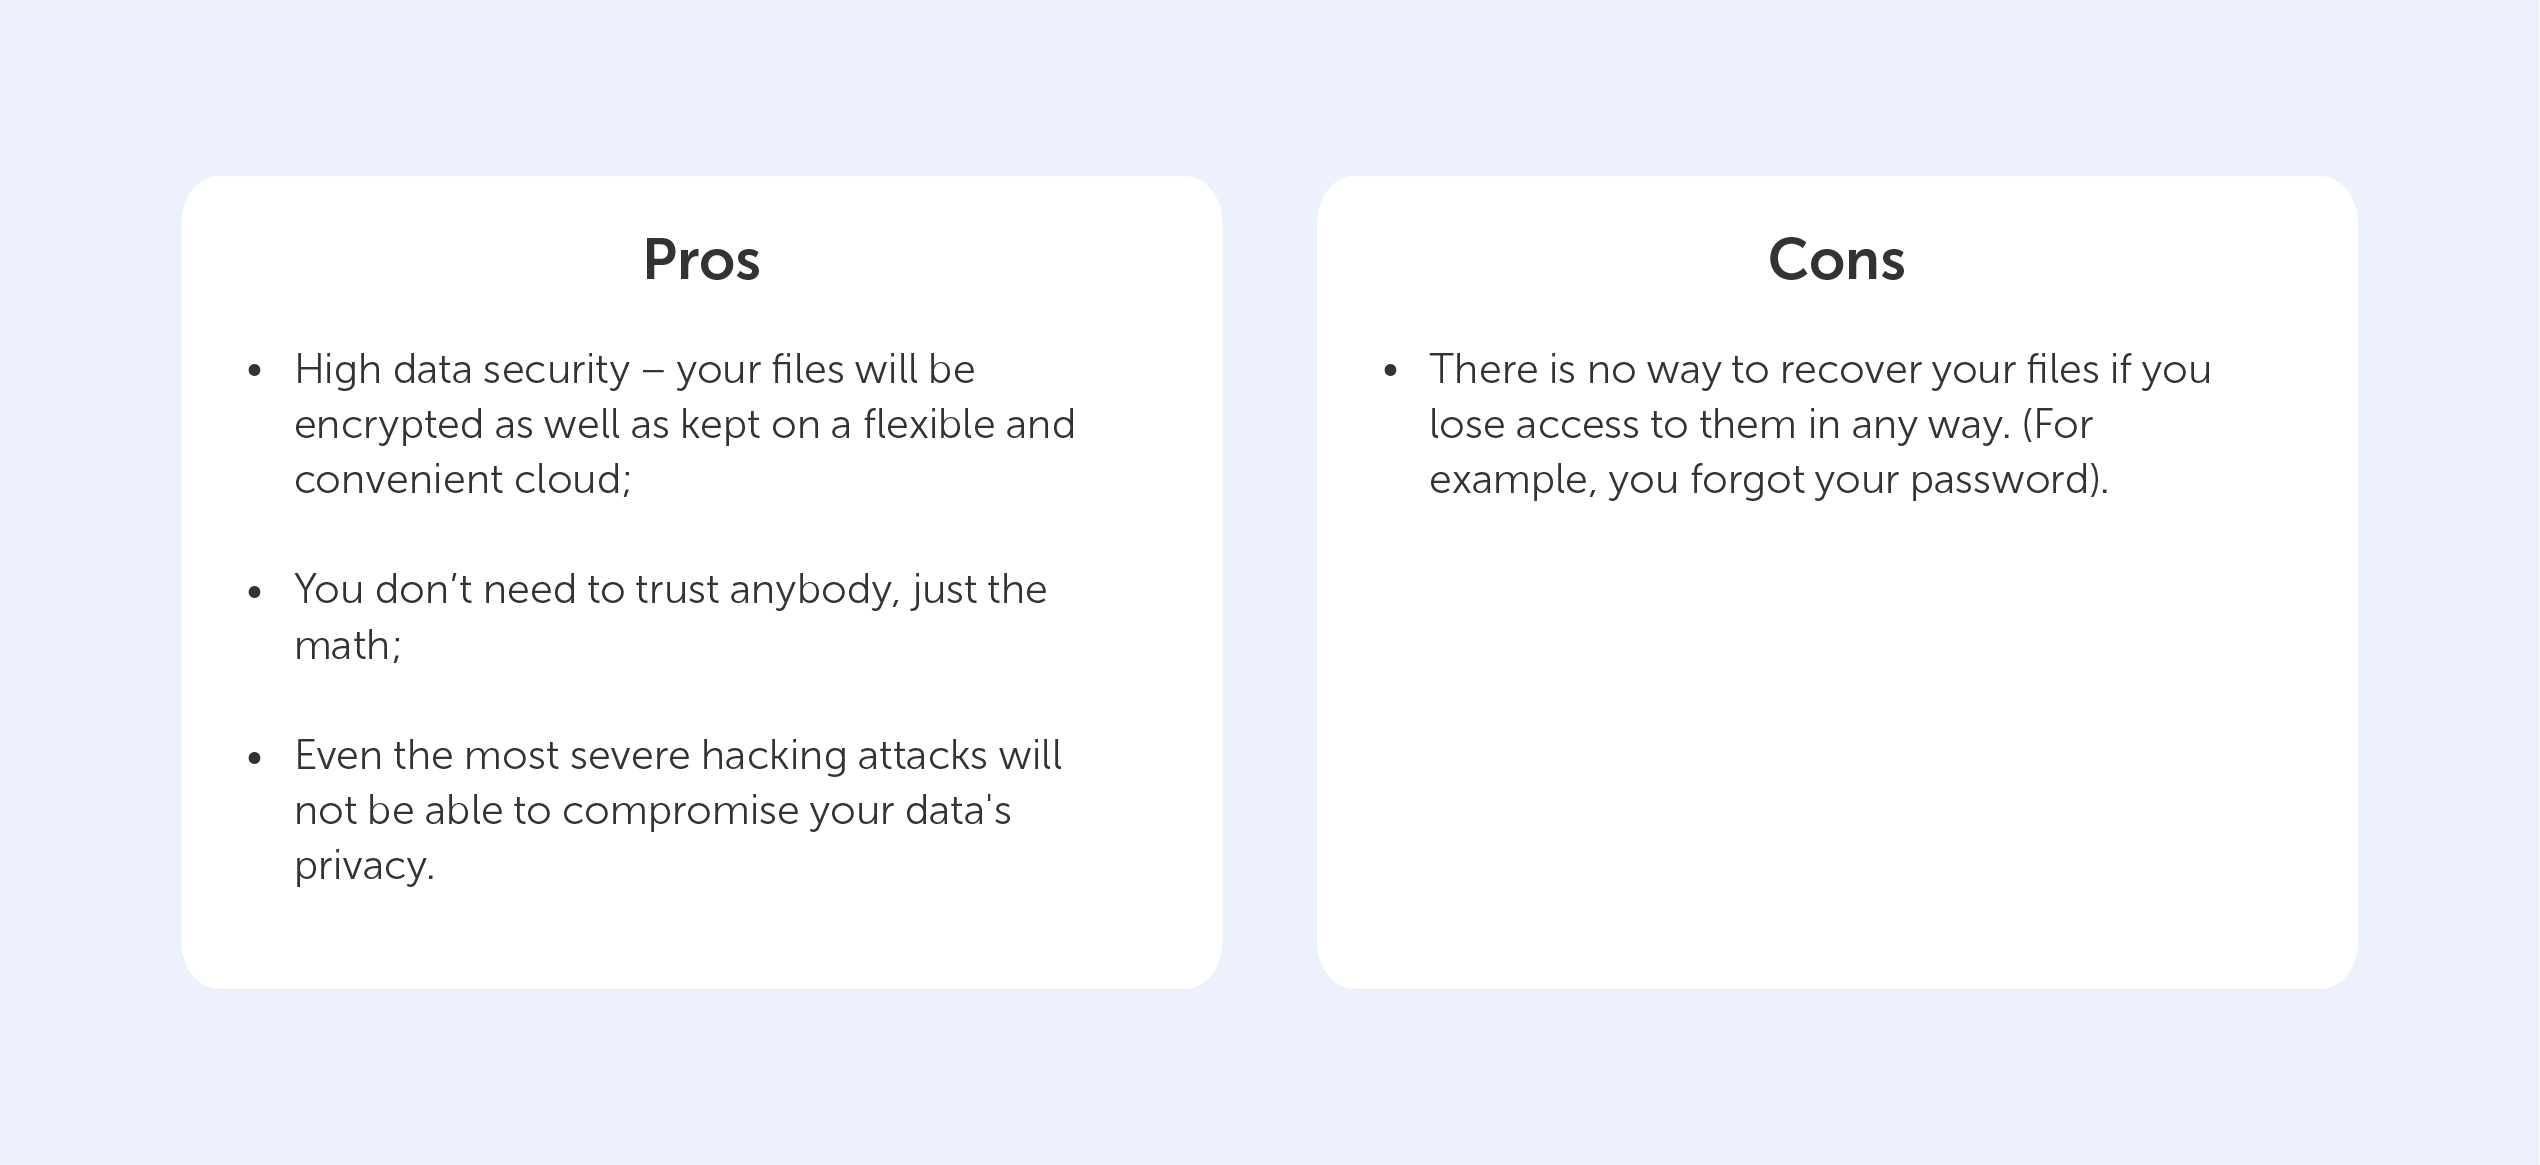
The con here is a clear example of the exceptional security provided by the Zero-Knowledge Encryption solution, which prevents even system administrators from recovering your password. This is why we, at Passwork, rely on this technology in our products. Ultimately, that’s why you can rely on us too.
Why Zero-Knowledge Encryption is the best
Many times, we’ve mentioned self-signed certificates and their most common use cases in our blog. After all, the main difference between a regular certificate and a self-signed one is that in the latter case, you act as the CA (Certificate Authority). But there are a variety of services that provide CA services for free, with the most popular being ‘Let’s Encrypt’, which is going to be the subject of this article.
What’s that?
‘Let’s Encrypt’ is a free certificate authority developed by the Internet Security Research Group (ISRG).
It provides free TLS/SSL certificates to any suitable client via the ACME (Automatic Certificate Management Environment) protocol. You can use these certificates to encrypt communication between your web server and your users. ‘Let's Encrypt’ provides two types of certificates. Single-domain SSL and Wildcard SSL, which covers a single domain and all of its subdomains. Both types of SSL certificates have a 90-day validity period. These domain-validated certificates do not require a dedicated IP address. They accomplish this by delivering the client a unique token and then retrieving a key generated from that token via an HTTP or DNS request.
There are dozens of clients available which can be easily integrated with a variety of standard administrative tools, services, and servers. They also come written in a range of different computer languages.
We'll use the win-acme client in this tutorial because it's a basic, open-source, and constantly updated command-line application. It not only produces certificates but also automatically installs and renews them. And yes, this tutorial is for Windows users.
How does it work?
‘Let's Encrypt’ verifies the ownership of your domain before issuing a certificate. On your server, the Let's Encrypt client creates a temporary file (a token) with the required information. The Let's Encrypt validation server then sends an HTTP request to get the file and validates the token, ensuring that your domain's DNS record resolves to the ‘Let's Encrypt’ client-server.
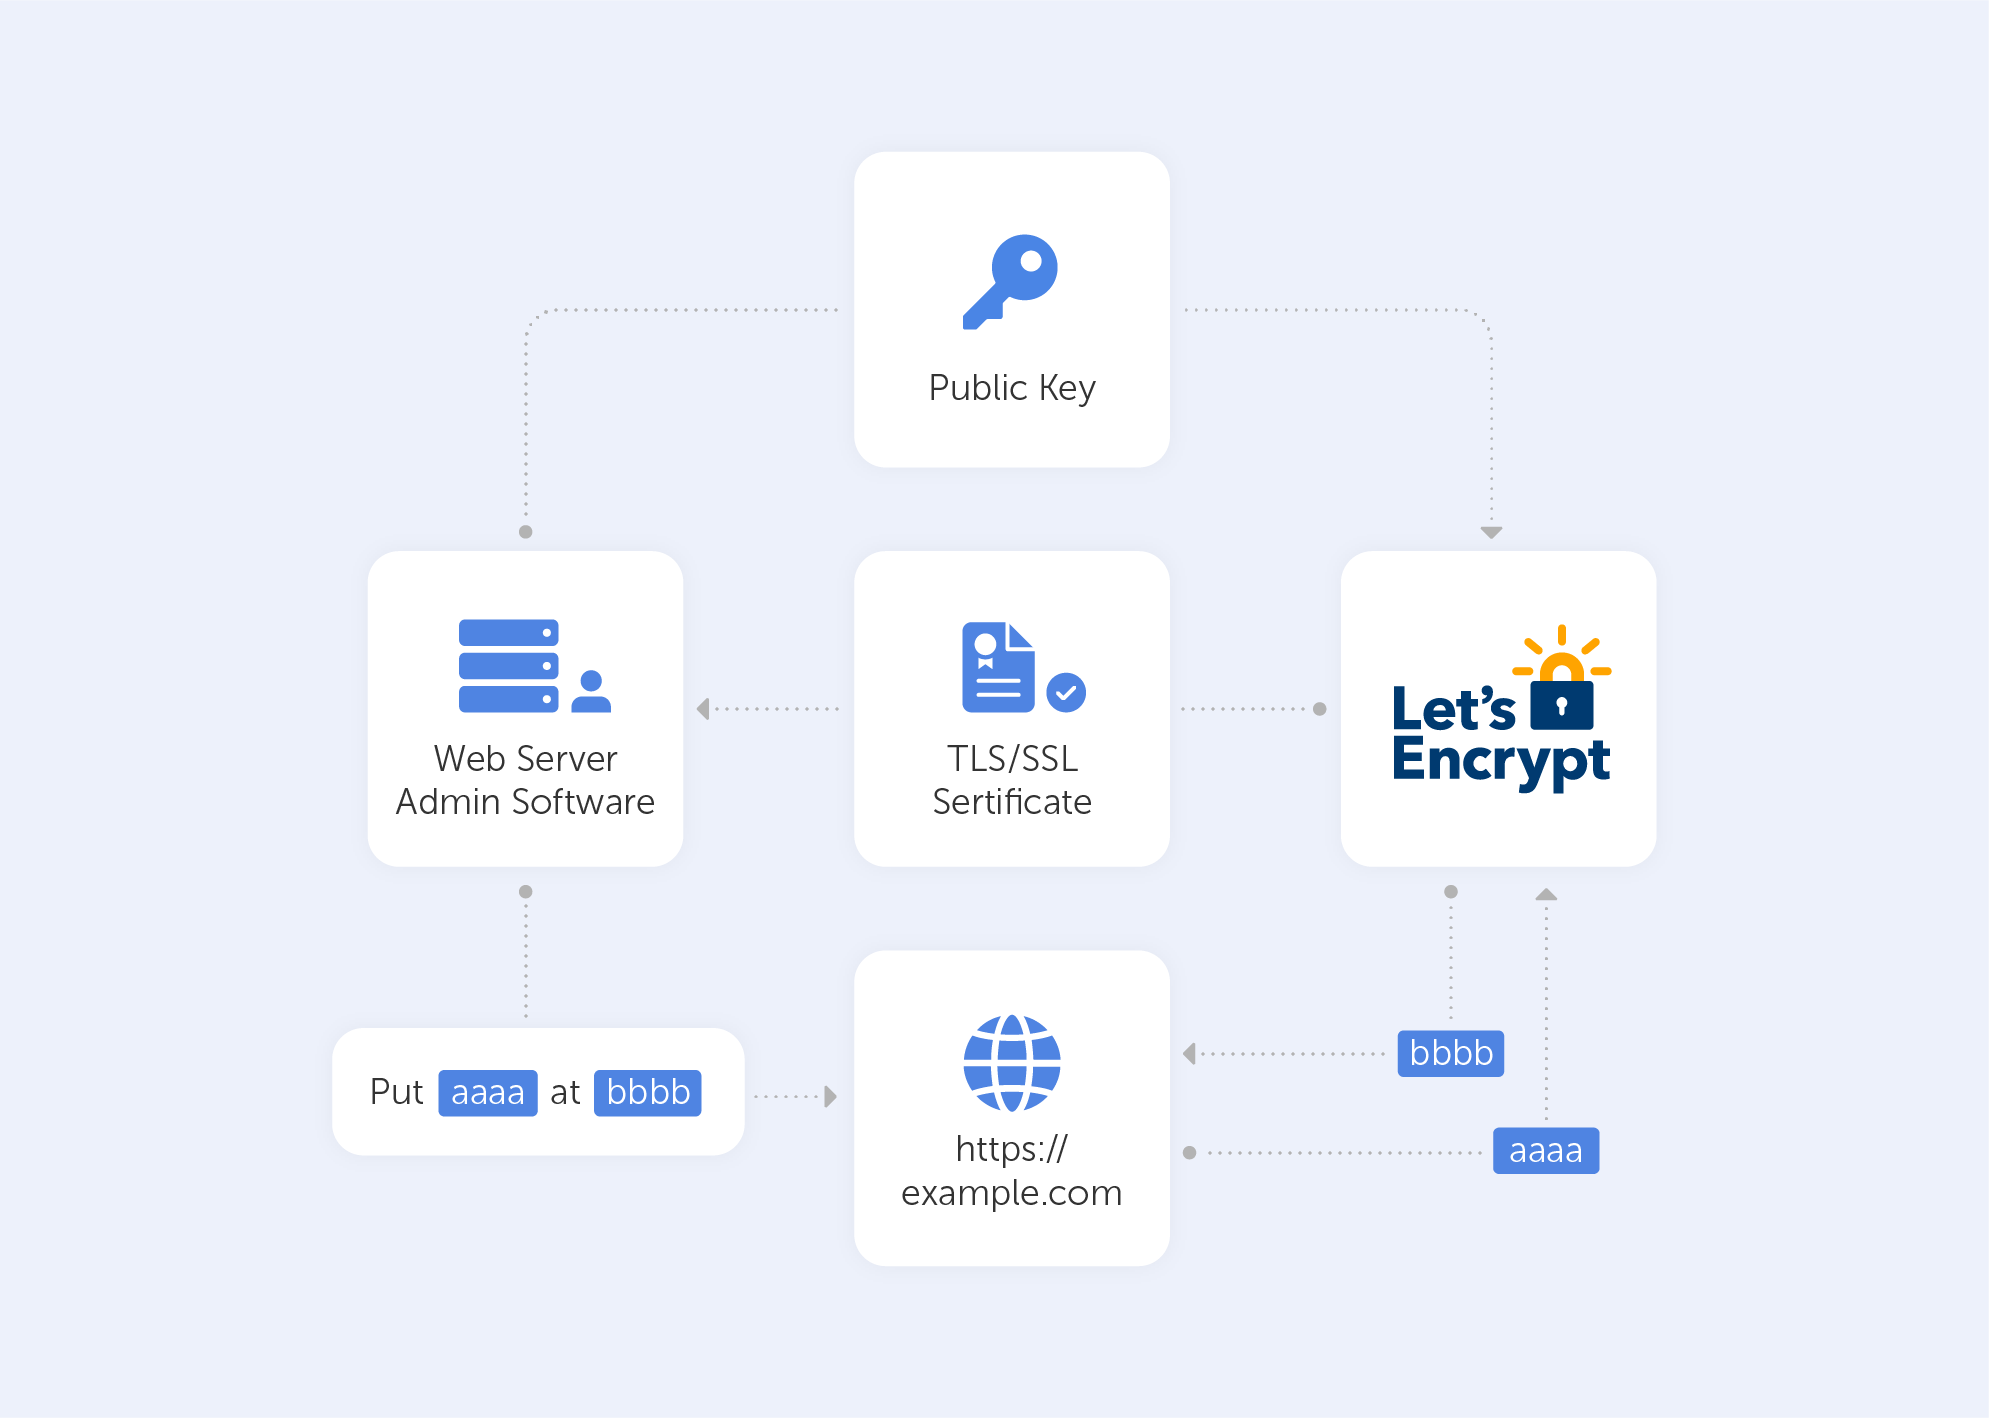
In an HTTP-based challenge, for example, the client will generate a key from a unique token and an account token, then save the results in a file that the web server will serve. The file is then retrieved from the Let's Encrypt servers at: http://passwork.com/.well-known/acme-challenge/token.
The client has demonstrated that it can control resources on example.com if the key is correct, and the server will sign and provide a certificate.
How do I set it up?
Before we start:
- Make sure that you’ve downloaded the latest version of the application on the server from its Github release page;
- Scroll down to ‘assets’ and download the zip package named win-acme.v2.x.x.x.zip from the release page. If you're having difficulty with Internet Explorer, you may install Chrome on the server following this approach. Once the application has been downloaded, unpack it and save it somewhere safe for future use.
Now let’s Generate the Let’s Encrypt Certificates
Simply run wacs.exe to generate the Let's Encrypt certificates. Because we downloaded the application via the internet, you may receive a notification from Windows Defender claiming that "Windows protected your PC". Because of this, after clicking the "More Info" link, click the "Run Anyway" option. Because it’s open-source and widely utilized, the application is completely safe to use.
Follow these simple steps once the application has started:
- Choose N in the main menu to create a new certificate with default settings;
- Choose how you want to determine the domain name(s) that you want to include in the certificate. These may be derived from the bindings of an IIS site, or you can input them manually;
- A registration is created with the ACME server if no existing one can be found. You will be asked to agree to its terms of service and to provide an email address that the administrators can use to contact you;
- The program negotiates with the ACME server to try and prove your ownership of the domain(s) that you want to create the certificate for. By default, the http validation mode is picked and handled by our self-hosting plugin. Getting validation right is often the most tricky part of getting an ACME certificate. If there are problems, please check out some of the common issues for an answer;
- After the proof has been provided, the program gets the new certificate from the ACME server and updates or creates IIS bindings as required, according to the logic documented here;
- The program remembers all choices that you made while creating the certificate and applies them for each subsequent renewal.
For advanced instructions, visit this page.
And that’s pretty much it. It will successfully generate an SSL certificate for you if your domain is pointing to your server. It will also include a scheduled task that will renew the certificate when it expires. The SSL certificate will be installed automatically by the application.
Are there other options?
‘Certbot’ is the most widely used kind of ‘Let's Encrypt’ client. We didn’t give it much light in this article because it's “designed for Linux” and also a little more advanced. It comes with easy-to-use automatic configuration features for Apache and Nginx. And yes, there is a Windows version as well.
There are many other clients to choose from – the ACME protocol is open and well-documented. On their website, ‘Let's Encrypt’ keeps track of all ACME clients.
Here’s a list of the best options (n.b. most are for Linux):
- lego. Lego is a one-file binary installation written in Go that supports many DNS providers;
- acme.sh. Acme.sh is a simple shell script that can run in non-privileged mode and interact with more than 30 different DNS providers;
- Caddy. Caddy is a full web server written in Go with built-in support for Let’s Encrypt.
‘Let’s Encrypt’ is just great, there are no other ways to put it. It’s a free, automated, and open certificate authority, run for the public’s benefit. It can be accessed via a variety of tools and services. The best part is, they really keep their motto close to heart:
“We give people the digital certificates they need in order to enable HTTPS (SSL/TLS) for websites, for free, in the most user-friendly way we can. We do this because we want to create a more secure and privacy-respecting Web for all.”